Simple Sourdough Loaf

*This post may contain affiliate links. Please see my disclosure for more details!*
How to make a simple sourdough loaf – a complete guide on every stage of baking a sourdough loaf!
Sourdough can feel intimidating at first, but once you break it down into stages, it becomes a really enjoyable (and rewarding!) process. I’ve put together this simple step-by-step guide to show you exactly how I make a basic sourdough loaf at home – no stress, no pressure, just good delicious bread.
Stage one: prepping the sourdough starter
Before you even think about mixing dough, you need an active starter that’s ready to bake with. As I often mix my dough in the morning, I prep my starter the evening before. The recipe I do uses 125g of starter, so the goal here is to make sure I have enough for baking and a little left over to keep my starter going.
You can approach this in two ways:
- Keep a large “mother starter” and remove small amounts to bake with
- Or, if you only have a small amount left, feed it up so you have enough for the loaf and some leftover
You never want to use *all* of your starter – otherwise you’ll be starting from scratch again (and after all that effort, no thank you).
Feeding ratios:
Here are some feeding options, depending on how quickly you want your starter ready:
- 1:1:1 – 50g starter, 50g flour, 50g water (150g total)
- 1:2:2 – 30g starter, 60g flour, 60g water (150g total)
- 1:3:3 – 20g starter, 60g flour, 60g water (140g total)
- 1:4:4 – 15g starter, 60g flour, 60g water (135g total)
- 1:5:5 – 15g starter, 75g flour, 75g water (165g total)
The smaller the ratio (like 1:1:1), the quicker your starter will peak. Larger ratios take longer but are just as effective. Personally, I usually feed 1:2:2 the night before baking, as the timing works perfectly for my routine.
Watch my video on how to prep a sourdough starter for baking with, here
Stage two: mixing the dough
Once your starter is active and ready, it’s time to mix the dough. Ingredients:
- 125g active starter
- 300ml water
- 500g strong white bread flour
- 12g fine salt
Add the starter to a bowl with the warm tap water and whisk until combined; it should look slightly milky. A dough whisk is great here, but a regular whisk, fork, or spatula works just fine. Add the flour and salt, then mix until everything is combined. The dough will look shaggy and a bit clumpy (this is completely normal). Cover the bowl (cling film, tea towel, shower cap… anything!) and leave it to rest for an hour.
Watch my video on how to mix the dough, here
Stage three: stretch and coil folds
After resting, it’s time to build strength in the dough. There are lots of folding techniques out there… this is just what works for me. As an example, ff you mixed your dough at 8am, your folds might look like this:
- 9:00am
- 9:30am
- 10:00am
- 10:30am
Personally, for the first two sets I do stretch and folds, and the second two sets I do coil folds. I lightly dampen my hands to stop sticking, then gently stretch the dough as far as it will go *without tearing*. I don’t count folds – I stop when the dough starts to resist.
Watch my video on how to do stretch and coil folds, here
Stage four: bulk fermentation
This is often the most confusing stage, but it really doesn’t need to be. Bulk fermentation is simply the period where the dough rises after folding. How long this takes depends heavily on your kitchen temperature, the temperature of the dough, and even sometimes the recipe itself. For example, in my kitchen during colder months:
- Dough mixed at 8am and folded by 10:30am may take until around 7-8pm to fully rise
- Dough mixed in the evening and folded by 8pm may take until 9-10am the next day
You can use temperature charts or the aliquot method as helpful guides, but generally finding out how dough works in your particular kitchen space is important. For this particular loaf, bulk fermentation took around 17 hours, as it was especially cold (You start the timer from when you mix the dough)
Watch my video on bulk fermentation, here
Stage five: shaping the dough and the cold prove
Shaping is very personal, and it’s okay if your technique evolves over time as mine has even done. After bulk fermentation, you need to:
- Pre-shape the dough and let it rest for about 30 minutes
- Do a final shape, creating as much surface tension as possible in the dough
- Place into a banneton lightly dusted with flour – personally I use rice flour, instead of bread flour at this point.
I shape by gently pulling the dough towards myself with the sides of my hands (slightly damp) to build tension and form a round loaf. After shaping, the dough goes into the fridge: If you shape in the evening, you can bake the next morning. If you shape in the morning, you could bake in the evening. Generally I find the fridge stage should be 12-48 hours, but generally at least 4 hours, and up to 36 hours is best.
Watch my video on shaping the dough, here
Stage six: baking the bread
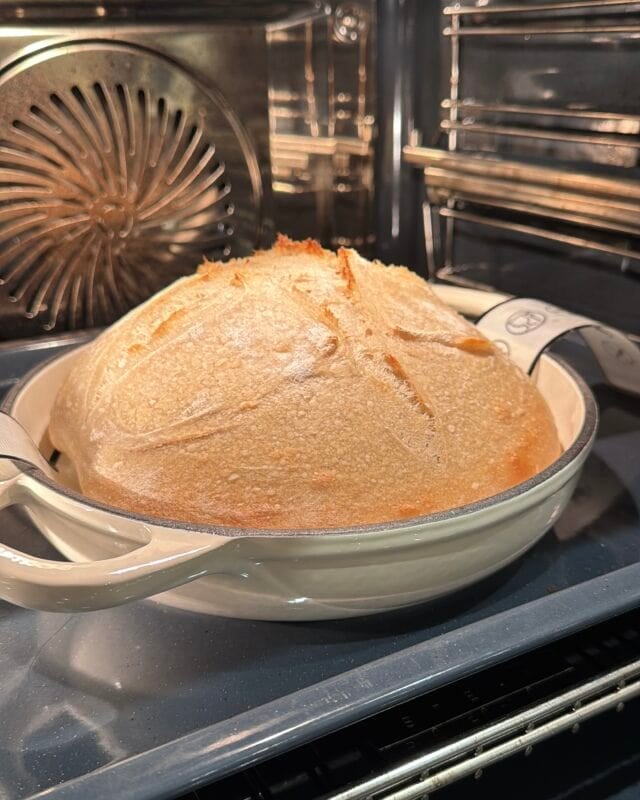
The best part of this entire process, is finally baking the loaf. I preheat my oven (which is fan assisted) to 230ºc and preheat my Dutch oven for at least 30-45 minutes. Personally I find the pre-heating process important.
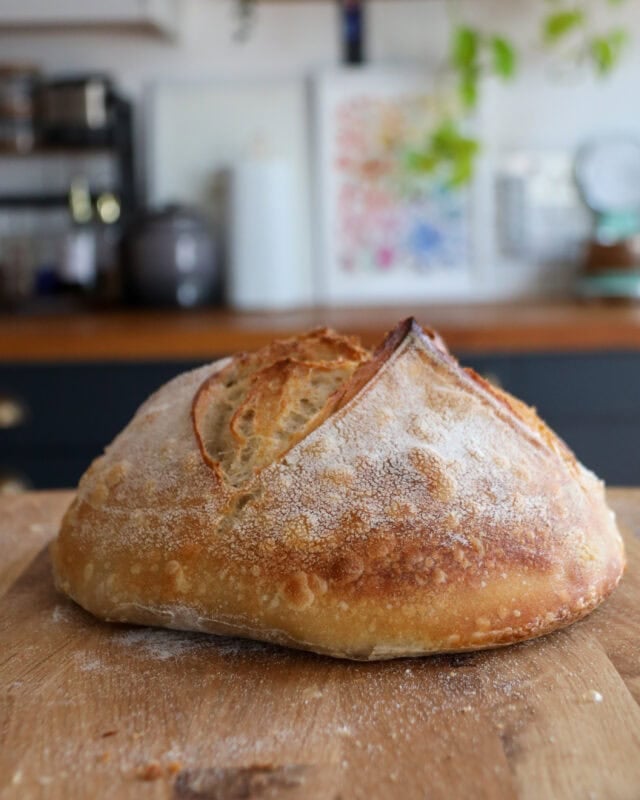
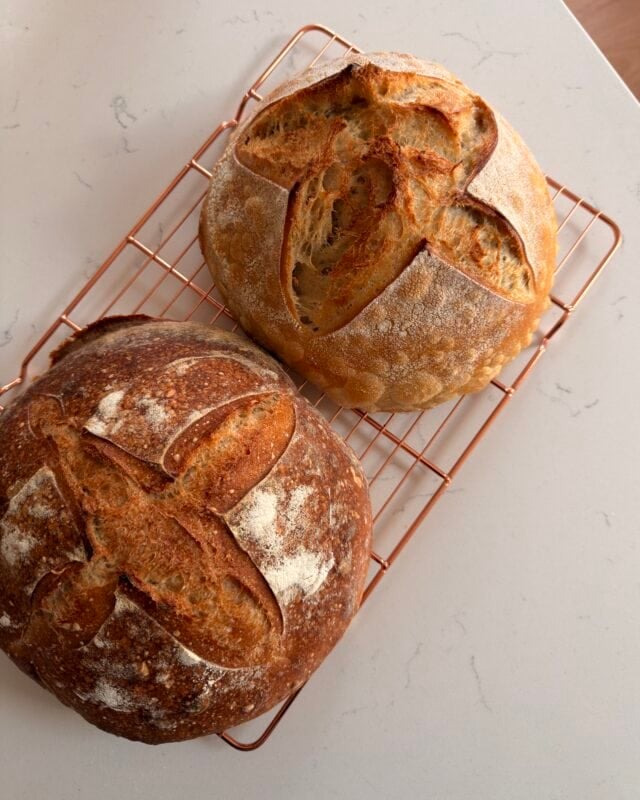
Once the oven has been preheated, and the pot you are using to bake, you can score the dough. An expansion score is a necessity in my books as it quite literally allows the bread to expand correctly and bake into the classic ‘sourdough’. You can also add decorative scores, but that is up to you. For a simple loaf, I score before baking.
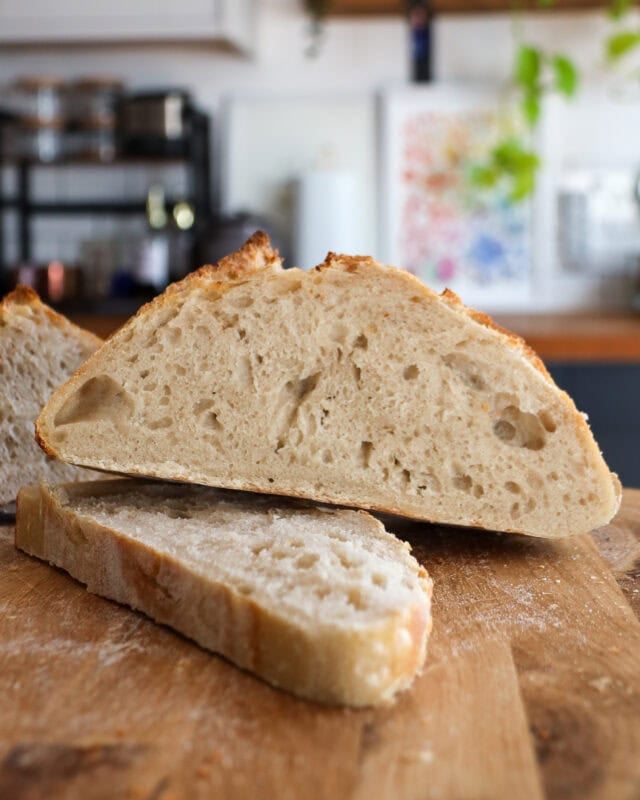
Bake the bread, in the dutch oven, for 30 minutes at 230°c with the lid on (I like to add a few ice cubes into the pot for steam). Then, I remove the lid, lower the temperature to 215°c, and bake for 10-20 more minutes until golden and baked through. The loaf is ready when the internal temperature reaches 98-99°c. Once baked, let it cool for AT LEAST 1 hour before slicing… cutting too early can ruin the bread.
Watch my video on baking the loaf, here
Summary
If you want to learn about sourdough, please don’t be scared. There are loads of good tools, videos, tutorials etc online that you can follow and view to make it as easy as possible. There are some useful tools I use when baking with:
- Danish dough whisk for mixing
- Dutch oven for baking in
- Scoring blade for the decoration and expansion score
- Silcone mat to bake on
Any questions, let me know in the comments!

Simple sourdough loaf
Ingredients
- 125 g sourdough starter (active and fed)
- 300 ml warm water
- 500 g strong white bread flour
- 12 g salt
Instructions
- Please see blog post/video links for much more detail.
- Add the active and fed starter to a bowl, and whisk together until it's a milky mixture
- Add the flour, and salt, and mix together until it's combined. I do this with a dough whisk, but you can use a spatula or your hands
- Cover the bowl and rest for an hour
- Perform 4 sets of folds, every 30 minutes. I do two sets of stretch and folds, and two sets of coil folds (see blog post for details)
- Cover the bowl well, and leave to bulk ferment. This can vary in time from 4-17+ hours, depending on room temperature and dough temperature (see blog post)
- Once it has risen, tip the dough out onto your work surface and perform a pre-shape, where you want it to be in a taught ball of dough.
- Cover the dough and rest for 30 minutes
- Shape again, and add into a floured banneton. Cover, and rest in the fridge for 12-48 hours, until you are ready to bake
- Preheat the oven to 230ºc (fan assisted) and add a baking dish to the oven to preheat as well (45 minutes)
- Tip the dough onto a silicone matt or baking parchment and perform an expansion score
- Add to the this to the preheated baking dish, with a few cubes of ice, and bake for 30 minutes, covered.
- Remove the lid, and bake for a further 10-20 minutes
- Remove from the oven and pot and rest for minimum of an hour before slicing
Notes
- This is just a simple recipe guide for this simple sourdough loaf. Full detail in blog post!
Thank you so much for your detailed description!!! Now that I have made my sour dough loaf which was delicious by the way, I am unsure how to go forward with the starter that I kept back to make my next loaf & keep it going
I’m so glad!! If you are not planning on baking with it soon, you can store any starter that you have left in the fridge, with the lid on the jar properly. It then may need 1-3 feeds to ‘revive’ it from being in the cold. If you are planning to bake with it soon, feed it and keep it at room temperature! xx
I followed Jane’s sourdough starter instructions and today made my first sourdough loaf. I can honestly say it’s the nicest sourdough I’ve ever tasted. The whole family loved it and it soon disappeared! This will no doubt be the first of many sourdough’s I make. Easy to follow instructions and highly recommended.
Thank you for such a helpful and clear recipe. If I was to double this recipe, how long should I leave my bread in the oven baking? Thank you.
I was given a starter by a friend yesterday. After feeding it last night she’s nice and frisky so in 5 mins (at 8am) I’m going to follow your recipe! So simple and straightforward 😀
I’ll let you know how it goes! Thanks for sharing with us x
Picture Perfect. 🍞👀🍃