Jane's Patisserie » Recipes » Best Baking Recipes » Kinder Bueno Cookie Bars!
Kinder Bueno Cookie Bars!

*This post may contain affiliate links. Please see my disclosure for more details!*
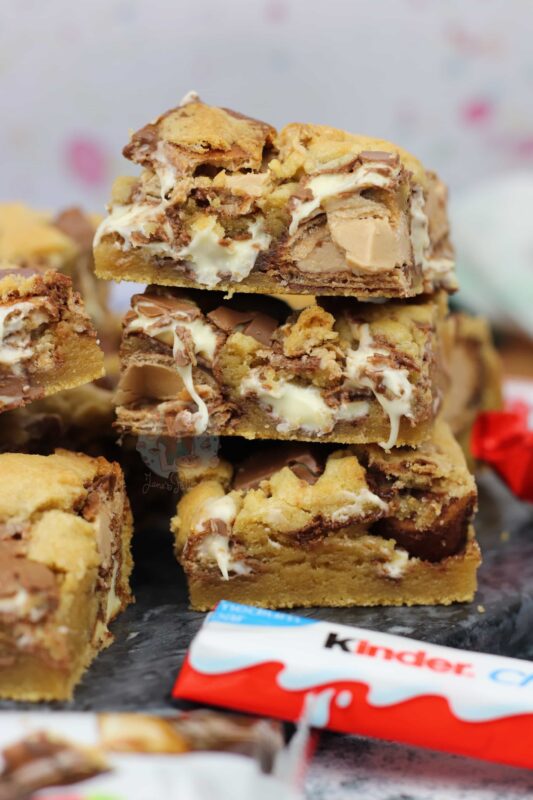
These Kinder Bueno Cookie Bars are soft, gooey and packed full of everything delicious. These bars are thick, chewy, soft and incredibly easy to make, whilst packed with chunks of kinder chocolate and kinder bueno pieces.
These cookie bars are perfect for birthday parties, afternoon treats, weekend baking sessions or even bake sales as they are always easy to make and an absolute crowd pleaser.

Notes from The Patisserie
Anything that has Kinder in continues to be incredibly popular every day on my blog, and it’s easy t see why. The combination of the creamy milk chocolate iconic flavour, with hazelnut and even a crunchy wafer is delicious – especially when added to something else like a cookie.
- These bars have a soft and gooey texture with crisp golden edges for the crunch
- They are LOADED with everything kinder heaven
- Easy one-bowl recipe
- Ready in about 30 minutes
- Perfect for freezing and making ahead
Unlike individual kinder bueno cookies, these cookie bars are even easier to bake as you shove all of the cookie dough into one lined tin and bake – you can portion them to whatever size piece you want, and it’s better as it takes less time to prep whilst still delivering the same delicious texture.
Ingredient notes + tips
Packed full of Kinder Chocolate, and Kinder Bueno pieces, this is the sort of treat that people will ask for again and again without fail. If you don’t like Kinder chocolate, however, please see my many other cookie bar recipes I have available
- Butter – using an unsalted block butter or bakings spread works well – I usually melt mine in a pan on the hob, or in the microwave in short bursts
- Sugar – the standard cookie mix of light brown and also white granulated sugar for the flavour and texture, I find using caster sugar makes them have a cake-like texture
- Egg – one egg only, I use medium, but large will also work if that’s what you have
- Vanilla – an added little bit of sweetness and flavour, but it’s optional
- Flour – always use plain flour, you don’t want to use self raising. I also add cornflour to create a softer texture, but you can substitute this by using 25g more plain flour
- Raising agents – I only use bicarb in the cookie bars, you don’t want to use baking powder as this changes the texture
- Salt – the best addition in my opinion. I use chunky sea salt, not table salt as it adds flavour and brings out the sweetness
If you wanted to make these into a chocolate cookie dough, rather than a ‘plain’ one, you can add in 25g of cocoa powder, but take out 50g of the plain flour. The cocoa powder dries the cookie dough out more in comparison to the flour, so you’d have a smidge less dry ingredients.

The Kinder Chocolate
So as this is a kinder bueno themed bake, I use the kinder chocolate and the kinder bueno bars. The kinder chocolate is best for the softer more chocolate chunk style part, and the kinder bueno is just kinder bueno with that iconic wafer filling.
Folding through the Kinder Chocolate is easy as its solid, but folding in the Kinder Bueno isn’t as easy because they’re quite a bit more fragile. If you’re worried, I did it a couple of times where I put the Kinder Chocolate pieces into the cookie dough first, and then the Bueno so it wasn’t quite as solid as just the dough on its own. It’s not the end of the world if they Kinder Bueno pieces break up, but if you do it by hand it’ll be a lot safer than using a mixer for this bit

Top tips to make the perfect cookie bars
I use a stand mixer or a hand mixer when making my cookie dough as I have easy access to these, but they are not essential. You can easily make the dough by hand, just with a bit of arm power. Try not to over mix the dough as this can cause texture problems, you just want to mix until it’s just come together.
As with any recipe it is always important to use the correct size tin for a recipe, as this is what they have been tested in. Changing tin sizes can cause volume problems, overall bake problems and consistency issues. I always use a 9″ metal square tin for an even bake all around.
The cookie bars should come out a light golden once baked, and still be soft in the middle. I bake on the dot of 160ºc in my fan oven. but I have an oven thermometer to double check temperatures (and it’s a new oven). If your bars come out a dark golden, or sections on top start to catch, your oven is running too hot and you should try and lower the temperature.

FAQs
Will the wafer go soft in the kinder bueno?
Yes, it will soften slightly due to being out of the packet and baked. If you don’t like this, I would suggest to use just kinder chocolate and then decorate after baking with bits of kinder bueno
Can I use chocolate chips?
Yes, you can swap the kinder bueno or kinder chocolate for chocolate chips, or chunks of other chocolates.
I don’t like a gooey cookie, will they be soft?
These cookie bars are designed to stay slightly softer but you can bake them for longer for a better texture if that is what you prefer
The chocolate on top always burns, why is this?
This sounds like your oven is on too high a heat setting, or the wrong oven setting – it’s worth lowering the oven temp by at least 20ºc to see if that helps, or covering the top with foil
Can I make cookies with this instead?

Kinder Bueno Cookie Bars!
Gooey, delicious Kinder Bueno cookie bars packed full with Kinder chocolate and Kinder Bueno pieces!
Print
Pin
Rate
Servings: 16 Pieces
Ingredients
- 115 g unsalted butter/baking spread
- 135 g light brown sugar
- 55 g granulated sugar
- 1 medium egg (or large)
- 1 tsp vanilla (optional)
- 275 g plain flour
- 1 tbsp cornflour
- 1 tsp bicarbonate of soda
- 1/2 tsp salt
- 100-250 g Kinder chocolate (chopped)
- 100-250 g Kinder Bueno bars (chopped)
Instructions
- Preheat your oven to 190ºc/170ºc fan, and line a 9×9 inch square tin with parchment paper
- Melt the unsalted butter until liquid, and add to a bowl.
- Add in the light brown sugar and granulated sugar and mix the mixture together for a couple of minutes to break the sugar granules down
- Add in the egg and vanilla and mix again until they're combined.
- Add the plain flour, bicarbonate of soda, salt and cornflour and mix again
- Add in the chopped Kinder chocolate, and chopped Kinder Bueno, and fold through. Reserve some for the top if you want .
- Push the mixture into the 9×9 inch tin, and add on the last few bits of Kinder goodness.
- Bake the cookie bars in the oven for 17-22 minutes. I usually do 19 minutes so they stay reasonably gooey.
- Once baked, leave to cool in the tin and set
Notes
- I use this 9″ square tin
- These will freeze for 3+ months
- These cookie bars will last for 4-5+ days at room temperature
Storage + Freezing
These cookie bars are delicious on the day of baking, but they will easily last for 4-5+ days at room temperature. If it’s super hot, you can keep them in the fridge.
These bars will also freeze once baked for 3+ months – you can either freeze the whole slice, or portion and then freeze.
I’ve made these for my best friends engagement party and they’re so good! Do o store leftovers in the fridge? Thanks!! Xx
Ahh yay! And no, just room temp! X
Hi, I love your recipes! Was just wondering if you wanted to change the chocolate you add, how much should you add? So if I wanted to change the beuno to a different chocolate, would I add the same amount?
I typically recommend maximum 400g of added chocolate total – (as most others also have 100g chocolate chips for example). And it can vary depending on what you add as fillings of chocolates can differ!! x
I’m struggling to find brown sugar, could I add extra granulated instead? Thank you 😊
Yes! Use all granulated x
Hi Jane, made these before SO YUMMYYYY😋
Just wondering when you freeze them do you freeze the dough or when they’re baked? Xx
Hey! Ahh yay! And you can do either! x
How long can you freeze them for?
Not the cookies just the cookie dough? Also I’ve made these before and they were so good I do them often and change the chocolates!
I usually say raw cookie dough is safe up to three months in the freezer! So glad you like them!
Thankyou jane!
Hi! Could I use a 9 inch circular baking tin for this to make a cookie cake?
Hiya – you can, but the volume is slightly different so may take a smidge longer to bake!
I absolutely love this recipe if I wanted to use a slightly bigger tin how much more ingredients should I add?
Thanks
Ah yay! And that depends.. what size tin would it be?
Hi!
I really want to make these but in the UK it seems quite hard to get hold of cornflour, is there anything this can be substituted for? Or can I leave it out?
Thanks!
Oh how annoying for you, all my local asda/sainsburys have had a good stock recently! The cornflour is designed to be there for the texture (it makes it better) but you can substitute for 25g flour (but the texture may be different!)
Hi,
I made these last week and they tasted delicious! I was planning on making for a friend for her birthday.
Can you tell me the best way to store it please to keep it fresh? Would it be ok in a cardboard pizza like box for a couple of days?
Hey! So generally I store something like this in probably something a little more sealed like a tin or plastic tub! x
Hi Jane 🙂 I’m using a bigger tray 12 x 8” I’ve worked out the amount of ingredients I would need but do I need to change the temp of the oven and how long I bake it for?
Thank you 🙂
The temp should be the same – timings will increase but not too much longer, maybe 4-5 minutes?
I’ve just baked these for my friends birthday and they look and smell amazinggg! I was wondering, would these be okay to freeze? I want to keep a few for myself but don’t want to eat them right now xx
Hey!! Yes you can freeze them!! Xx
Hi,
Would you freeze after baking or freeze the dough?
Hey, you can do either!x
I have just made these after a long day at work! So easy, quick and delicious. I was slightly hasty and cut them whilst they were warm, I think I should have waited until they were completely cool. There goes my diet out the window, but it is worth it. I will be making your Lemon Loaf Cake next!
Honestly so delicious!!!
I did everything as per the instructions, however mine haven’t turned out like that. The dough was crumbly?
The dough is quite dry as shown in the video – you just need to push it down and it’ll be fine!