Jane's Patisserie » Recipes » Best Baking Recipes » Tear & Share Christmas Tree Cupcakes!
Tear & Share Christmas Tree Cupcakes!

*This post may contain affiliate links. Please see my disclosure for more details!*
Chocolate & vanilla tear & share cupcakes in the shape of a Christmas tree… Christmas tree cupcakes! These pull apart Christmas cupcakes are basically a batch of cupcakes you arrange into one big shape, covered all over in buttercream to hold them together, and then everyone pulls one away to eat.
This one is a Christmas tree, and honestly it looks SO impressive for how easy it actually is. Mine is a simple 12 cupcake version too, so you are not stuck making 23 or 24 like some of the giant builds out there. Twelve is plenty for a lovely little tree!

Making tear and share cupcakes!
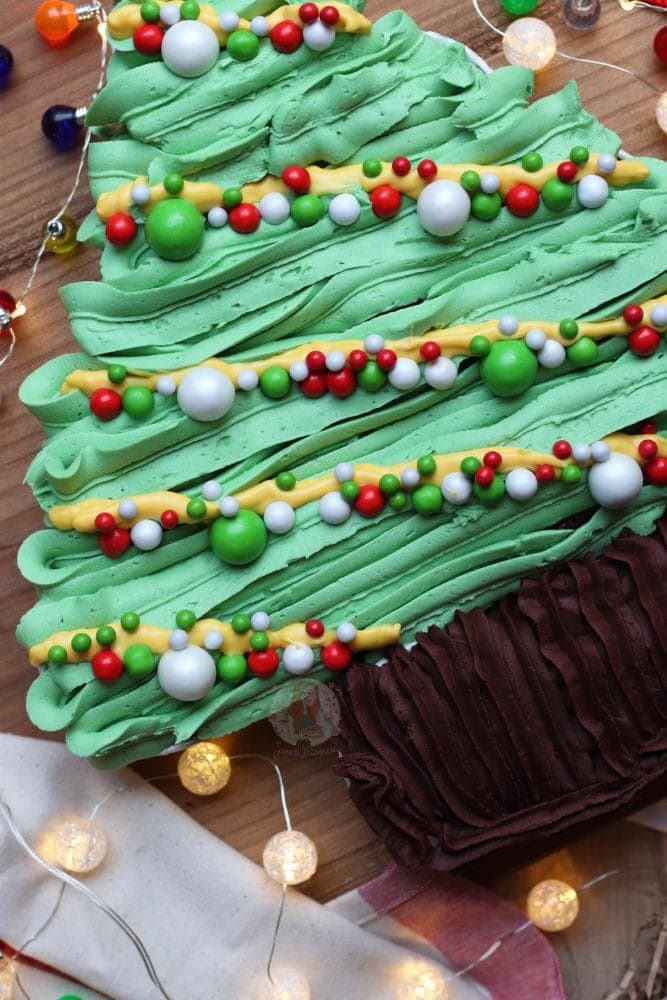
Yummy chocolate cupcakes, with vanilla & chocolate buttercream frosting, with gorgeous Christmas sprinkles, and a white chocolate tinsel! Honestly, these sound so fancy, but looking at the images, they are basically just a giant cupcake Christmas tree!
This is one of those recipes that you’re either going to utterly adore making, or you are going to hate me. Either way, it looks fabulous and that’s what you should stick with. It’s a bit of a weird one if you aren’t so used to making the tear & share style cupcakes, or ‘pull-away’ as they’re sometimes known. I definitely think there are so many designs out there that you can try once you get the hang of it all, but get one down and you’ll be ready.
I obviously went for a Christmas tree as it’s well and truly the festive season now, and who doesn’t love a festively themed bake?! Honestly, I don’t think I know anyone who doesn’t. Well, only people who don’t like Christmas and they’re all basically the Grinch. (By the way, saw the new Grinch film and loved it, so nothing against the Grinch!).
The build could not be simpler, you just line the cupcakes up into a tree with two extra at the bottom for the trunk, and the buttercream is the glue that holds the whole lot together. So don’t be shy with it! And the bit I love most is the mix of green and chocolate buttercream with that white chocolate tinsel drizzled over the top, that little finish is what makes it look properly Christmassy.

Pull apart Christmas tree cupcakes: the quick overview
Before we get stuck in, here is the whole thing at a glance:
- Makes: 12 cupcakes, one Christmas tree
- Layout: rows of one, two, three and four cupcakes, plus two at the bottom for the trunk
- Time: about 30 minutes, plus cooling
- Skill: easy, honestly you can’t fail with it
- The look: green buttercream tree, chocolate trunk, white chocolate tinsel and festive sprinkles
Using food colouring
The best food colouring that I can recommend for something like is Sugarflair holly green or Progel leaf green! I’ve had messages from people in the past who have tried other colourings such as supermarket own, and have complained that the mixture has split, or it tastes funny, or the colour just isn’t what they wanted, and that’s because the colouring isn’t good. I will always stand by colourings such as Sugarflair Holly Green or Progel Leaf Green!
I realise its a bit of effort to buy colourings online, or in the stores such as Hobbycraft but they are so worth it. Also, they don’t end up that much more expensive at all. You use such a small amount in comparison to an entire bottle sometimes of the cheap stuff, but it lasts SO much longer after your investment. So yeah, seriously recommend the investment.
Cupcakes
Anyway, back to Christmas trees… there are so many ways you can do something like this. I went for a standard 12 cupcake recipe so that it’s much more straightforward, and you all know how to crack a cupcake already. It’s more just the decoration bit. The only way to make the cupcakes to stick together is to slather the buttercream all over, and essentially glue them that way. It’s a bit awkward as you have to mush the buttercream down, but if you pipe it on as I have done, it’s easy!
One thing I would really recommend, arrange all your cupcakes into the tree shape on your serving board or plate first, before any buttercream goes near them. Once the buttercream is on they basically become glued together and are a nightmare to shuffle around, so get the shape sorted first, then decorate.

Piping
I used a medium leaf piping tip to do the tree part, and just snaked it down (if that makes sense) in long rows of buttercream to get the tree styling. You can just use any piping tip you want, but I really like the leaf piping tip. It’s a handy piping tip to have around Christmas time as I use it quite often. For example, I used it for the holly leaf on my Christmas yule log!
No leaf tip? Don’t worry, you really can’t fail with this. Just use any piping tip you have, or even a freezer bag with the corner snipped off, and snake the buttercream down in the same way. The leaf tip gives the prettiest texture, but any tip will still give you a lovely tree.

How to assemble and decorate the Christmas tree
Once your cupcakes are baked, cooled and both buttercreams are ready, here is exactly how I build the tree:
- Arrange the cupcakes into the tree shape on your serving board first, one at the top, then rows of two, three and four, with two at the bottom for the trunk. Push them snug together so there aren’t any big gaps.
- Pipe or slather the green buttercream over all the tree cupcakes, working from the top down. Use an angled spatula or a piping bag, whatever feels easier for you.
- Fill in any gaps between the cupcakes with a little extra green buttercream, so the tree reads as one solid shape rather than separate cakes.
- Pipe the chocolate buttercream onto the two trunk cupcakes at the bottom.
- Melt your white chocolate, stir in a little yellow food colouring, and drizzle it over the tree in snaking lines for the tinsel or lights.
- Finish with as many festive sprinkles as you fancy. ENJOY!


Tear and Share Christmas Tree Cupcake Recipe
Chocolate & vanilla pull apart cupcakes in the shape of a Christmas tree… Christmas tree cupcakes!
Print
Pin
Rate
Servings: 12 Cupcakes
Ingredients
Cupcakes
- 150 g unsalted butter/baking spread
- 150 g light brown sugar
- 125 g self-raising flour
- 25 g cocoa powder
- 3 medium eggs
Buttercream
- 200 g unsalted butter
- 400 g icing sugar
- 1 tsp vanilla
- 1 tsp cocoa powder
- Green food colouring
Decorations
- sprinkles
- 50 g white chocolate
- Yellow food colouring
Instructions
For the Cupcakes
- Preheat your oven to 180ºc/160ºc fan, and get your cupcake cases ready on a tray.
- Beat together your butter and sugar, and beat until light and fluffy.
- Add in the flour, cocoa powder and eggs and beat until smooth.
- Split evenly between your 12 cupcake cases, and bake in the oven between 17-20 minutes.
- Once baked, leave to cool fully.
For the Buttercream
- Make sure your butter is at room temperature and beat it on its own for a couple of minutes to loosen it up.
- Add in the icing sugar and vanilla and beat again until combined.
- Take out about 100g worth of buttercream, and move to a separate bowl. Add in the cocoa powder, and beat into the 100g of buttercream.
- With the rest of the buttercream, beat in some good quality green food colouring until you reach your desired green.
For the Decoration.
- Line your cupcakes up onto whatever plate/tray you want to serve them on. I do one, two, three, and then four cupcakes for the tree part, with two at the bottom for the trunk.
- Slather/pipe on some of the green buttercream over the tree cupcakes. I usually use an angled spatula to get it on or pipe it on.
- Slater/pipe the chocolate buttercream on the trunk part.
- Melt your white chocolate and add some food colouring for tinsel/lights and drizzle on in lines
- Decorate with sprinkles or anything you fancy to make it represent a Christmas tree!
Notes
- You can make smaller cupcakes to have a bigger tree, but be careful about transportation as once you connect them with the buttercream they’re hard to move without ruining it!
- You can make the cupcakes vanilla by using 150g of self-raising flour, and no cocoa powder.
- These cupcakes will last for 3 days at room temperature!
Make ahead, storage, and transport
Make ahead
You can absolutely get ahead with these. Bake the cupcakes and whip up both buttercreams the day before, then keep the cupcakes in an airtight tub and the buttercreams covered at room temperature. Assemble and decorate on the day so everything looks lovely and fresh.
Storage
Once decorated, these cupcakes will keep for 3 days at room temperature. I wouldn’t pop them in the fridge as the buttercream can go firm and the cupcakes can dry out a little.
Transport
This is the one to plan for! Once the cupcakes are glued together with buttercream they really don’t like being moved, so always build the tree on the board you are going to serve it on. If you are travelling with them, keep the board flat and level, and honestly, if you can, do the white chocolate drizzle and sprinkles once you have arrived.