Triple Chocolate Cake!

*This post may contain affiliate links. Please see my disclosure for more details!*
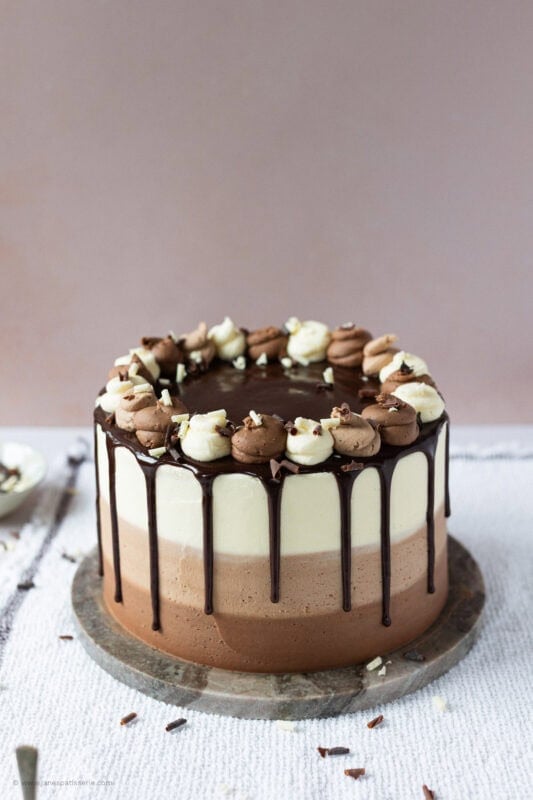
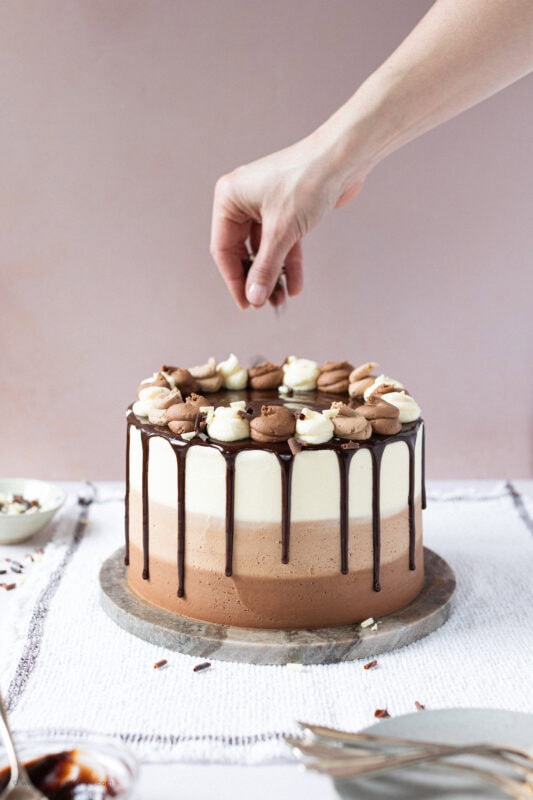
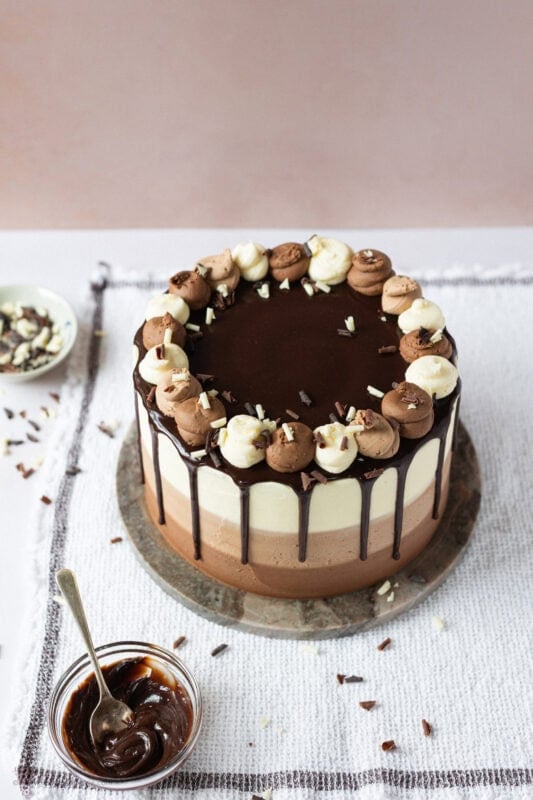
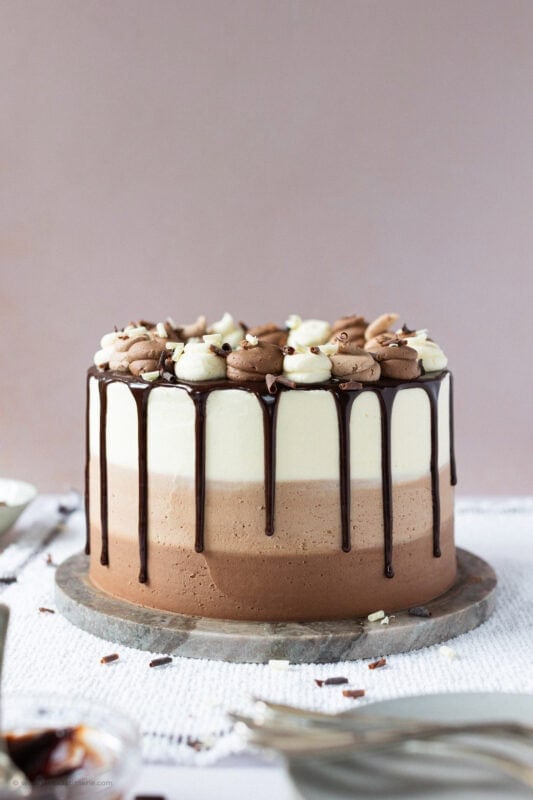
Triple chocolate cake with dark, milk and white layers and a chocolate drip!
Triple chocolate cake!
Welcome triple chocolate cake! It’s not midway through the year, and I thought it was about time to post a showstopper. I’ve made a few ‘insane’ bakes this year so far such as my millionaires cookie bars and my Lindt chocolate cheesecake, but nothing as unapologetically chocolattey as this.
This is a beauty I’ve made at home a few times before. However, as I was posting similar layer cakes quite close together, I wanted to hold off and give this one its moment. When I finally revisited it and tweaked the design slightly, it turned into something genuinely glorious.
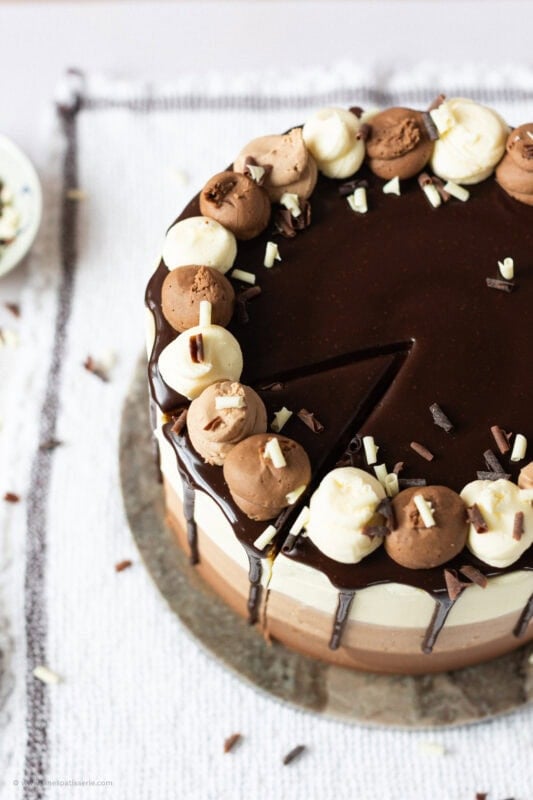
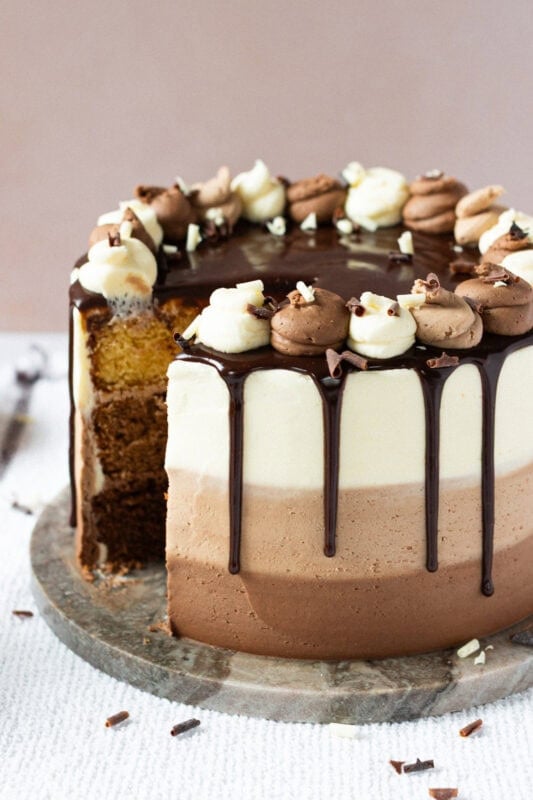
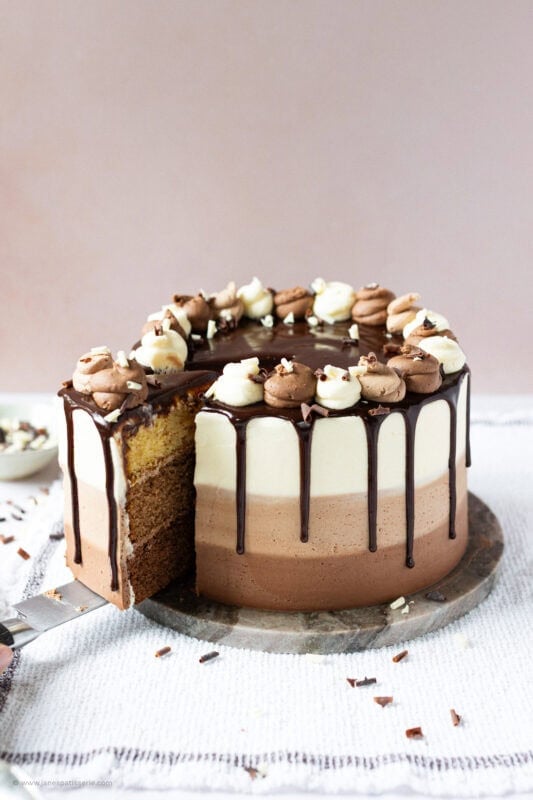
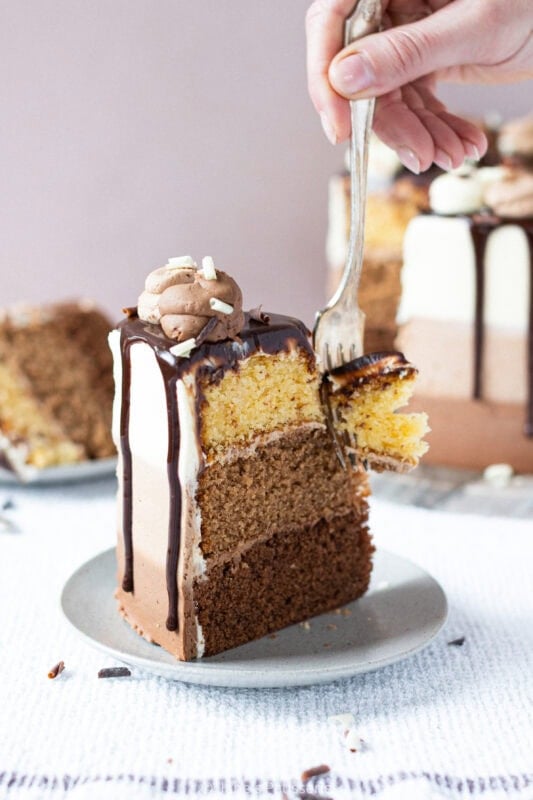
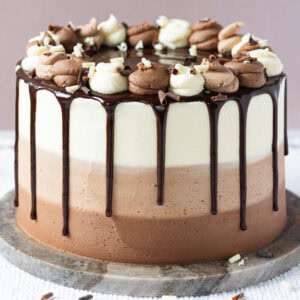
And honestly… just LOOK at it. If you love chocolate, this is absolute heaven in cake form. Triple chocolate sponges, triple chocolate buttercream, and a glossy chocolate drip running down the sides, it’s intense, dramatic, and completely irresistible.
Combination of recipes
The look came from various other cakes I have done in my time, all combined together. My drip cakes so far have been one tone in frosting (such as my Oreo drip cake), but when I mashed the idea with my neapolitan cake, I knew I had a winner.
Decorating it is slightly faffy to explain, but in reality it’s much easier than it sounds. The key is starting with a simple crumb coat of plain buttercream before adding the flavoured layers. Trying to go straight onto sponge with three different flavours can get messy very quickly.
Once you have that base layer chilled and smooth, the rest is just piping and scraping. It’s one of those cakes where patience pays off. Take your time and it all comes together beautifully.
Chocolate
Some people can say ‘ you can’t taste the difference between the milk and dark layers’, but that tends to be because you’re using the incorrect chocolate. I use my favourite chocolate in the recipe as I love baking with it and its tastes deeeeelicious!
Dark chocolate wise, I prefer to stick to 80%+, but 70% will do. Milk chocolate tends to come in at about 35% usually, so there is quite a difference. White chocolate isn’t even really chocolate!
I decided to use slightly less cake mix in comparison to my other cakes, with only 350g of everything in comparison to 400g, because the chocolate gives extra weight to the mix.
It also makes the cakes slightly heavier, which is why I used the baking powder in this beauty. This is optional, but cake with chocolate in always turns a bit more madeira like (particularly the dark chocolate sponge)!
Bake
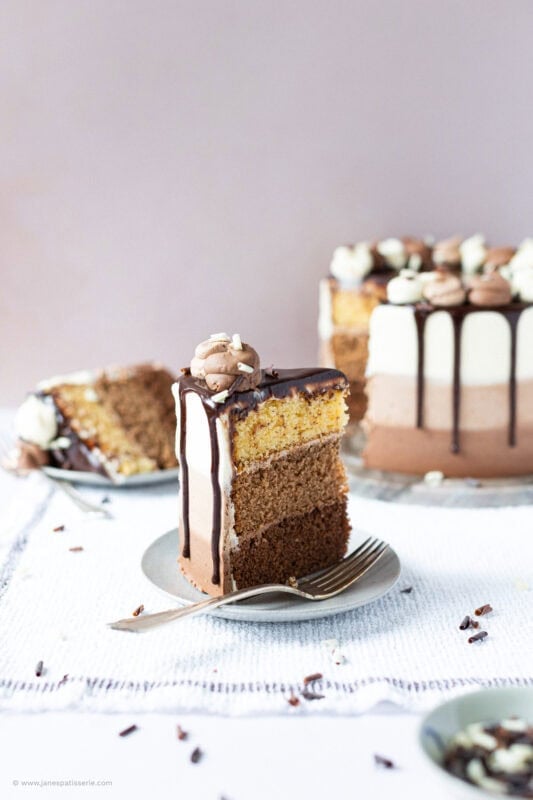
Baking wise, it’s hard to get definitive layers because the outsides of the cake brown somewhat, which is why I went for surrounding the cake in frosting, so that it’s obvious that there are three flavours! When you cut into the cake however, you get the definition!
One of the main ‘issues’ with this bake, is the pure amount of bowls that are required. It’s slightly mad, but having to melt chocolate basically SIX times is a bit much. However, a bit of washing up never hurt anyone, and having a dishwasher is even better. I personally think a bake like this is completely and utterly worth all the washing up, as its one of the most satisfying bakes to look at, and eat.
Decadent drip
The drip is what takes this cake from impressive to dramatic. A mix of dark and milk chocolate with double cream creates a silky ganache that flows beautifully down the sides. It shouldn’t be too hot or too thick, you want controlled drips, not chocolate waterfalls.
Pipe carefully around the edge first to create the drips, then fill in the top and spread evenly. Let it set slightly before piping any leftover buttercream on top. The contrast between matte buttercream and glossy ganache is so satisfying. Finish with chocolate curls for the ultimate triple chocolate statement. At this point, there is absolutely no confusion about what flavour this cake is.
Tips & tricks
- I use supermarket own chocolate for all three layers, I wouldn’t recommend stuff like Galaxy or Dairy Milk for the milk layers – just go with the cheap!
- This cake lasts for 3-4 days at room temperature!
- For this Cake I used:
- These piping bags for the buttercream
- These piping bags for the drip
- This cake turntable to make decoration easier
- This Scraper for the buttercream
- This dark chocolate
- This milk chocolate
- And this white chocolate
- You can just slather the buttercream on in any which way, but I have tried to describe it as best as possible. You basically want the buttercream of each flavour, to match each sponge, and then wipe round so its all smooth!
Triple Chocolate Cake!
Ingredients
Cake
- 350 g unsalted butter
- 350 g caster sugar
- 7 medium eggs
- 350 g self raising flour
- 2 tsp baking powder
- 125 ml whole milk
- 100 g dark chocolate
- 100 g milk chocolate
- 100 g white chocolate
Buttercream
- 350 g unsalted butter (room temp)
- 750 g icing sugar
- 85 g dark chocolate
- 85 g milk chocolate
- 85 g white chocolate
Drip Ganache
- 75 g milk chocolate
- 75 g dark chocolate
- 150 ml double cream
Decoration
- Chocolate curls
Instructions
For the Cake
- Preheat your oven to 180ºc/160ºc Fan, and line three 8"/20cm cake tins with baking parchment.
- Melt your dark, milk and white chocolates carefully, and leave to cool whilst doing the cake mix!
- In a stand mixer, or a large bowl, beat together your butter and sugar until light and fluffy and lovely!
- Add in your eggs, baking powder, and flour, and milk and beat again until combined well.
- Split the mixture between three bowls, and to each bowl add one of the melted chocolates - mix until smooth.
- Add your dark chocolate mix to one tin, your milk chocolate to another tin, and the white chocolate to the last tin.
- Bake the cakes in the oven for 35 minutes, or until baked through - check with a skewer to make sure they're done!
- Leave the cakes to cool in the tins for 10 minutes, and then take out and leave to cool fully on a wire rack!
For the Buttercream
- Melt your dark, milk and white chocolates carefully, and leave to cool whilst doing the buttercream!
- Beat your butter on its own for minute or two, to soften it and loosen it.
- Add in your icing sugar 1/3 at a time, and beat fully after each addition - you shouldn't need to add any liquid in!
- Take out about 150g of buttercream and leave separate. (This is for a crumb coat)
- Split the rest of the mixture evenly between three bowls, and just like the cake mix, add each chocolate to its own batch of buttercream.
- Mix fully, until delicious.
Assemble
- I started with my dark chocolate sponge on the bottom, and spread about 2tbsp of buttercream onto the cake.
- My milk chocolate cake went second, and the white on top!
- Use the spare buttercream to make a crumb coat around the cake and to make it smooth!
- Add each flavour of buttercream to a large piping bag, and pipe rings around the cake - I did two layers of buttercream for each layer of cake (this is so hard to describe)
- Once the three flavours are on the cake, scrape around the cake just like you would other drip cakes, and smooth it all over! Be careful when you are doing it as you'll be able to save the rest of the buttercream for piping!
Ganache
- Add your chocolates and cream to a microwave proof jug/bowl, and heat for 30 seconds. Stir well, and microwave on 10 second bursts till the ganache is smooth, stiring each time.
- Add your ganache to a piping bag and snip a small amount off the end of the piping bag
- Pipe drips down the side of the cake, and then fill in the top and spread it over.
Decoration
- Leave this to set for a minute, and then pipe the rest of the buttercream on top as decoration!
- I finally sprinkled on some triple chocolate curls!
Notes
- I use supermarket own chocolate for all three layers, I wouldn't recommend stuff like Galaxy or Dairy Milk for the milk layers - just go with the cheap!
- This cake lasts for 3-4 days at room temperature!
- For this Cake I used:
- These piping bags for the buttercream
- These piping bags for the drip
- This cake turntable to make decoration easier
- This Scraper for the buttercream
- This dark chocolate
- This milk chocolate
- And this white chocolate
- You can just slather the buttercream on in any which way, but I have tried to describe it as best as possible. You basically want the buttercream of each flavour, to match each sponge, and then wipe round so its all smooth!
I melt the chocolate in disposable piping bags, in a bowl of water in the microwave at short intervals. Snip the end off the bags and pipe into the cake batter – saves a little time on the washing up 😀
Hi Jane
Another wonderful recipe to try. For less people how would you recommend scaling the recipe down?
Thanks!
Use this website! http://www.cakebaker1.co.uk/apps-for-bakers/baking-tin-size-conversion-calculator/
Thank you! You are a star! ps I totally agree with you I wouldn’t know where I would be without my Kitchen Aid!
Hi Jayne
I’ve just made this cake and the white layer has gone a little crispy on top is this because it’s white chocolate I used dr oetkers chocolate
Hi! I had this problem too, did you get to the bottom of it? I wasn’t sure whether I needed to start over
You won’t need to start over – you can trim the cake slightly if you want but it should be fine!
Hi, I’m trying to decide which of your chocolate cakes to make for my daughters birthday, I will be decorating the outside with a semi naked buttercream finish. Would you recommend this cake or one of your other recipes which uses cocoa powder rather than melted chocolate? Thank you
Hi Jane, I’m hoping to use this recipe for the upcoming Macmillan bake sale. I was wondering if you could confirm what piping nozzle you used. Also are there any nozzle kits you’d recommend?
2D closed star!
Hi Jane
Isit just normal milk chocolate I use not cooking?
Thanks
Ffion
I use supermarket own chocolates in my baking, or Callebaut for example! I only use a brand such as dairy milk if specified!
Hi jane, do you have any tips for avoiding grainy/moussey buttercream? Which icing sugar do you use? I’ve been buying cheaper brands and wondering if that’s the issue. Thanks 🙂
I just use any brand really, I love the Tate & Lyle one as it doesn’t cloud anywhere when you mix it but that’s not sold many places anymore! Adding chocolate at slightly the wrong temperature can lead it to be grainy sometimes so maybe cool your chocolate a smidge more? x
Hi Jane,
I’v purchased x3 20cm sandwich tins from The Range – link below.
They’re 2.5cm deep – is this deep enough for this recipe? Is that what you’ve used?
If so, can you please confirm how much batter should go into each tin to ensure the cakes are flat and to avoid them forming a dome / overflowing onto the sides?
Thanks,
Stella
Hello! If they’re only an inch deep they may be borderline too shallow. All cake tins I use are deeper, usually 3-5″ in-depth! I buy them from Asda and they’re £4 I think?!
I can’t recommend how much to put in the tins as I split the sponges as dictated in the recipes and they don’t have an issue – in regards to forming a dome, that can happen depending on your oven, no matter what tin you use.
Thank you so much for your speedy reply. Is this the one:
Thanks again
No, for cakes I don’t use springform ones – only cheesecakes. I just use a regular deep 8″ tin for cakes!
Hi Jane love your recipe’s, they are my go to for all cakes!! Do you know what quantities I would use for a 6″ cake or the best way to convert ingredients for smaller cakes?? Thank you
I believe you need to use 2/3 of the ingredients for a 6″, and reduce the baking time! x
Hiya, is it okay if I add semi skimmed milk? Or does the recipe require whole milk? x
Whole milk is much better as the less fatty the milk, the more likely it is to split. I always recommend full fat milk in baking!
Jane
Thank you for inspiring me to bake again, my family and friends are very grateful but sadly my waistline line isn’t !! Do you have a recipe for a banoffee cheese cake you could kindly share? Xx
Jane
Thank you for inspiring me to bake again, my family and friends are very grateful but sadly my waste line isn’t !! Do you have a recipe for a banoffee cheese cake you could kindly share? Xx
Hey, huge fan. I find it so much easier when there’s a video along with the recipe, have you got one for the triple chocolate cake 🙏
Many thanks
Jack
Unfortunately as I am having to run my blog on my own, I am unable to film a video for every recipe.
Stunning cake! Absolutely worth the extra washing up.
Thank you!
You’ve put whole milk in the ingredients for the cake mixture but it’s not listed in the method… is it needed?
It is needed – add along with the eggs and flour.