Biscoff Drip Cake!

*This post may contain affiliate links. Please see my disclosure for more details!*
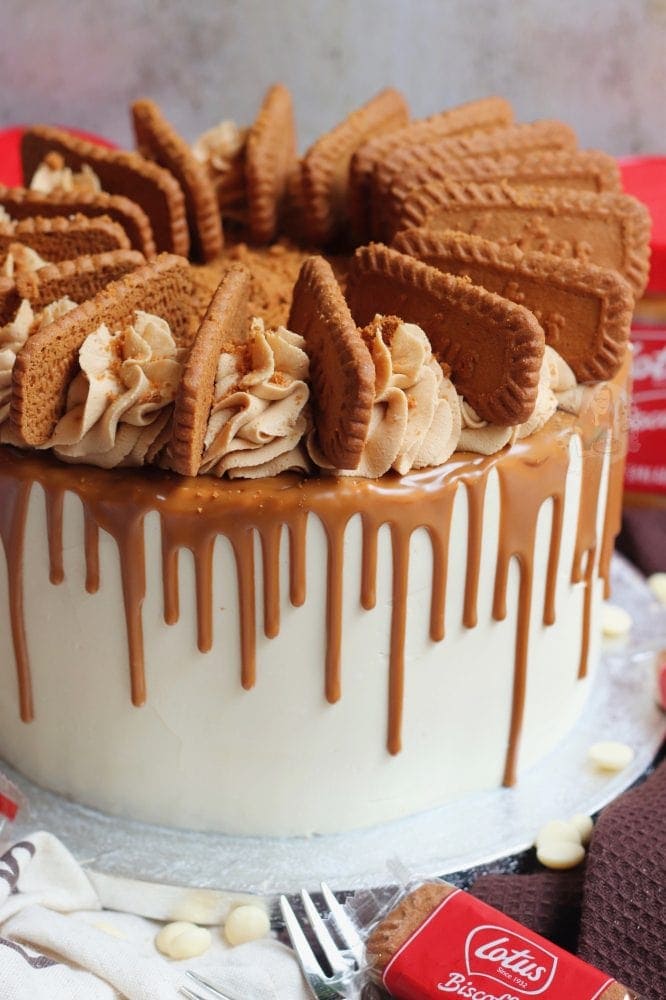
A three layer Biscoff drip cake with brown sugar sponges, Biscoff buttercream, white chocolate ganache, and a Biscoff drip!

New Biscoff recipe
Oh hey Biscoff, it’s been a while… about six months to be exact which is far too long in my books. I love Biscoff, it will always have my heart, and I am here for a new recipe. It is THE Biscoff Drip Cake that you have all been asking for, for AGES.
Anyway. I thought I would make this beauty a complete and utter showstopper, by taking it to the next level. My Biscoff cake recipe has always been a popular one on my site, especially helped by Zoe Sugg using it a few years ago on Youtube, and it remains popular still.


Biscoff drip cake
I can’t believe that the recipe for my Biscoff Cake if now three years old, but I thought it was high time I answer the calls and requests for a drip cake version. Oh hey, here it is!
Now, theoretically you can just use my Biscoff Cake Recipe as a drip cake, by adding on a bit more buttercream to the recipe (probably about another half), but I wanted to do a new post for it, and make it a little different.
One of the other requests I have been getting for *ages* now is to have a recipe for white chocolate ganache for cake decorating purposes. So, combining the two seemed ideal, and it worked well. Oh hello HEAVEN.


I personally find Biscoff quite savoury in a way, which makes sense as it’s quite a spicy biscuit flavour. So combining the brown sugar sponges with Biscoff buttercream, and white chocolate ganache was the ideal marriage made in heaven!
Three layers
I thought going for a three layer cake just like all my other drip cakes probably was best as most of my readers have now invested in three cake tins to make their lives easier, and it would be a bit much to now say “you need four”. When I have made ganache covered cakes in practices though, they have used four sponges as I love a tall cake.
White chocolate ganache shell
I realise that the white chocolate ganache shell of the cake might not be the ideal for some, and sound terrifying for others but I thought this cake would be the ideal time for it. I personally adore how it looks on the cake with the Biscoff drip creating such a good contrast!


Ganache ratios
When making ganache there is a basic rule… for dark chocolate you use equal quantities of dark chocolate and cream (1:1), for milk chocolate you use double the chocolate to cream (2:1), and for white chocolate you use triple quantities of chocolate to cream (3:1). It’s the same for drips as it is for covering!
Make the white chocolate ganache I either use Callebaut chocolate as I utterly adore it, or I use the cheapest supermarket one I can find. Tesco is usually my go to as its 30p per 100g so lovely and cheap. I personally use the microwave method as I find it so easy!
Ganache method
Whack the chopped chocolate and cream in a bowl, and microwave on 15-30 second bursts at half power, stirring each time fully. Melt until its smooth, and leave to sit in the fridge, stirring it every few minutes. If the ganache is too soft, it’ll be messy as hell decorating the cake, and if its too hard, you’ll struggle.

The ideal consistency for the ganache is like peanut butter, or the Biscoff spread just out of the jar. You can leave it to sit at room temp to get there, but obviously that’ll take longer! For decorating, you decorate in the same way that you would with buttercream drip cakes.
Applying the ganache
I slather it on the sides (on top of a crumb coat) with a small angled spatula, and then smooth around the edge with a large metal scraper. A chilled cake is the easiest to coat as it won’t budge, and it’ll make it so much easier! But honestly, just whack it on, and scrape around over and over until you have a smooth lovely finish.
If the ganache isn’t quite the right consistency then it might be that it’s still too soft still, and you just need to leave it a little longer. You can use the ganache for the crumb coat instead of the buttercream, but it just makes it so much easier if you have a crumb coat!

Decoration
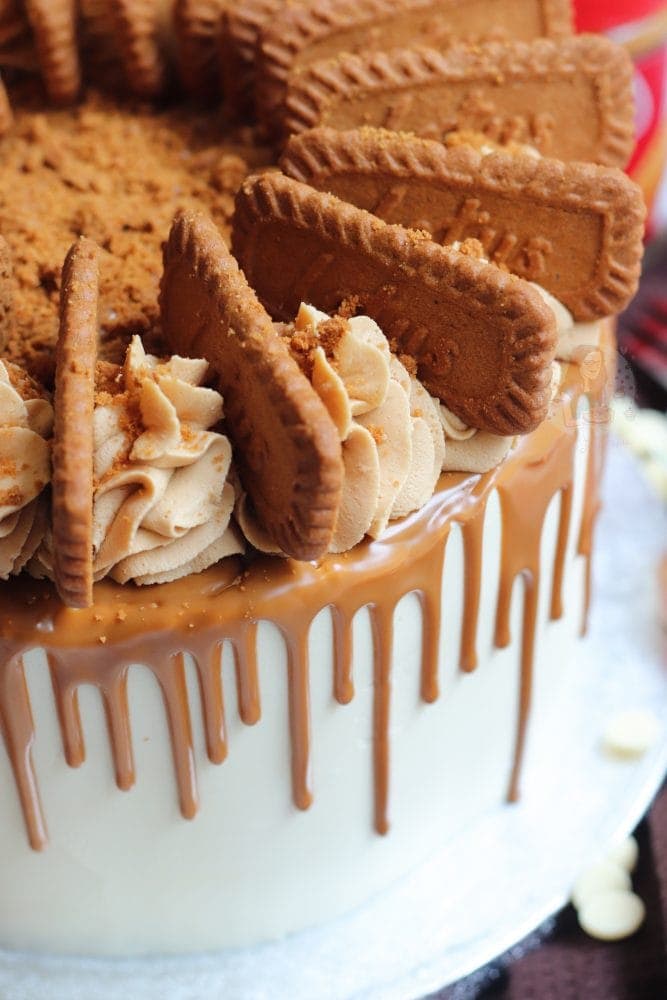
Pop the cake in the fridge for 10 minutes or so once the ganache is on to fully set and the cake should feel rock solid afterwards! Melt the Biscoff spread slightly to drip it down, add some Biscoff buttercream swirls on top, and some biscuits, or decorate how you fancy!
For the sponges and buttercream, it’s all the same as my Biscoff cake! The brown sugar gives such a lovely and natural caramel flavour to the cakes, and keeps them moist, and the buttercream is just delicious!
I hope you all love this recipe as much as I do! If you have any questions then leave a comment below! I am working on bringing my Youtube videos back and will do one on ganache, but until then… good luck!


Biscoff Drip Cake!
Ingredients
Cakes
- 400 g unsalted butter
- 400 g light brown sugar
- 400 g self raising flour
- 8 medium eggs
- 2 tsp baking powder
Buttercream
- 250 g unsalted butter (not stork) (room temp)
- 500 g icing sugar
- 300 g Biscoff spread
Ganache
- 450 g white chocolate (chopped)
- 150 ml double cream
Decoration
- 200 g Biscoff spread
- Biscoff buttercream (above)
- Biscoff biscuits
Instructions
For the Cakes!
- Preheat your oven to 180C/160C Fan, and line three 8"/20cm cake tins with parchment paper.
- Add your butter and sugar to a bowl, and beat until light and fluffy. I use my Kitchenaid with the paddle attachment!
- Add in your flour, eggs and baking powder and beat again until a lovely smooth cake mixture is formed.
- Split evenly between the three tins and bake in the oven for 30-35 minutes (or until a skewer comes out clean!)
- Once baked, leave to cool in the tin for 10 minutes, and then leave to cool fully on a wire rack.
For the Buttercream
- Beat your butter on its own for a while in your mixer until it's smooth and supple.
- Add in your icing sugar a little at a time and beat fully until its light and fluffy!
- Add in your Biscoff spread and beat until combined. If its really stiff, add in 1-3tbsp of boiling water mixing fully each time.
For the Ganache
- Add your chocolate and cream to a microwaveable bowl, and heat for 15-30 second intervals at half power. Keep going and stiring each time until a smooth ganache is formed.
- Alternatively, add your cream to a pan and heat till just before boiling point. Pour over finely chopped chocolate and leave to sit for 5 minutes. Once sat, mix till smooth (Add back to the pan if its not quite melted).
- Leave the ganache in a bowl and stir every few minutes till it forms a peanut butter like consistency - you can do this in the fridge as well, just make sure to stir it so it doesn't set too quickly!
For the Decoration
- Spread a smidge of buttercream on the cake board, and add your first cake to a cake board (for an 8" cake, I use a 10" board). Spread over some of the buttercream.
- Add on the second cake, and repeat!
- Add on the third cake - spread some of the buttercream on top and around the edges till the sides are smooth and you have created a crumb coat. It doesn't need to be thick, it just needs to fill any gaps or holes that may be on the sides!
- Refrigerate the cake for 10-15 minutes to set the crumb coat.
- Once done, using an angled spatula, slather over the white chocolate ganache and then smooth around using a large metal scraper.
- Keep repeating this till the sides of the cake are smooth and lovely. Set the cake in the fridge again for 10-15 minutes.
- Carefully melt down the biscoff spread till drippable, and drip down the sides of the cake and over the top of the cake. Set the cake in the fridge again for 10-15 minutes.
- Pipe some swirls of the leftover buttercream on top using a medium 2D closed star piping tip and decorate with the biscuits and crushed biscuits! Enjoy!
Notes
- This cake will last for 3-4 days once made.
- I recommend using an angled spatula and a large metal scraper to make decorating easier!
- I used a medium 2d closed star piping tip for the swirls on top!
- I melted the Biscoff spread in the microwave in 15 seconds!
- The white chocolate ganache is optional - simply add on another half of the buttercream if you just want to use buttercream to make it!
- You can make a smaller version of the cake by using:
- 250g Butter/Sugar/Flour, 5 medium eggs and 1tsp baking powder and splitting between two 8" tins. Bake in the oven for 35 minutes or so!
- Use half of the decoration ingredients!
- I used the smooth Biscoff Spread so that the buttercream and drip were also smooth!
ENJOY!
Find my other Recipes on my Recipes Page!
You can find me on:
Instagram
Facebook
Pinterest
Twitter
Youtube
J x
© Jane’s Patisserie. All images & content are copyright protected. Do not use my images without prior permission. If you want to republish this recipe, please re-write the recipe in your own words and credit me, or link back to this post for the recipe.
Hello! I am looking to use this cake in a different way, I want to use it under my sons birthday cake next week, however he wants a fortnite cake (but adores biscoff) so I will be covering it in icing. I’ve never seen you work with icing or decorations so you may not know if this cake will be fine with this. Also id you have worked with icing/fondant before, Im hoping to make the characters a couple of days before to save me time, any advice? 🙂
Hey! Yes so I have worked with fondant and sugar paste, but I don’t do recipes on it (As they’re too hard to explain in writing!) – and also I personally hate eating it haha!! The cake would be fine – but you would want to chill it for a while before covering so it’s firm. And you can definitely make the models beforehand – when I’ve made sugar paste flowers I’ve made them two months before and they’ve been fine! I would suggest a mix of flower/sugar paste and fondant, as just fondant can be far too soft!
Hi, can I used golden caster sugar instead of light brown sugar for the sponge? If so would it be the same amount? Thanks 😊
Yes you can!! And yes it’s a straight swap!
Hi Jane,
If I do this cake with the 2 tin version as I only have 2 tins, will it be very tall?
Thanks 😊
Hey! Do you mean the less ingredients version? it will probably end up being about 4-5″ tall in total! x
Hi Jane love your recipes!
I want to make this cake for a friends birthday and would like to write a message on the top. Would biscoff spread work for the writing or what do you suggest I use? I’ve also never done cake writing before so do you have any other tips? x
Ahh thank you!! So melted biscoff spread is very runny – it may be easier if you can to buy the cheap icing sets you can get in the supermarket as often you can use those for writing – or maybe try melted chocolate! It may also be a good shout to write it onto parchment paper, set the chocolate in the fridge or freeze before moving! x
Hi. I don’t know if you tried the writing with the Biscoff spread or not but I can tell you that I was able to use just the spread to drizzle straight lines on my cupcakes. I took a little bit of the spread and melted it for a few seconds in the microwave then put it in a regular sandwich bag to cool down. My lines were pretty spot on. Remember I didn’t use a piping tip either. It can be done. The only reason why my lines had some wiggles was because I was rushing to get the cupcakes completely decorated. If you’re good at writing on cakes you shouldn’t have a problem whatsoever. Happy baking…
Hey Jane, I’m hoping to make this cake next week but with two tiers rather than three. Can you assist at all with measurements for this? Many thanks!! Leo
Hey! There is notes in the notes section on how to do that! X
Can I use dark brown sugar instead of light brown?
Hey! Yes definitely! X
Hi,
My ganache hasn’t turned out that well. Cake is chilling in fridge but I think another layer would make it look great. Can I add a second layer of ganache ?? Or will it turn out wrong?
Thanks
Yes it should be okay to do another layer – make sure there is no moisture on the outside of the ganache so it doesn’t cause any problems x
Hi Jane
Made this cake today and the smoothing the ganache bit was a nitemare for me. Do you have any tips or a video of you making this cake? I have a cake smoother and a relatively newbie to baking but I feel like I went wrong somewhere
A ganache covered cake is on my list to film – I just haven’t had a change yet! When making it the ganache really does have to be the thick peanut butter consistency first to make it easier, if it’s too soft it can be difficult – but cake smoothing is about practice as well! xx
Hi Jane,
I am about to attempt this wonderful cake for my husband’s birthday. The cake tins I have at the moment are 2” deep, is this sufficient for this recipe? Or so I require something deeper?
Thanks x
Hey! So I usually use cake tins about 3″ deep, but they don’t rise up fully! As these layers are baked separately they should be fine, but I wouldn’t recommend putting any more mix in (and baking in fewer tins) x
Hi Jane. I made this cake and the cake itself is amazing but the buttercream turned out too sweet. I followed the recipe as stated but found the cake too sweet. I would definitely reduce amount of the icing sugar or biscoff spread in the buttercream.
American buttercream frosting is always sweet as it is just butter and sugar, with a spread added in. You can reduce the sugar, but it will just taste more buttery which I personally hate!
Hey, sorry if this is a stupid question but I don’t bake 😂 I am going to attempt this for my partners birthday! When it says light brown sugar , is light brown soft sugar the same?
Yes, they are the same!
Hey Jane!
I love this recipe. It’s absolutely gorgeous. How should I store it – in the fridge? I don’t want the drips to fail!
You can definitely store a cake like this in the fridge before it is cut into as it’s sealed – however after cutting the fridge will dry it out! It can also be stored outside the fridge but in a cool place!
Delicious!
Hi Jane, I want to make this cake but make it into a pinata with caramel bits in the middle. I think it would be better as a four layer cake to make room for the pinata part. I use deep 8” tins for all my cakes and then slice them into two to make four layers. How much more of the ingredients would I need to make a four layer cake rather than the three in the recipe?
Thanks
I would suggest looking at my easter piñata cake post for a four layer version, but combining with this one!!
Hi. I don’t have self raising flour and have all purpose instead. Can I make it with all purpose flour? Do I need to make any adjustments?
To use plain/all purpose flour you need to replace the raising agent. Typically it’s 2 level tsps of baking powder per 150g of flour, whisked in before using!
Sorry if this has been asked a zillion times before but how do you stop your sponges from doming at the top? Whenever I make sponges they always dome slightly in the middle and if I want it to be covered/decorated like this one it means trimming off the top and losing cake. I’ve read about the cake pan strips that you soak in water but do you have any tips? Thanks x
Hey! So this can happen for a number of reasons… the type of oven you use, how you mix the cakes, the temperature of the oven and so on! Mine come out ever so slightly domed, but I usually cool them upside down on some parchment paper if so, and it helps flatten them a smidge! I don’t use cake strips as I just don’t feel like they do anything for me, but you can give them a go for sure!
Hi Grace, my cakes are working out better since I’ve been baking cakes at about 160 deg C for about 5-10mins longer. It seems baking at a lower temperatures than the recipe states helps reduce the doming effect, for me anyway!
I bake mine at 160C as I have a fan oven (as listed in the recipe) so it can the oven isn’t being set to the correct temp.