NYC Chocolate Chip Cookies!

*This post may contain affiliate links. Please see my disclosure for more details!*
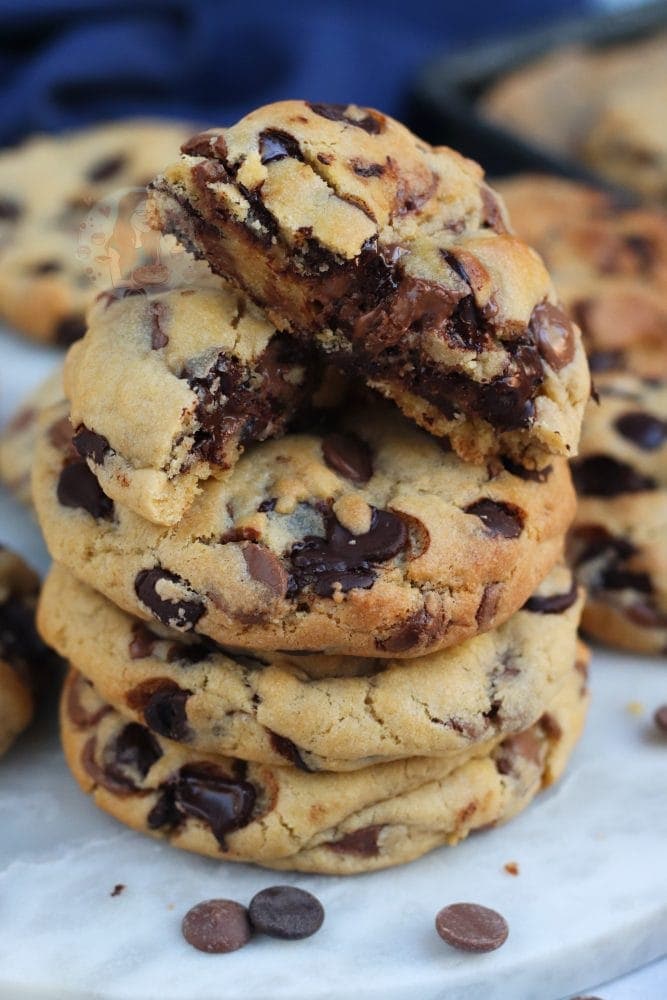
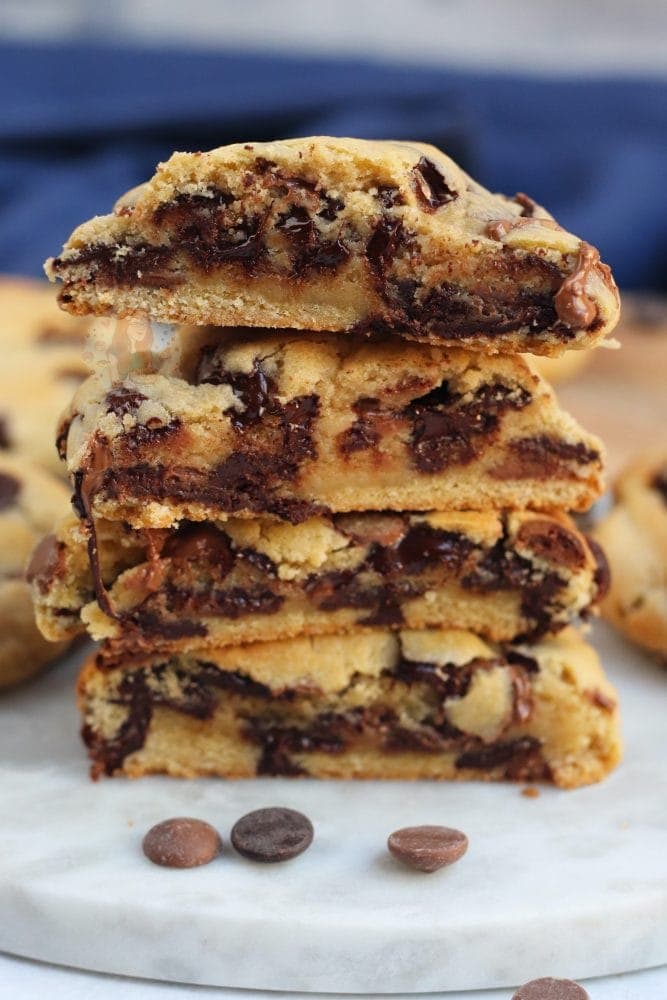
Giant, gooey and utterly delicious NYC chocolate chip cookies based on the famous cookies from New York City!!
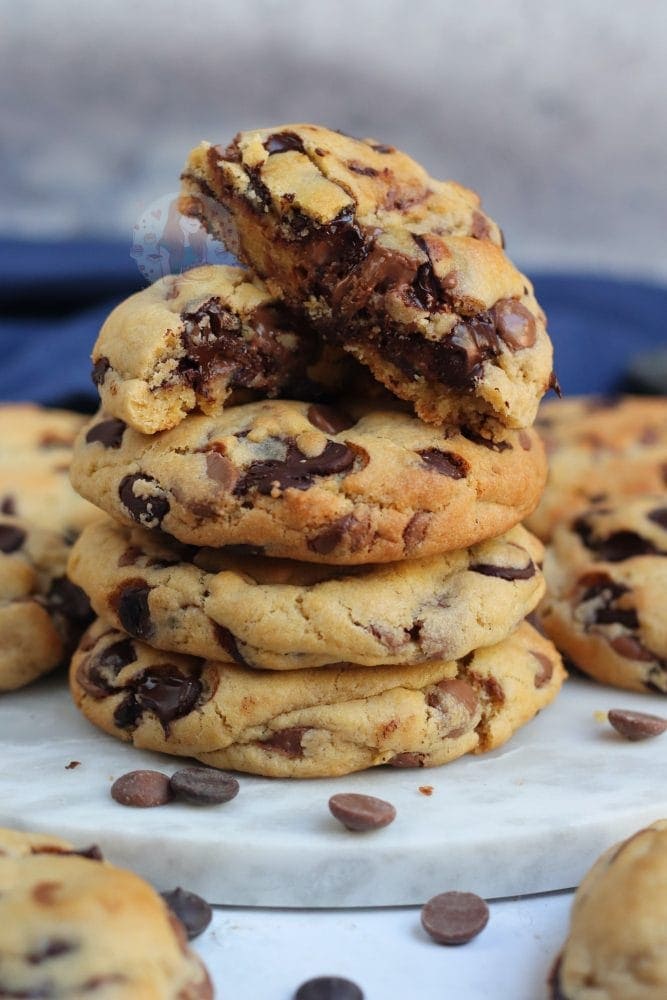
NYC chocolate chip cookies
Can we take a minute, right at the beginning of this blog post, to appreciate… that I have given you guys this recipe. I have finally given you all the recipe that you have been after, for such a long long time. QUEUE THE APPLAUSE.
I’m joking – seriously. But anyway… I will say the reason they took this long to come to my blog, is because I only, finally, went to New York four months ago, so I finally got to try some classic NYC cookies for myself!
I wasn’t prepared or willing to post an NYC chocolate chip cookies recipe before I had actually eaten some for myself! I feel like that is pushing the limit really… can you make a recipe for something as famous as this, if you haven’t even there and eaten them?!

Levain Bakery
Anyway. When I was in New York, I ate so. many. cookies. The best of all, for me personally, was the ones from Levain Bakery. Oh, holy geeeeeeee they were insanely epic. I heard lots and lots of talk about Levain Bakery on my social channels before I went, and my gosh they did not disappoint.
I managed to get in when there was absolutely no queue, and then trotted over to Central Park to enjoy them, and my gosh it was the best thing ever. Not only was I finally taking in the sites of Central Park, in actual New York City, but the cookies… wow.
When it comes to making a recipe for them though, I will say that these are not authentic Levain Bakery cookies, as I just don’t think they can be recreated. I really don’t. There are many great NYC chocolate chip cookies recipes out there – this recipe from Modern Honey is great, so is this one from Cupcake Jemma, or this one from Kirbie Cravings!

Recipe
I have honestly made about 20 batches of cookies now, to get these right. There are so many factors when it comes to making these cookies – and jeez it’s hard to get them all right. When researching into recipes, what Levain Bakery and other bakeries such as Creme in London and so on do.. it is a bit of a mix. What flavours actually go into them, what order you put the ingredients in, and so on! Lots of recipes use a mix of two flours, but I like to stick to just one!
I basically just wanted to create giant chocolate chip cookies, that resemble NYC chocolate chip cookies, that are easier to make. They are definitely different from the rest of my cookies, but that’s what we want – NYC cookies are a world of their own. I teased this post on my Instagram a little while ago and you guys went crazy for them… so I hope you are READY!!
This recipe is quite easy to follow, luckily. I wanted to make it as simple as possible – but obviously any questions, leave them below.


The cookie dough
The cookie dough for this recipe is quite similar to the other NYC Cookie recipes I’ve shared on my blog – the basic cookie dough, as you will see can be used in so many variations, but they work for me – so why change it?
- Butter – I use fridge-cold baking spread or room-temperature block butter, but either works well.
- Sugar – A blend of granulated sugar and light brown soft sugar enhances the flavour and gives the cookies a rich taste.
- Egg – I usually bake with medium eggs, but you can substitute with one large egg if that’s what you have on hand.
- Flavours – Vanilla extract is optional but add a wonderful depth of flavour.
- Flour – Always use plain flour for your cookies! Self-raising flour will result in a cake like texture, which you want to avoid.
- Raising Agents – I use both bicarbonate of soda and baking powder. Bicarb is the traditional choice for cookies, while baking powder helps achieve the signature texture of a New York-style cookie.
- Salt – I add sea salt to my cookie dough because it enhances the flavours, but you can skip it or use salted butter if you prefer.
Sugar
I use a mix of two sugars… light brown sugar (soft), and white granulated sugar. This is similar to my other recipes, such as my Mini Egg cookie bars – in the fact that it gives the best flavour and texture. You really want to stick to these if you can – but you can use all brown, or all white if you have to.
Switch the sugars to caster sugar can really change the texture. I’m not the biggest fan of caster sugar in cookies anymore – and if you try this recipe as listed, you will agree with me. There is alot of science behind sugars in cookies – and if you can grab the listed sugars I will promise you, they will be better.


Flour
Now when it comes to the flour… I stand by using cornflour in my other recipes. I really honestly do. I even think these are better with a bit of cornflour. The cornflour creates a softer texture in the cookie, without drying the cookie out. It’s perfection. However, a lot of you don’t like using it.
A lot of NYC Cookie recipes use a mix of flours, but again I wasn’t a fan… I wanted to make it be fewer ingredients. However, you can switch it up. You can easily use self-raising flour instead of plain, but you would then only use the bicarbonate of soda, and no baking powder
I use all plain flour and add in the baking powder to get the texture, and I love it. You want the rise from the raising agents to create the perfect texture.. and it really works! You want a decent amount of flour, and to help it raise to get the classic texture so that when you bite into it… heaven.


Chocolate?!
When it comes to the chocolate chips, I, as always, use actual chocolate chips. I use a 50/50 mix of milk chocolate and dark chocolate. You get the sweetness from the milk chocolate, but also some bitterness from the dark chocolate which creates the balance. You can, of course, use all of one or the other.
I like to use baking chocolate chunks as they are slightly larger, but you can use bars of chocolate that you can chop up, or you can use any supermarket chocolate chip. Honestly, any work. You can use a mix of other flavours of chocolate as well, or even adapt to include extras. I just wanted a base recipe on this particular recipe post.


Tips & Tricks
- These are best eaten on the day of baking, but can be revived by microwaving for 15-30 seconds, or putting into a hot oven for 2-3 minutes
- You can freeze the raw cookie dough easily, and bake from frozen if you don’t want to bake the entire batch
- If you are baking straight from frozen after some time, I usually bake for the same 12-14 minutes, at the same temp, but an extra couple minutes won’t hurt
- Once baked, these will last for 4-5+ days
- You can use any chocolate you fancy, I just love the combination of milk and dark chocolate
- You can use chocolate bars chopped up instead of chocolate chips, just make sure the chunks aren’t too big
- If your oven runs hot you will want to reduce the temp slightly as mentioned in the method
- If you prefer your cookies flatter, you can squish them down slightly before baking but I don’t do this personally
- If you want a lovely texture – you can add in 1 level tbsp of cornflour, and take out 25g of the flour
- If you can’t access one of the sugars, use all of the other one – i.e. all granulated, or all light brown sugar. Using other sugars can change the texture.
- If you want to make smaller cookies (60g) – they take about 9 minutes to bake


NYC Chocolate Chip Cookies!
Ingredients
- 125 g unsalted butter
- 100 g light brown sugar
- 75 g white granulated sugar
- 1 medium egg
- 1 tsp vanilla (optional!)
- 300 g plain flour
- 1 + 1/2 tsp baking powder
- 1/2 tsp bicarbonate of soda
- 1/2 tsp sea salt
- 300 g chocolate chips (150g dark, 150g milk)
Instructions
- Add your butter and sugars to a bowl and beat until creamy - I use my stand mixer with the beater attachment
- Add in your egg, and beat again. If using vanilla, add it in now
- Add in the plain flour, baking powder, bicarbonate of soda, and salt and beat until a cookie dough is formed
- Add in your chocolate chips and beat till they're distributed well
- Weigh your cookies out into eight cookie dough balls - they're about 120g each
- Once they're rolled into balls, put your cookie dough in the freezer for at least 30 minutes, or in the fridge for an hour or so
- Whilst the cookie dough is chilling, preheat your oven to 180C Fan, or 200C regular! If your oven runs hot, go for 160C-170c.
- Take your cookies out of the freezer/fridge and put onto a lined baking tray. I put four cookies per tray
- Bake the cookies in the oven for 12-14 minutes. I don't personally flatten the cookies, as they flatten enough during baking - however, if you like flat cookies, flatten them a bit before baking.
- Once baked, leave them to cool on the tray for at least 30 minutes, as they will continue to bake whilst cooling
- ENJOY!
Notes
- These are best eaten on the day of baking, but can be revived by microwaving for 15-30 seconds, or putting into a hot oven for 2-3 minutes!
- You can freeze the raw cookie dough easily, and bake from frozen if you don't want to bake the entire batch!
- If you are baking straight from frozen after some time, I usually bake for the same 12-14 minutes, at the same temp, but an extra couple minutes won't hurt!
- Once baked, these will last for 4-5+ days!
- You can use any chocolate you fancy, I just love the combination of milk and dark chocolate!
- You can use chocolate bars chopped up instead of chocolate chips, just make sure the chunks aren't too big!
- If your oven runs hot you will want to reduce the temp slightly as mentioned in the method!
- If you prefer your cookies flatter, you can squish them down slightly before baking but I don't do this personally!
- If you want a lovely texture - you can add in 1 level tbsp of cornflour, and take out 25g of the flour!
- If you can't access one of the sugars, use all of the other one - i.e. all granulated, or all light brown sugar. Using other sugars can change the texture.
- If you want to make smaller cookies (60g) - they take about 9 minutes to bake!
ENJOY!
Find my other Traybake Recipes on my Recipes Page!
You can find me on:
Instagram
Facebook
Pinterest
Twitter
Youtube
J x
© Jane’s Patisserie. All images & content are copyright protected. Do not use my images without prior permission. If you want to republish this recipe, please re-write the recipe in your own words and credit me, or link back to this post for the recipe.
Another great recipe, made smaller ones and they all went.
Hi Jane,
I have made these cookies before & they are insanely delicious. Was hoping to make them today but was wondering if using lactose free spread would work instead of butter so that my lactose free son could enjoy them this time?
Yes that should be absolutely fine xx
Hi, Jane! I tried the exact recipe which turned out super good! But my cookies didn’t spread. I refrigerated it for 30 minutes. Is it okay to ask why is that? Thank you!
This can happen from over mixing, and also rolling the cookie balls too tightly. It’s worth flattening them slightly before baking next time x
Hi! Thanks for the awesome recipe! I made it twice this weekend! I baked for 12 mins at 392 def F but that’s all that was needed. They turned out very pale to light brown but really soft and thick! The bottoms were a deep brown color. They didn’t have that deeper brown color as the ones in your pics. Any suggestions? The flavor and texture is still great but yours are more appealing!
Do you recommend using softened butter and if so should it still be cool to the touch or room temperature?
Do you recommend The addition of corn flour or cornstarch? I’ve seen other recipes with cornstarch. Can I use that? Thanks!
Hiya – there are notes on the post about using cornflour if you want (which I recommend) and the colour difference could just be the difference in ingredients as I am in the UK. You can increase the temp slightly to get a darker colour, or use just a light brown sugar rather than part white! x
Hi! I’m thinking about adding some walnuts on this recipe. Can you suggest how many grams should i put? Thanks a lot! xx
You want 300g max of additions, so maybe like 200g chocolate chips, 100g walnuts!
Hi Jane
I have made this a few times now and it’s been great, but today I made them and they came out flat and burnt at the sides. Do you know why this could have happened?
Did any of the brands of ingredients change, how you mix it or type of oven etc?
My cookies turned out great but the only thing was that it was burn at the bottom. How do i prevent this from happening?
It could be the type of tray you are using, or your oven is on the wrong temp setting, as they shouldn’t burn within the time frame they should be in the oven. Lower the temperature, make sure the tray is lined! x
Would it be possible to replace the butter with oil in this recipe?
Personally I would stick to the butter!
Can I put them in for a bit less time to make them more doughy rather than fully baked?
You can do, but they are pretty soft when they come out anyway so you don’t want them to be raw.. x
Perfect cookie recipe. If I wanted to add cocoa powder to make it a triple chocolate one how much cocoa would you add?
Have a look at the triple chocolate version on my blog!!
I use your cookie recipe all the time and my friends and family love it! Although I’d love to try adapting the recipe for my vegan friends
Do you have any suggestions?
Thanks so much:)
Hi any help would still be appreciated…
I have a vegan version coming soon, but for now I don’t have a vegan one on my blog, sorry.
What would happen if you didn’t put cookie dough in the fridge/freezer before baking? Would it just change the texture of the cookies? X
Yes it would – they would probably spread more, and the texture would be different x
can I mix with a whisk if I have no stand mixer? and what do you mean by actual chocolate chips? do you have a brand recommendation? thank you
A beater is better than a whisk because the mixture can get caught in a whisk – and chocolate chips are just chocolate chips! There’s no particular brand better than another – but you can just chop up chocolate too!
These cookies are so delicious! I was wondering if this recipe would be suitable to create a cookie pie In a large tinfoil tray? Thanks xx
I would look at my cookie bar recipes as they are already technically giant cookies!
Hi Jane. I’ve just made these and followed the ingredients/instructions exactly as you’ve said. I baked them for 12-14 minutes but I found that they looked quite pale still and really soft! I popped them back in for another couple of minutes but still the same so I’ve left them out like you said for 30 mins to carry on cooking. Does this sound right to you? I’ve not baked cookies before so not sure if this is how they are. Any tips would be great 🙂 They smell amazing though!
The timings are definitely correct – so they may be a bit harder once they cool with the extra time, but otherwise they should be fine. The colours can change depending on sugars, or even just the oven, but they will be really soft as they do need the cooling time to continue to bake outside of the oven. x
Hands down best cookie recipe ever! I never knew about the cult-like NY cookies until I saw your recipe and did some reading about them! After making them-wow! I never knew what I was missing! Recipe was clear, easy, and super delicious! I used my scale to make the right measurements as I am in the US, and it all came together perfectly! Thank you for sharing it!