Rainbow Cake!

*This post may contain affiliate links. Please see my disclosure for more details!*
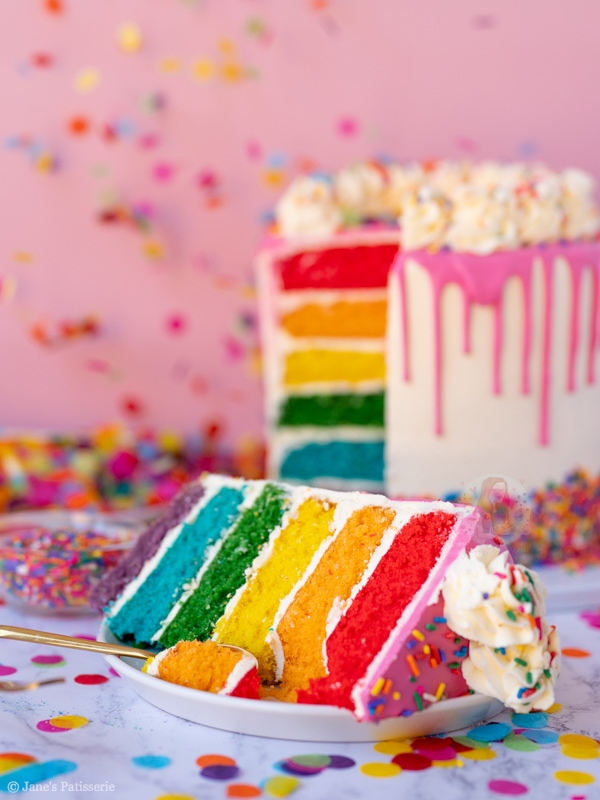
A delicious and bright rainbow cake with vanilla buttercream frosting, a pink drip and sprinkles!
Rainbow cake
Oh hellooo most requested recipe OF ALL TIME. I am not even joking, this recipe has been requested over and over again and I am ~finally~ posting it on to my blog! It’s taken a fair old time as I wanted to get it right!
I love all things cake, we all know this, but a rainbow cake is something else. The absolutely insanely bright colours, the sweet taste, and all things cute take it to a different level entirely! It is just glorious.
Disclaimer
So… I will say from the beginning that this recipe uses lots and lots of ingredients, and it is a humongous cake! Like, its 6 layers of cake, and all the buttercream in-between the layers, and all the decor on top!
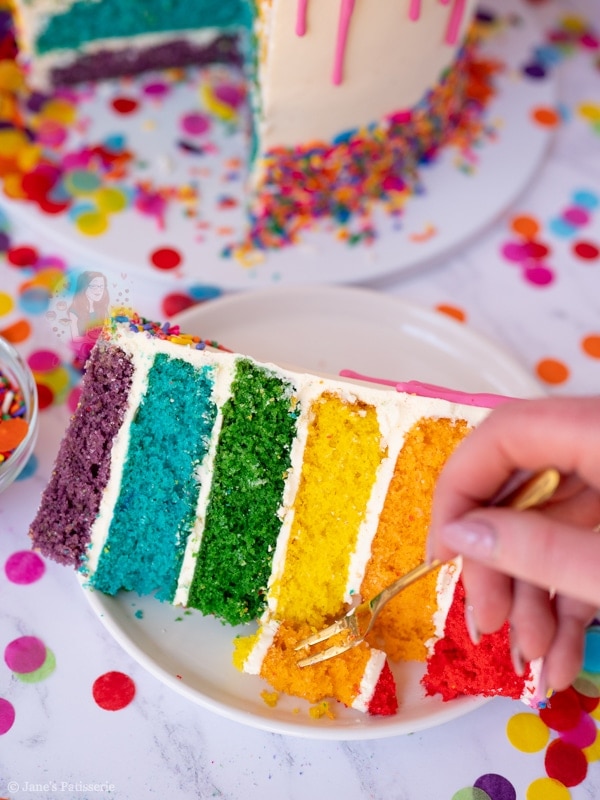
And I will also say from the beginning… YES I KNOW THE RAINBOW HAS SEVEN COLOURS. This cake, is only six. When baking this cake, I just find making 6 colours so much easier, and you can see the obvious differences. I am not bothered about the seventh!
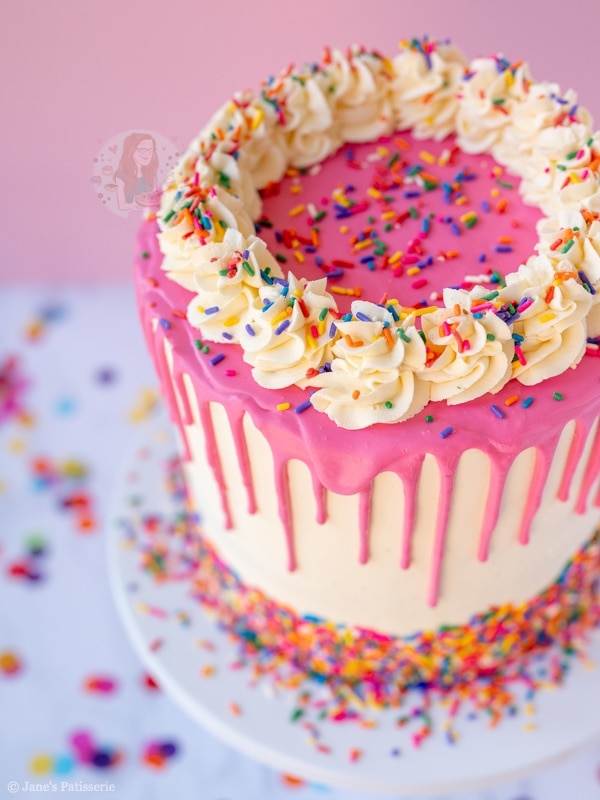
Red, orange, yellow, green, blue and purple… the main colours you need in your life. I did slightly compensate for the lack of seven colours by adding in a pink drip on the outside but we will get to that later.

Sponge
For this cake, I did make probably the biggest one tier cake ever. It’s about 8-9” in height, and uses so many ingredients. Because it is a six layer cake I decided to make it in two batches. So three layers at a time, so therefore you still only need three tins!
I made the cake a 600g mix, so that it’s super easy to split into two batches. The best way is to weigh 5-6 medium eggs, and get as close to 300g as you can, for example 312g, and then match the butter, sugar and flour to that weight.


Colour
Then, you mix it all together like normal, and then split into three bowls. It doesn’t matter which colours you do first, but I did red, orange, and yellow together, and then green, blue and purple.
The oven temperature is a bit lower than normal, as I don’t want the sponges to brown too much. This also comes somewhat from the brands of colours that you use! Red food colouring, orange food colouring, yellow food colouring, green food colouring, blue food colouring and purple food colouring. for the sponge mixtures!


Buttercream
Once my sponges are baked, I leave them to cool completely and freeze them wrapped in clingfilm over night so that they are easier to decorate the next day – but this bit is completely optional of course!!
For the buttercream, you do use 750g unsalted butter and 1500g icing sugar, which technically is a little obscene but the amount of servings from this cake is huge so please don’t be a negative Nelly about the sugar content!
I make my buttercream like normal by beating room temperature unsalted butter on its own for several minutes to make it really loose and supple, and then I gradually add in the icing sugar! I make sure to beat this for quite a long time.


White food colouring
You can do several methods to get whiter buttercream, by beating the butter on its own for a lot longer, or using a smidge of purple buttercream to counter act the yellow, but I love using this white food colouring! It looks amazing on my white chocolate drip cake and I haven’t looked back since.
I add a little at a time and keep beating it very well to make sure its really white and bright to contrast against the colours of the sponge! Making the buttercream whiter is completely optional of course though.


Decoration
When I am starting to decorate the cake, I dollop a few tablespoons of buttercream onto each sponge and smooth over, making sure to get the order of the colours in the sponges correct of course…!
Once you have layered each sponge you need to do a crumb coat by using as little buttercream as possible around the edges to seal in the spare crumbs from the sponges! I then chill the cake for a while to firm it up before adding another layer of buttercream on top.
I use a large metal scraper to decorate the sides of the cake, and a small angled spatula to also help cover the sponges – and its much easier and you are going to get a smoother finish using these as well!

Sprinkles and drip
Just as I have finished the buttercream I carefully press in some rainbow sprinkles to the bottom of the cake for a bit of colour and I just love the design – be warned, sprinkles will fall off at this point so beware! After this, I chill the cake again!
For the pink drip, I use white chocolate ganache with this pink food colouring added in. Its a super bright colour so you don’t need add too much and it means you get the best coloured drip ever!
Finishing touches and tips
I then pipe on the leftover buttercream and add on some more rainbow sprinkles and the best cake ever is finished! I am in love with the sponges and how bright and pretty it is – but the key point to make, YOU NEED TO USE GOOD QUALITY COLOURS.
Using supermarket colourings, will NOT work as well, or maybe at all… so please don’t waste ingredients by doing this! The colourings are 100% worth the investment as they last for so long! Any questions, leave them below in the comments and happy baking! x


Rainbow Cake!
Ingredients
Cake
- 600 g eggs (weigh eggs in shell) (about 10-12 medium eggs)
- 600* g unsalted butter
- 600* g caster sugar
- 600* g self raising flour
- 1/2 tsp red, orange, yellow, green, blue, purple food cololuring
Buttercream
- 750 g unsalted butter (room temp, not stork)
- 1500 g icing sugar
- 1 tsp vanilla extract
- 1-2 tsp white food colouring
Decoration
- 180 g white chocolate
- 75 ml double cream
- 1/2 tsp pink food colouring
- Rainbow sprinkles
Instructions
For the Cake
- Preheat your oven to 160ºC/140ºC fan and line three 8"/20cm springform tins with parchment paper and leave to the side for now.
- Weigh 5-6 medium eggs in their shells and get as close to 300g as possible (e.g. 312g)
- Then add 312g of butter and caster sugar to a bowl and beat until light and fluffy.
- Add in the eggs, and 312g of self raising flour and beat again until smooth.
- Bake the cakes in the oven for 30 minutes (or until baked - test with a skewer).
- Once baked, leave the cakes to cool in the tin for 10 minutes before removing to a wire rack to cool fully.
- (You can wrap the sponges in clingfilm once they have cooled and freeze over night to make decoratin easier but this is optional!)
Buttercream
- Once all of your cakes are cooled, you can make the buttercream.
- Beat the room temperature unsalted butter on its own for a few minutes to soften it and make it supple.
- Gradually add the icing sugar beating very well each time until its all mixed in.
- Keep beating and add the white food colouring and vanilla extract and beat for a few minutes.
Buttercream Decoration
- Using a 10" cake board, add your first sponge. I start with purple as its the bottom colour.
- Add a couple tablespoons of the buttercream on to the sponge and smooth over. Repeat this with blue sponge, then green, yellow, orange and finally red at the top.
- Using a small amount of buttercream, smooth over the sides of the cakes and fill in any gaps and create a crumb coat.
- Refrigerate or freeze the cake on the board for an hour or so to chill and firm to make the next stage of decorating easier.
- Once chilled, add on lots more buttercream around the sides of the cake with a small angled spatula, and smooth over using a large metal scraper until the sides of the cake are smooth like in the photos!
- Carefully press some of the sprinkles into the bottom of the cake using the palm of your hand to create the sprinkle effect!
- Once this has been done, refrigerate again whilst you make the drip!
Decoration
- Add the white chocolate and double cream to a bowl and heat in a microwave in short 10 second bursts stiring well each time.
- Once melted and combined, add the pink food colouring and mix until smooth!
- Add the pink ganache to a piping bag and carefully cut off the end and drip down the sides of the cake. The more you push over the side of the cake with the piping bag, the further it will drip!
- Add the leftover buttercream to a piping bag with your favourite piping tip and pipe swirls of buttercream onto the top of the cake (like I have done in the photos)
- Finally sprinkle on some etra sprinkles and leave the cake to set in the fridge fully.
- In the hot weather I store the cake in the fridge until it has been portioned.
Notes
- This cake lasts 4-5+ days once made!
- The colours that you use and what order are up to you, this recipe is just how I did it! You can swap up the order or whatever you prefer!
- You should avoid supermarket colours as they are not strong enough.
- In this recipe use:
ENJOY!
Find my other Recipes on my Recipes Page!
You can find me on:
Instagram
Facebook
Pinterest
Twitter
Youtube
J x
© Jane’s Patisserie. All images & content are copyright protected. Do not use my images without prior permission. If you want to republish this recipe, please re-write the recipe in your own words and credit me, or link back to this post for the recipe.
Hi Jane
Would really love to try out this recipe,but I just want to check first after mixing the butter and sugar ,do you add the eggs 1 at a time or all together ? With the flour ?
Thanks xx
I add all the eggs in with all the flour – if I do it one by one I will always say in the method x
Hi Jane, I am planning to do this tomorrow and Saturday for Sunday’s party (to give me much time to make it), just wondering if I can use the Ruby chocolate instead of white chocolate? Will that be similar measurements or ratio? Thank you.
Hi Jane! Did you use the same 8inch cake tins that you’ve linked in previous recipes for this cake? Thank you! X
Would you ever put jam in a couple of the layers under the buttercream or is that a no no?
You can, but its a risk where the cake is so tall that it might slide about a bit if you aren’t confident! x
Hello Jane, firstly thank-you very much for sharing your recipes ❤
I am making the rainbow cake but had to look back as I thought I had something wrong. Your amounts are 600g but then it goes to half the amount lol. Just thought I would tell you in case you didn’t know xx
On the post it explains that it is because you only make half the cake at a time – so the totals are 600g roughly, but for the first half you only use 300g x
Hi Jane!
Could you please link the tins you used for the recipe? Are they the same ones linked in others such as the raspberry ripple cake? Hoping to make this in a few weeks for my boys 2nd birthday. Thank you for all your bakes, they have never failed and always taste amazing xx
Yes I did – but I also have a great blog post on all cake tins I use!! x
Hi Jane, I’m planning on making this cake for my daughter’s 2nd birthday next week. I have a couple of questions; do you trim yourself sponges before layering? And presumably it’s ok to keep sponges frozen for a few days before assembling and decorating if trying to get ahead?
Hiya! I did not trim them (other than the purple one ever so slightly as it caught) and yes you can freeze for a few days easily! x
Hi Jane, thanks so much for sharing this recipe! I’m planning to make for my daughters birthday cake in a couple of weeks but wondered if you think it would be okay to use icing (only because I have some Hey Duggee figures I’m making to put on the cake) rather than buttercream? And would I still be okay to refrigerate the cake once decorated if it’s hot with icing
Thanks so much!
I personally don’t refrigerate cakes with fondant icing on as it can make it sticky x
Hi Jane,
Do I need to trim the edges of the cakes before I crumb coat?or just leave it as it is out of oven?sorry I’m not great at the decorating part 🤣🙈
No you don’t need to x
Thanks for sharing, this cake looks amazing, perfect for a party 🙂
Hi, I am hoping to make this cake for my daughter’s birthday next week but I was wondering whether this recipe would be suitable to make into a pinata cake or are the layers too thin to cut a hole in the centre of? Thanks!
Hi! I’m hoping to make this cake for my daughters birthday next week. Could I turn this into a piñata cake or would the sponges be too thin to cut a hole in & then stack?
Thanks!
It would be worth chilling the sponges before cutting the hole out so they are easier to manoeuvre as they are relatively thin xx
When you say to match the ingredients eg 312g – is that
312 eggs
312 caster sugar
312 butter
312 SR flour?
Sorry I just don’t want to make all the effort to then ruin by silly mistake!
Also I don’t bake often but am hoping to do this for my daughters birthday. Would you say this recipe is ok for beginners?
Yep exactly that. If 312g is the weight of the eggs in the shells, you match the weight with the butter sugar and flour!
I am NO baker, but I made this for my daughter’s birthday this weekend and it was SO GOOD! When she cut out the first slice there was a collective “WOW” from her friends . . . I used the exact colours as recommended and they came out so bright and fabulous, especially against the whitened buttercream. I was so worried that it wouldn’t look good because it’s my first attempt at anything like this, but it was honestly so straightforward and just took a little time.
I struggled to figure out how to press the sprinkles onto the bottom with my hand so in the end I put them on the board around the bottom of the cake then lifted them with a butter knife and pressed them on to the sides of the cake.
Thank you so much Jane for your recipes – I’m a hero to my daughter and her friends now 😉
Hi Helen,please can I ask what whitening you used as link isn’t working many thanks 😊
Gorgeous cake, I made for my boys birthday, used supermarket gel and came out better than expected but not quite as vibrant, opted for blue drip. One thing I could note is make sure you leave enough time for the drip to cool before putting the buttercream on.. I didn’t and unfortunately had some melting casualties haha fixed with a chill in the fridge.
Ahh maybe your ganache was thinner than mine – that can depend on the colouring as well! x
Hello, I’m just wondering if you froze the cake before decorating or not. I’m wanting to make this for my little boys birthday next week. But can’t decide whether to freeze it once it’s been baked. As I’m terrible at decorating