Chocolate Drip Cake – Back to Basics

*This post may contain affiliate links. Please see my disclosure for more details!*
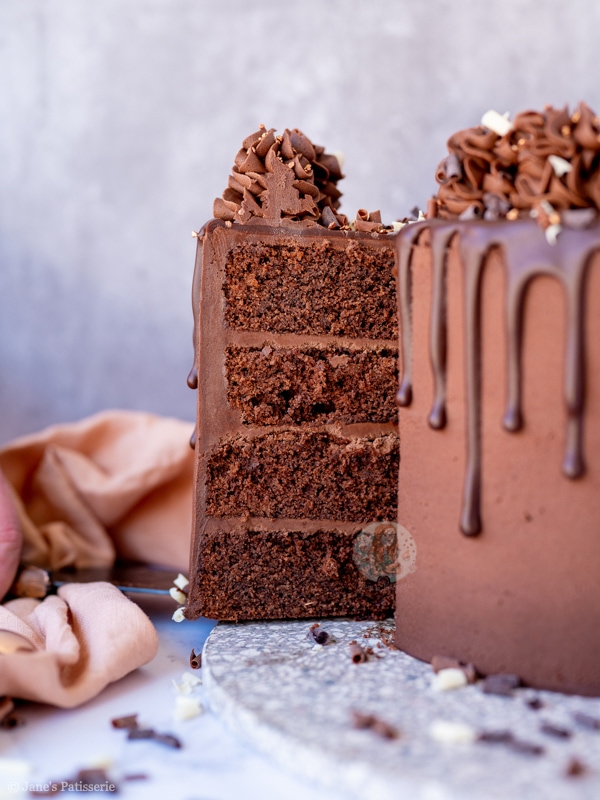
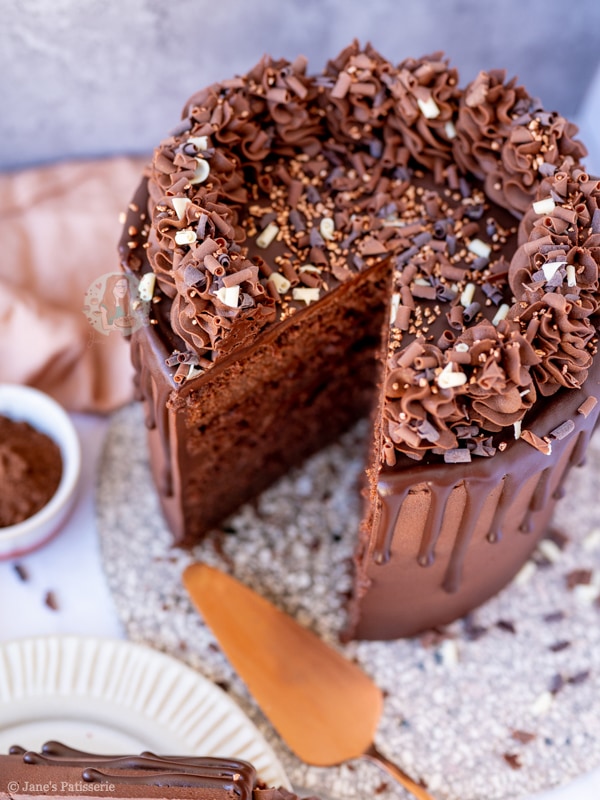
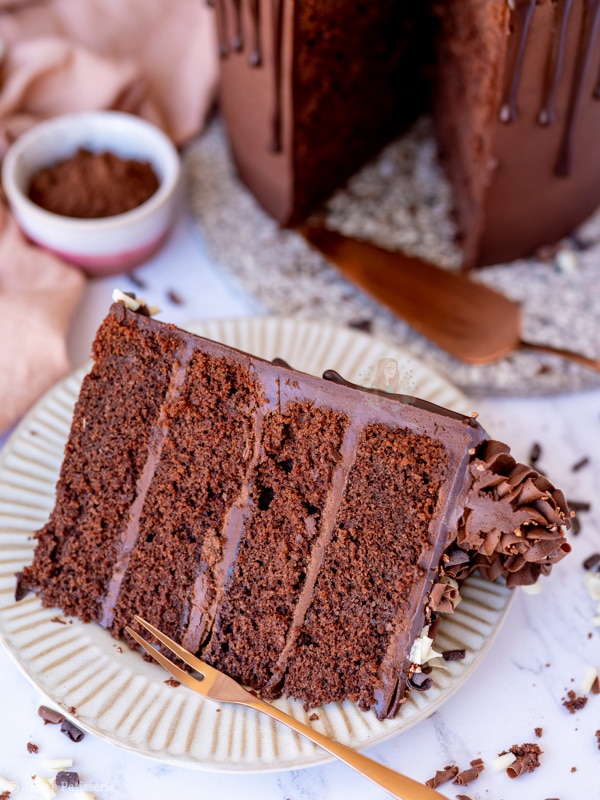
A four-layer chocolate drip cake with chocolate sponges, chocolate buttercream frosting and more – a part of my back to basics blog series!
Drip cakes
So it was a while before I realised that I had never actually posted a basic chocolate drip cake on my blog… I feel like this is a bit of an error because it’s something people always ask for, I just never actually posted one!
I have my white chocolate drip cake on my blog – which is definitely one of my favourites – and I have my two-tier celebration cake recipe – but I wanted to be able to just write a full back to basics post on a normal chocolate drip cake.
It’s been a while since I did a back to basics post, and I thought this one would be ideal! I have gone into a fair amount of detail on other drip cake posts such as my mini egg drip cake (with a YouTube video to go alongside), but I wanted to write everything I could think of for this one.
Cake
The cake itself is a basic chocolate cake – this is because I find it much sturdier to work with compared to a chocolate fudge cake sponge. A simple chocolate Victoria sponge recipe is the dream for me!
I used a 500g cake mixture for this chocolate drip cake as I wanted to make it a four-layer sponge – I usually bake these into two deep 8” tins as they work perfectly for it, and then halve each one to make the four layers!
To make a 500g mix I tend to weigh my eggs, in their shells, into a bowl and weigh them to as close to 500g as possible. Say it’s 511g, I then match the rest of the ingredients to this weight. Because it’s chocolate, the cocoa powder stays the same to make it easier!
Below I will put 500g anyway, but as close to 500g is ideal. It also makes it easier if you want to be able to use large eggs, or even extra-large – you just want the total weight in the shell. Then, use the unsalted butter, sugar, flour and cocoa powder to make up the rest of the sponge!
Once baked, I tend to bake on a slightly lower temp for longer for deeper cakes, you leave them to chill fully. I then wrap the sponges in clingfilm twice, and foil, and then freeze the cakes for at least one night. This is optional, but I find decorating frozen sponges so much easier!


Sugar syrup
If you normally find basic chocolate cakes dry, I often believe this is because they are overbaked. However, you can make a simple sugar syrup of 150g caster sugar, and 150ml water – dissolved together in a pan and cooled.
When you then halve the sponges, you can drizzle the sugar syrup over the sponges and decorate the cake like normal – it just makes sure the cake keeps moisture! And don’t worry, it doesn’t taste massively sweet.

Buttercream
For the buttercream on my chocolate drip cake, it is a basic American chocolate buttercream frosting – unsalted block butter (the kind wrapped in foil), with icing sugar and cocoa powder! It may be quite sweet for some, so you can use slightly salted butter if you fancy – but I love the sweetness with 100% cocoa powder.
The reason I like using a basic American buttercream frosting is that it is sturdy – hot weather can change this, but block butter (NEVER A SPREAD!), icing sugar and cocoa powder are ideal. It’s best to avoid adding any liquid if you can help it other than a flavouring so that it’s super sturdy!
I use this buttercream to fill the sponges, crumb coat, decorate the sides and then also swirl on the top – it makes it really easy and straightforward. You can of course change the flavours, but this is meant to be a basic chocolate drip cake so I have rolled with it!


Decoration
When you want to start decorating the cake, I always use a cake board that is 2” bigger than the cake – so for this 8” cake, I use a 10” board! You add a small dab of buttercream to the board and put the first sponge down.
I then add a couple of tablespoons of buttercream on each sponge as I go, and smooth with a small angled spatula – you just need enough to give it flavour but you don’t want masses as there will be so much on the outside as well.
Once you’ve put buttercream between all the layers you want to add a small amount of buttercream around the sides of the cake and on top and seal in any crumbs – chilling the sponge after this makes it set and then easier to decorate after.
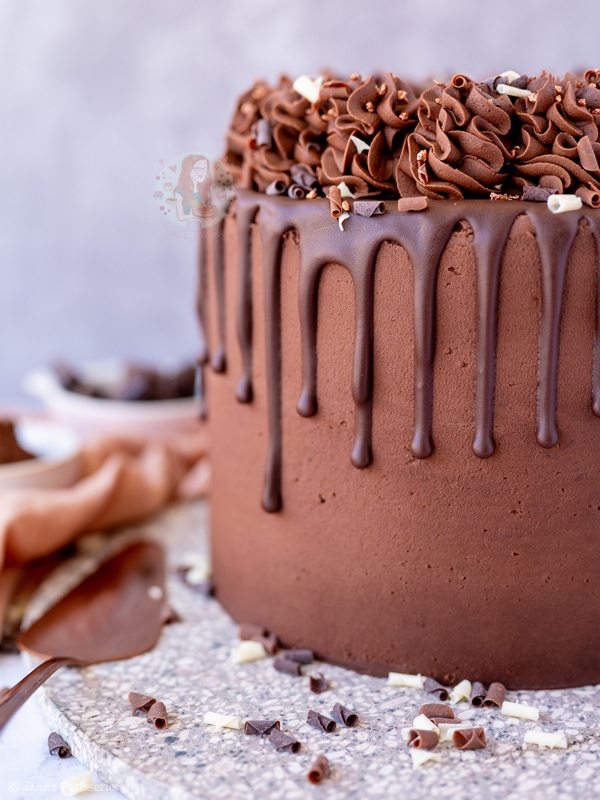
I use a large metal scraper for the crumb coat and then also the buttercream decoration on the sides. You just want to spread enough on the sides of the cake with the small angled spatula again so you can then smooth it around with the large metal scraper.

You end up scraping off a lot of buttercream, so it’s best to pile a lot on so that when you smooth the cake over it ends up with an even finish. It works the same with colours buttercream, ganache etc!
Once you have a smooth finish, you can also go around again with the metal scraper that you have heated – run the hot tap onto the scraper and then quickly dry it off, and smooth around the cake. This is completely optional but it leaves it smooth and perfect!


Ganache
I then chill the cake again whilst I make the ganache – it’s the same ganache again as in my mini egg drip cake so it’s a mix of dark chocolate and milk chocolate to make the perfect flavour and thickness with double cream.
I use a small disposable piping bag to do the drip with as you can just snip off a small part of the bag to do the drip. You want to place the edge of the piping bag on the edge of the cake and gently squeeze the bag – the more you squeeze the more it will drip so I vary them! This then sets again in the fridge.
Final touches
You can then pipe on any leftover buttercream with your favourite piping tip (I use this one as per usual) and then sprinkle on your favourite sprinkles or whatever!
I hope this post for my chocolate drip cake made as much sense as I could in writing – you can check out my YouTube channel for other videos on other recipes such as my mini egg drip cake but unfortunately there is no video for this recipe. Enjoy! x


Chocolate Drip Cake!
Ingredients
Cake
- 500 g unsalted butter
- 500 g light brown soft sugar
- 9-10 medium eggs
- 400 g self raising flour
- 100 g cocoa powder
- 1 tsp vanilla extract
Buttercream
- 500 g unsalted butter (room temp)
- 900 g icing sugar
- 100 g cocoa powder
Ganache
- 75 g dark chocolate
- 75 g milk chocolate
- 150 ml double cream
Decoration
- Spare buttercream
- Sprinkles
Instructions
For the Cake
- Preheat your oven to 170ºC/150ºC Fan, and line two 8"/20cm cake tins with baking parchment.
- In a stand mixer, or a large bowl, beat together the unsalted butter and light brown soft sugar until light and fluffy.
- Add in the eggs, self raising flour, cocoa powder and vanilla extract and beat again until combined well.
- Split the mixture between the two tins.
- Bake the cakes in the oven for 50-60 minutes, or until baked through - check with a skewer to make sure they're done!
- Leave the cakes to cool in the tins for 10 minutes, and then take out and leave to cool fully on a wire rack!
For the Buttercream
- Beat the unsalted butter on its own for minute or two, to soften it and loosen it.
- Add in the icing sugar and cocoa powder and beat well until smooth and fluffy.
For the Decoration
- Split the two cakes into four layers in total.
- Put the first cake onto a cake board of plate. Add a little buttercream and spread. Repeat with the second and third sponges. Add the final sponge on top.
- Using a small amount of buttercream, spread and smooth around the cake sides and top for a crumb coat and add to the fridge for at least 30 minutes.
- Once set, add more buttercream onto the tops and sides of the cake, and smooth around covering the cake completely in buttercream.
- I add the buttercream on using a small angled spatula, and smoothed around the edge with the large metal scraper! You need to make sure there is more buttercream on the sides of the cake than you need, as some will be removed as you smooth it over.
- Once finished, put the cake in the fridge again for at least 30 minutes.
Ganache
- Add the dark chocolate, milk chocolate and double cream to a bowl, and microwave until smooth.
- Using a small piping bag or a teaspoon, drip the ganache down the sides of the cake. The more you push over the edge, the further the drip will fall.
- Set the cake in the fridge again for 30 minutes!
- Finish the cake off by piping on any leftover buttercream, and adding any sprinkles and anything you like!
Notes
- This cake lasts for 3-4 days at room temperature!
- For this Cake I used (affiliate links):
- I used two of these 8" cake tins
- These piping bags for the buttercream
- These piping bags for the drip
- This cake turntable to make decoration easier
- I used this piping tip for the buttercream!
- You can use half of the recipe to make a two-layer cake - half the sponge recipe, and half the buttercream!
ENJOY!
Find my other Recipes on my Recipes Page!
You can find me on:
Instagram
Facebook
Pinterest
Twitter
Youtube
J x
© Jane’s Patisserie. All images & content are copyright protected. Do not use my images without prior permission. If you want to republish this recipe, please re-write the recipe in your own words and credit me, or link back to this post for the recipe.
We all love this recipe as a family, and all of our friends we have shared it with too! So much so that I have decided to make this as one of our Christmas deserts this year! Only thing is, I’m unsure how to keep it fresh since it worked better for me to make it 3 days early (it was still moist after a week last time). The only thing I have done is the drip because of the dates on the double cream. Would you suggest this cake needs to be kept in the fridge, or would this be okay at room temp? Xx
Hiya! I would keep it in the fridge – hope this helps! x
Hello, I was wondering if I used 600g unsalted butter 600g light brown sugar, 12 eggs, 480g self raising flour, 120g cocoa powder and 1tsp vanilla extract, would this be enough to use in 2 x 9inch tins to then be able to split them into 4 layers when cooked? Would you say about 60-70mins for cooking time?
I hope you can respond, I’m doing my daughter’s birthday cake I only have 9in tins.
Thank you
Hi Jane,
I’d like to make this cake for my partner’s 30th bday and wondered if I could add coffee in the cake mixture to make it moist.
Thank you!:)
Hiya! For a moist chocolate cake, take a look at the chocolate fudge cake recipe! Hope this helps! x
Please could you tell me quantities for a 10 inch tin and whether I would still bake it in 3 tins or if I could split in two and for how long to bake. Thank you
Hi,
I’m planning on making this cake for my sons birthday, but would like to do it with a black buttercream. Would it still work if I made the chocolate buttercream and then added in the sugarflair extra black gel? Thanks x
Yes that should be perfect! Enjoy! x
Hi, i want to make this for part of a wedding cake using 3x10inch tins. could you please tell me the quantity i would need to use to divide between the three tins. Thank you.
I am wanting to make 6” 4 layer cake, how do I scale this recipe down please?
I’m making a galaxy chocolate cake for a birthday. Would this work with galaxy butter cream & galaxy ganache?
Thank you x
Yes absolutely, sounds yummy! x
Hi! I’m going to use this recipe for my daughters birthday cake but unsure about the syrup. I’m making the sponges today and freezing ready to decorate on Friday. When am
I best adding the syrup? Before freezing or after? And if after, do I need to wait until the sponges have defrosted?
Many thanks 😊
Hiya! This recipe has no syrup – so I am unsure what you are referring to! x
Hi Jane,
Would the cake work with stork or is it better to have unsalted butter?
Thanks!
Hiya! Either will work for this cake – just be sure to use block butter for the buttercream! Hope this helps! x
Hi Jane, I want to try this cake recipe but abit confused if I should use 9 or 10 eggs? I’m going to make it in an 8 inch cake tin! Please help x
Hiya! Weigh the eggs in their shells to match the other ingredients as close as possible! Hope this helps! x
Hi, I’ve followed the instructions and my cakes have both been in for 60 minutes but are not cooked in the middle – please help
Hiya! It would be worth checking your oven temp and cake tin sizes – they can both vary! Hope this helps! x
Hi..what would the cooking time be for half the recipe aand 2 tier please ?
If you make half you can bake into one tin, so the timings remain the same x
HELP !!
Hi Jane,
Help please! I want to make this cake but use 3 20cm 8 inch tins.
What would the measurements for the ingredients be please for this.
Please HELP!!!
I would say half the recipe again for the actual cake, not sure for the decoration but you could always half again for this, just may be a bit too much.
Hi! I’ve made this cake 3 times now all to reviews!! I want to make it into a sheet cake for a number 7 cake I’m doing…would I need to alter the cooking times etc?? I have no idea because I never bake sheet cakes but I really want to use this recipe as it’s divine!!
Hi Jane,
u wanted to make this cake but without the dripping as I am going to put fondont over it. However I only have 3 of the 8 inch 20 cm cake tins that you use for your salted carmel cake. How would I adjust rhe measurements and baking time for the either 2 or all 3 of these cake tins please?
Hi Jane,
I am really nervous about freezing a cake, I’ve never done that before.
I want to make the cake for Thursday, if I cake today Tuesday and freeze it. Will I be ok to get it out of the freezer Thursday morning and then decorate? Would I need to to put a ‘syrup’ on it? How long do I have to wait for it to defrost to decorate and eat
Thanks xx
Hi Jane,
I want to make this for my friend’s 30th birthday. I’m a bit nervous about splitting Sponges in 2 to make 4 layers even with the cake leveler. So could I do with 3 tins and they’ll obviously be deeper layers?
Thank you x
Yes absolutely, however the baking time will change – so keep an eye out! Hope this helps! x