Jane's Patisserie » Recipes » Best Baking Recipes » Bloody Halloween Cake!
Bloody Halloween Cake!

*This post may contain affiliate links. Please see my disclosure for more details!*
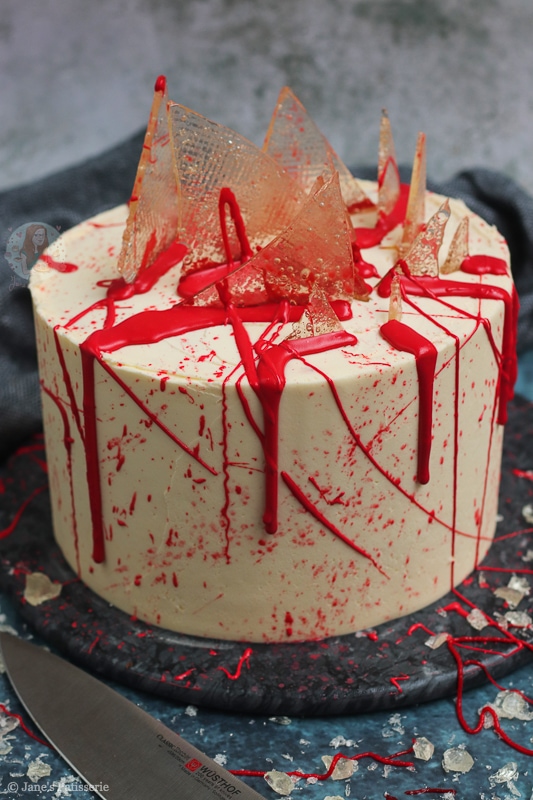
A delicious vanilla and chocolate bloody halloween cake – with sugary glass shards, a red ganache bloody drip, and more scarily delicious treats!
Halloween baking
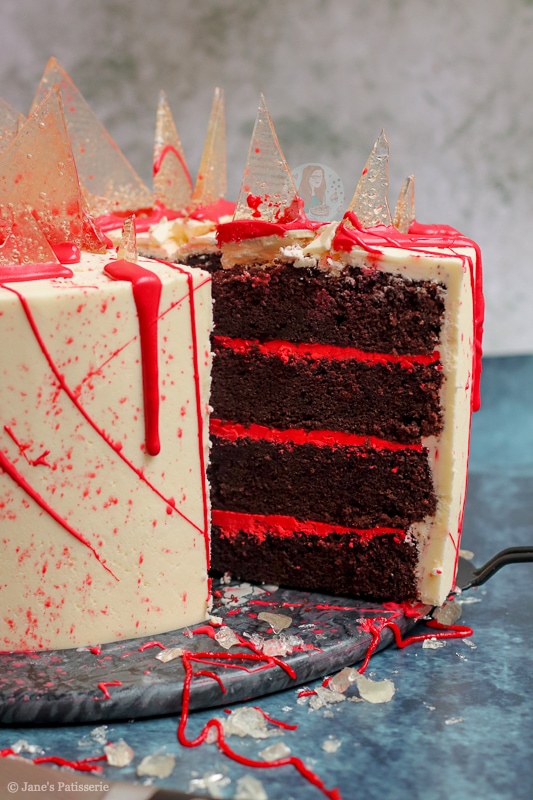
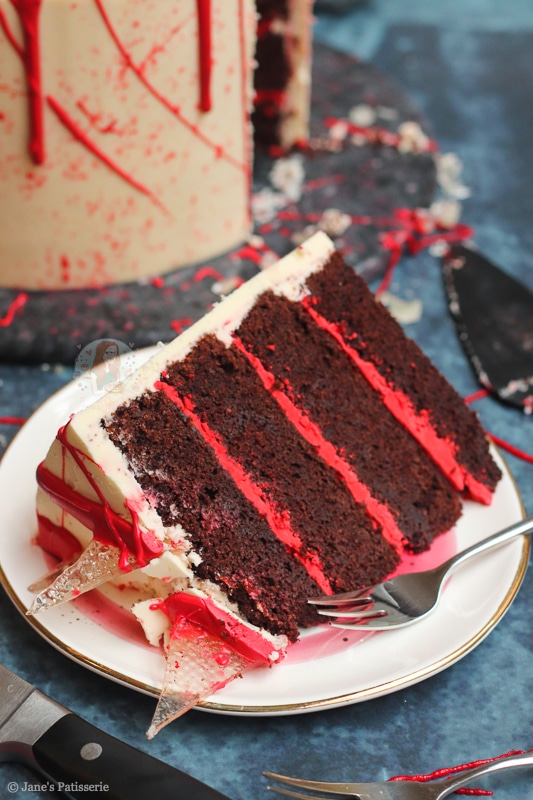
So… can I comfortably say this bloody Halloween cake is halloween enough?! It is definitely a ‘scary’ bake in my eyes, with shards of glass (sweets), blood (red ganache), and a bloody buttercream frosting (red vanilla buttercream) inside, with a deliciously spooky dirt cake (chocolate sponge).
Yes I know, in reality it does just sound quite tasty… and it really was! I am a little proud of it I won’t lie. I had far too much fun making this bake, and I just wanted to enjoy a little spookiness in my kitchen.
What I hadn’t planned though?! Getting red ganache on the ceiling of my kitchen. Yeah, make sure if you flick the ‘blood’ onto the bake like I did, that you do it with more care and attention, and not whilst singing very loudly along to the radio. Oops.
Bloody Halloween cake
But anyway… the bake. I wanted to do something relatively simple, so standard bakes are involved. A basic chocolate Victoria sponge style bake, a vanilla buttercream frosting, and ganache! This bake is to show simple recipes can create something really fun!
I used a chocolate cake, as I had already made it. You can of course colour this red, or even make it into a red velvet sponge like in my spooky spider web cake if you preferred. I however, just love chocolate cake!

Buttercream and colouring
I did a simple buttercream frosting for the insides of the bloody Halloween cake, as well as the outside. I made the inside buttercream red by using this strong red food colouring, and then coloured the rest of the buttercream white using this white food colouring.
I wanted the contrasting colours to really pop for his cake and it is everything I wanted it to look like! I really do recommend investing in the better food colouring – some supermarket colours don’t work as well and the better colours really are an investment. Mine last good while and being in mind how much I use them, its good going!

White buttercream
You can however make buttercream naturally whiter in colour, by just mixing the butter like crazy. I beat the room temperature unsalted block butter (not a spread of any sort!) on it’s own for about five minutes. This makes it super supple, and lightens the colour naturally!
Adding the icing sugar in, and beating again for about five minutes creates the perfect buttercream. Filling this bloody Halloween cake requires a couple of tablespoons per layer, and then the rest of the cake is covered in white. All optional of course, but it fit the theme of the bake perfectly in my eyes.
I use a large metal scraper to create the crisp white outside edge of the cake – and a turntable. These tools are a must to get the best affect on the bake! You can smooth it around to perfection. Top tip though, you can run the metal scraper under the hot tap for a while, dry it off quickly, and then smooth around the cake one more time to get the best finish.

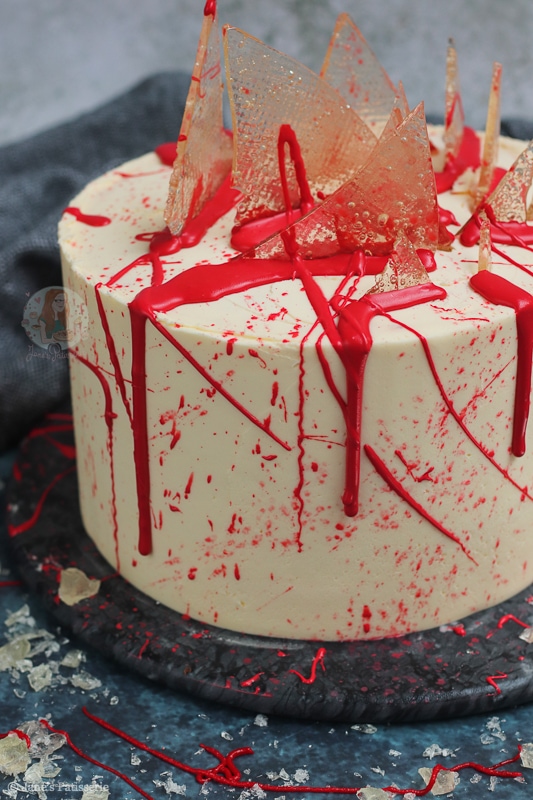
Glass shards
For the smashed glass… I used clear sweets! These were a tad harder to find in my local supermarkets as I thought they may be… why is there a shortage?! But in the end, clear mint sweets won. I didn’t want to use coloured hard sweets as I wanted it to look as ‘smashed glass’ like as possible.
It may sound a weird to those of you who have never done this method before – but you honestly just get the solid clear sweets, crush them (I used a pestle and mortar) and sprinkle them onto a lined baking tray – making sure it’s an even coverage of crushed sweet. Then, in the oven for 5 minutes until melted, and leave it to cool.
I used the end of a rolling pin to very lightly tap in the middle of the hardened melted sweets, and it created the shards! Obviously though, these can actually be quite sharp… so be careful guys!


Blood ganache
For the ‘blood’ I used white chocolate ganache, which I coloured red. I used the same red food colouring that I used in the buttercream earlier on which made it much easier. If you find your ganache is a little thick, add a smidge more double cream.
I carefully piped some of the red ganache onto the bloody halloween cake around where the glass was inserted in – and then carefully dripped it down the side of the cake – I then got a pastry brush, added a little red ganache, and flicked the end until it left ‘splatter’ marks.

Decoration
All of this decoration is completely optional, but I love it – I had so much fun with this bake, and if you have a go, I hope you do too! I found it was the perfect Halloween centrepiece.
You can switch up colours on your decoration or buttercream if you would prefer – maybe even a different coloured ganache. The choice is yours! Any questions, leave them in the comments below. Jane x


Bloody Halloween Cake!
A delicious vanilla and chocolate bloody halloween cake - with sugary glass shards, a red ganache bloody drip, and more scarily delicious treats!
Print
Pin
Rate
Servings: 18 People
Ingredients
Cake
- 500 g unsalted butter
- 500 g light brown soft sugar
- 9-10 medium eggs
- 400 g self raising flour
- 100 g cocoa powder
- 1 tsp vanilla extract
Buttercream
- 500 g unsalted butter (room temp)
- 1000 g icing sugar
- 1 tsp vanilla extract
- 1/2 tsp red food colouring
- 1 tsp white food colouring
Ganache
- 150 g white chocolate
- 50 ml double cream
- 1 tsp red food colouring
Decoration
- 150 g clear hard sweets
Instructions
Cake
- Preheat your oven to 170ºC/150ºC fan, and line two 8"/20cm cake tins with baking parchment.
- In a stand mixer, or a large bowl, beat together the unsalted butter and light brown soft sugar until light and fluffy.
- Add in the eggs, self raising flour, cocoa powder and vanilla extract and beat again until combined well.
- Split the mixture between the two tins.
- Bake the cakes in the oven for 50-60 minutes, or until baked through - check with a skewer to make sure they're done!
- Leave the cakes to cool in the tins for 10 minutes, and then take out and leave to cool fully on a wire rack!
Buttercream
- Beat the unsalted butter on its own for five minutes, to soften it and loosen it.
- Add in the icing sugar and vanilla extract and beat well until smooth and fluffy.
- Remove 400g of the buttercream, and colour this using a red food colouring to a deep red colour.
- If needed, colour the rest of the buttercream with the white food colouring.
Decorationg
- Split the two cakes into four layers in total.
- Put the first cake onto a cake board of plate. Add a third of the red buttercream and spread. Repeat with the second and third sponges. Add the final sponge on top.
- Using a small amount of the white buttercream, spread and smooth around the cake sides and top for a crumb coat and add to the fridge for at least 30 minutes.
- Once set, add more buttercream onto the tops and sides of the cake, and smooth around covering the cake completely in buttercream.
- I add the buttercream on using a small angled spatula, and smoothed around the edge with the large metal scraper! You need to make sure there is more buttercream on the sides of the cake than you need, as some will be removed as you smooth it over.
- Once finished, put the cake in the fridge again for at least 30 minutes.
- Whilst the cake is chilling, heat the oven to 180ºC/160ºC fan, and line a large tray with parchment paper.
- Carefully crush the clear sweets to a fine crumb, and pour onto the lined tray in an even spread - and place in the oven for 5 minutes.
- Once the sweets have melted, remove the tray from the oven and leave to cool whilst the cake is setting in the fridge.
- Once the 'glass' is solid, break carefully into shards (I tapped it with the end of a rolling pin).
- Remove the cake from the fridge and carefully insert the shards randomly, like you see in the photos.
Ganache
- Add the white chocolate and double cream to a bowl or jug, and microwave until smooth. I do short 10-20 second bursts, stiring well each time.
- Once melted, add the food colouring.
- Using a small piping bag or a teaspoon, drip the ganache near the shards of the glass, and down the sides of the cake. The more you push over the edge, the further the drip will fall.
- Carefully 'splatter' the blood coloured ganache using a pastry brush and flicking it towards the cake... this bit can be messy.
- Set the cake in the fridge again for 30 minutes, and then enjoy.
Notes
- This cake lasts for 3-4 days at room temperature!
- For this cake I used:
- I used two of these 8" cake tins
- These piping bags for the drip
- This cake turntable to make decoration easier
- I used this red food colouring
- I used this white food colouring
- I used this metal scraper
- You can use half of the recipe to make a two-layer cake - half the sponge recipe, and half the buttercream!
- You can use any solid clear sweet, I used mint ones I found.
ENJOY!
Find my other Recipes on my Recipes Page!
You can find me on:
Instagram
Facebook
Pinterest
Twitter
Youtube
J x
© Jane’s Patisserie. All images & content are copyright protected. Do not use my images without prior permission. If you want to republish this recipe, please re-write the recipe in your own words and credit me, or link back to this post for the recipe.
Hi Jane,
I’ve made this cake which turned out perfect,
However when I melted the sweets it’s remained bubbled, how could I fix this for future ?
Hi Jane, I have 10 inch tins, could you recommend the quantities I would need please?
Hi Jane I am going to adapt this for a Stranger Things cake! Can I split this into 3 x 8″ tins rather than try and cut the 2 cakes in half? (That makes me really nervous 😄)
Hi Jane, are these 8 inch tins just the standard sponge tins or are they the deeper 8 inch ones, thank you
I’m going to split the recipe in half to just do a 2 layered cake, but I have a 7 inch tin! How much should I reduce the recipe by? Thanks! X
Hi!
If i’m wanting to make this cake the day before i’m going to serve it…how would it best be stored overnight? I know it says it’ll keep for a few days at room temperature but should that be in an airtight container or just covered, carefully, with foil or something? Thanks!
Hi Jane, do you have a link for some clear boiled sweets please? Can’t seem to find any! Thank you
Hiya! I just got mine from Asda! They were the Fox’s Glacier Mints. Hope this helps! Team Jane x
I like to just melt sugar in a pan as if I’m about to make dalgona ,and then just let it cool and break it as normal. Good luck with your bake!
I’ve had this cake vision in my head for a month! Can’t wait to try it.
If I did whipped cream in the layers instead of buttercream, do you think the colouring would still work?
What measurements would i use to do a 6inch cake? Thanks.
I would use 2/3 of the recipe! X
To make a 2 layer cake do you just half the ingredients and cooking time please? And where can I buy the shards from?
Yes, as mentioned in the notes you just use half for a 2 layer cake – as you’d be using one tin, not two, baking time is the same. You can’t buy the shards, you make them as per the recipe! x
This looks so good! Gonna have to try this
Thank you!!
Hi Jane,
I can’t wait to try, I am new to baking, my first cake was really dense, my second was better, I noticed baking powder & soda was in it.
I’m sure this cake is unreal but just in case it goes tits up I’m thinking adding a bit, would you say definitely not, go with?
Hiya! For this bake, you can add 1tsp baking powder for a slightly lighter sponge! Hope this helps x