Jane's Patisserie » Recipes » Best Baking Recipes » My 30th Birthday Cake!
My 30th Birthday Cake!

*This post may contain affiliate links. Please see my disclosure for more details!*
A recipe for my 30th Birthday Cake… Chocolate, caramel, and all sort of decoration!

So yes, that is correct… I am now 30 years old!! And yes, I do feel that little bit older now my age because with the big 3 haha!
And as a baker, as a lot of you will all know, I did end up making a birthday cake myself – but mainly this is for you guys as a little inspiration post as I do one every year!
Cakes
So, for these cakes… I did use cakes that I had stored in my freezer. I am trying to do a freezer clear out, and sometimes I bake sponges ahead of time and then use them as and when needed!
Freezing cake is super easy – you double wrap a cooled sponge in clingfilm and then wrap in foil, and store. I usually say the rules are 3+ months, but to be honest I leave them longer sometimes as they are just for my own consumption.
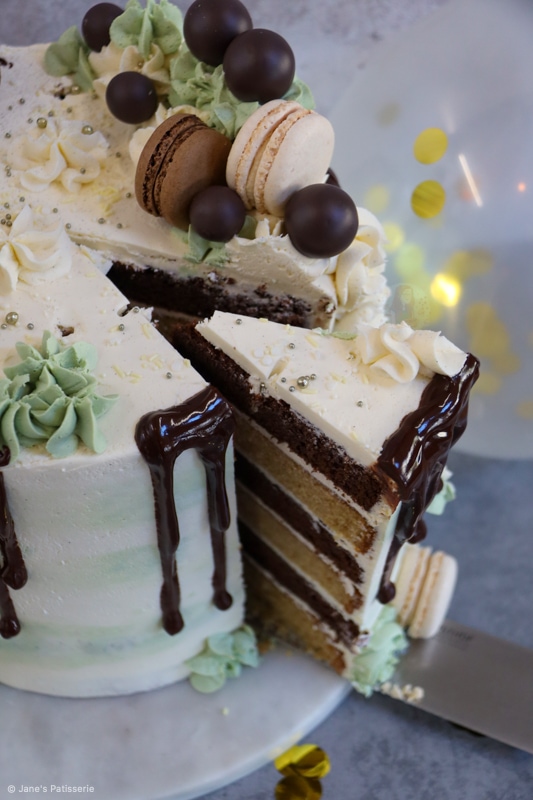
This cake ended up being a 6 layer (of 8″ sized sponges), but four layer works, or even 6 layers of a 6″ sponge – this post is just inspiration for it.
For some cakes you can use these recipes

Buttercream
I wasn’t really sure on the design I wanted for this so sort of winged it slightly… last year for my 29th birthday cake I did a fault line cake, I’ve done chocolate orange flavours for my 28th birthday cake, so this one I just wanted a fun random dappled design.
I used a basic buttercream recipe of unsalted butter and icing sugar in an American buttercream style, flavoured vanilla.
I know it’s a lot of buttercream in the recipe, but that is because it was such a massive cake – so you need it.
If you are making a four layer sponge of 8″ cakes like a lot of my other celebration style cakes, I would stick to a ratio of 500g of butter, and 1000g of icing sugar.


Colours
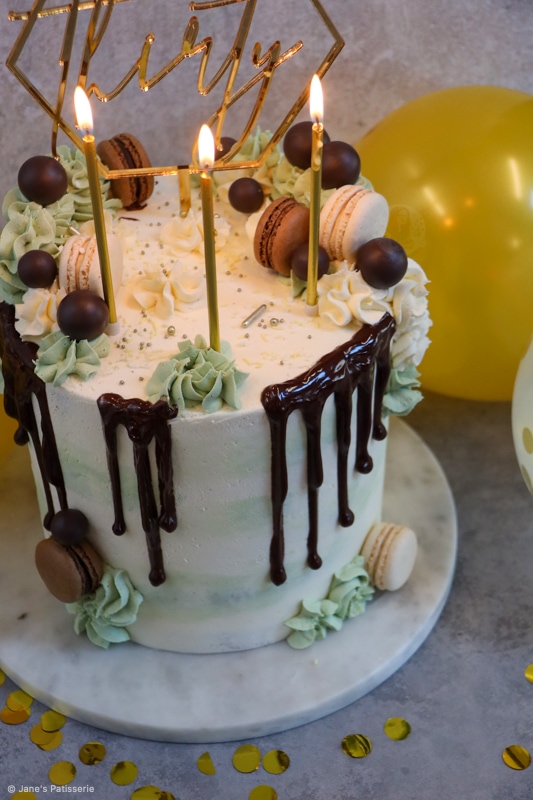
I used a majority as a white colour, and then used a gooseberry colour to create a cute sage like green! I just wanted a subtle colour to bring something to the cake, and then have a nice base.
There’s a few ways of getting white buttercream, one of which is colour. I often use a liquid white colouring but it’s harder and harder to get hold of – this powder however is very good at helping to whiten buttercream.
It also helps to beat the butter on it’s own for a good while to lighten itself naturally, and you can also add in a tiny amount of purple colouring to counteract the yellow undertones to create a whiter looking frosting.


Drip
Because I was just having fun with the decoration and sort of making it up on the spot, the drip is also a little random. I used the same recipe idea as before with a mix of milk chocolate, dark chocolate and double cream melted together as I just love it.
It can sometimes be hard to be ‘random’ when it comes to the decoration of a cake like this, but you really just have to try and not overthink it.
I did sections of drips around the side of the cake to be a little similar to my blogs 7th birthday cake which I loved. You can of course do a drip all the way around if you prefer.


Decoration
The decoration may not be to everyones taste, but it’s just a bit of fun. I smooth the white buttercream around the edge until smooth, then add on little dashes of the green colouring and smooth again to create the look. I then added on swirls of leftover buttercream, macarons, sprinkles, the drip and so on.
Of course, you can do whatever you fancy! I just wanted a massive cake that was fun to make for my 30th birthday cake, and I love it!

Tips and Tricks
For this recipe I used:
If you are nervous about making such a large cake, you can insert a dowel into the middle to make it easier to stay together if you are worried, but generally if you stick to chilling the cake at each stage its absolutely fine!


My 30th Birthday Cake!
A recipe for my 30th Birthday Cake... Chocolate, caramel, and all sort of decoration!
Print
Pin
Rate
Servings: 20 Slices
Ingredients
Buttercream
- 600 g unsalted butter (room temp)
- 1200 g icing sugar
- 1-2 tsp vanilla extract
- 1 tsp white food colouring
- 1/4 tsp green food colouring
Decoration
- 75 g dark chocolate
- 75 milk chocolate
- 150 ml double cream
- macarons
- feature sprinkles
Instructions
Buttercream
- Beat the unsalted butter on its own for a while in your mixer until its smooth and supple and starting to whiten.
- Add in your icing sugar a little at a time and beat fully until its light and fluffy and add the vanilla extract and white food colouring!
- (If the mixture is really stiff, add in 1-2tbsp of boiling water and beat fully to smooth out)
- Add a few spoonfuls of the buttercream to a new bowl and colour this to a sage green.
Decoration
- Level the cakes off if necessary.
- Add your first cake to a cake board or flat serving plate and secure with a small amount of buttercream.
- Spread some buttercream onto the first layer, add the second sponge. Repeat until you reach the top layer of cake.
- Spread some buttercream around the sides to fill in the gaps and create a crumb coat. Refrigerate the cake for at least 30 minutes.
- Once refrigerated, using an angled spatula, spread the rest of the white buttercream around the cake and then smooth around using a large metal scraper.
- Chill the cake again for another 30 minutes.
- Once chilled, carefully dab on the coloured buttercream, and then smooth around using a large metal scraper. You really do not need much coloured buttercream to get the effect.
- Refrigerate the cake for another 30 minutes.
- In a small bowl or jug, add the milk chocolate, dark chocolate and double cream and melt carefully in short bursts in the microwave, stirring well each time, until smooth.
- Carefully pipe this onto the cake to create a drip - I chose random sections to make the look of the cake. Set the cake in the fridge for another 30 minutes.
- Pipe some swirls of the leftover buttercream on top using a Medium 2D Closed Star Piping Tip and decorate with the sprinkles, macarons and decorations.
Notes
- This cake will last for 3-4 days once made.
- You can look at this post to see the details on making an 8" cake - or a chocolate cake version.
- In this recipe I used:
Find my other recipes on my Recipes Page!
You can find me on:
Instagram
Facebook
Pinterest
Twitter
Youtube
J x
© Jane’s Patisserie. All images & content are copyright protected. Do not use my images without prior permission. If you want to republish this recipe, please re-write the recipe in your own words and credit me, or link back to this post for the recipe.
Hi Jane, I was wondering what the exact measurements are for your 30th cake for the chocolate and caramel bases (6 layer, 8 inch). Many thanks, Hannah Ps your amazing!:)
Hiya! I link the recipes I used in the post for the cakes – my chocolate drip cake, my blog 7th birthday cake and my two tier celebration cake. Hope this helps! x
Hi Jane, I am just about to freeze some cakes to get ahead of time I need them for next Wednesday but won’t have time to make them. I just want to check you would decorate straight from the freezer ? Does the butter icing not go funny ? And do you still stick it in the fridge between icing ?
Hiya! Yes – I often do this, sometimes I find it easier! Yes I do! Enjoy x
Where is the caramel in this recipe please.
Hiya! I used a caramel flavoured sponge I already had! Hope this helps! x
Do you have a caramel cake recipe on your website or a cinnamon sponge. I would like to try them
Thank you
Hope you had a lovely birthday Jane
Absolutely – take a look at my salted caramel drip cake, biscoff cake or my caramac cake – they are both caramel sponges! Hope this helps x
I can see you froze the cake. Can I ask do you defrost slightly before decorating? Or would you decorate frozen then defrost? If so how long does it take to defrost (would you decorate frozen and leave out for a few hours) or would you leave in the fridge overnight and have ready for the following day?
I have always wanted to freeze cake then decorated but have no clue on timings
Hiya! I decorate straight from frozen – I find it really helps! I then just leave it at room temp to defrost. Hope this helps! x
Happy birthday Jane,
Your cake looks amazing and I hope you enjoy it and have a fabulous day! 🙂
Thank youuu! x