Rocky Road Christmas Pudding!

*This post may contain affiliate links. Please see my disclosure for more details!*
A no-bake chocolate rocky road christmas pudding – a fun alternative for those who want something chocolatey for christmas!
Confession…
So… confession time. I don’t really like christmas pudding. Like… not at all. I don’t want to scare anyone off by saying this, but I thought I would be honest. I have posted a few christmas pudding/cake style bakes now but I really just don’t want to eat them.
My christmas cake is super popular, and my family adore it and I will make it for them every year, but I’d rather eat something else. Anyone else agree?!
Rocky road Christmas pudding
However, this is where this recipe comes in. I am all for everyone having a Christmas pudding if they want it and like it, but for me? I want something delicious and full of chocolate… so why not make a chocolate Christmas pudding?!
Or better yet… why not make a no-bake Christmas pudding to make it even easier! That is where the rocky road Christmas pudding is born. Now, I definitely did not invent this idea, so don’t think I am saying I have… but this is my own version.
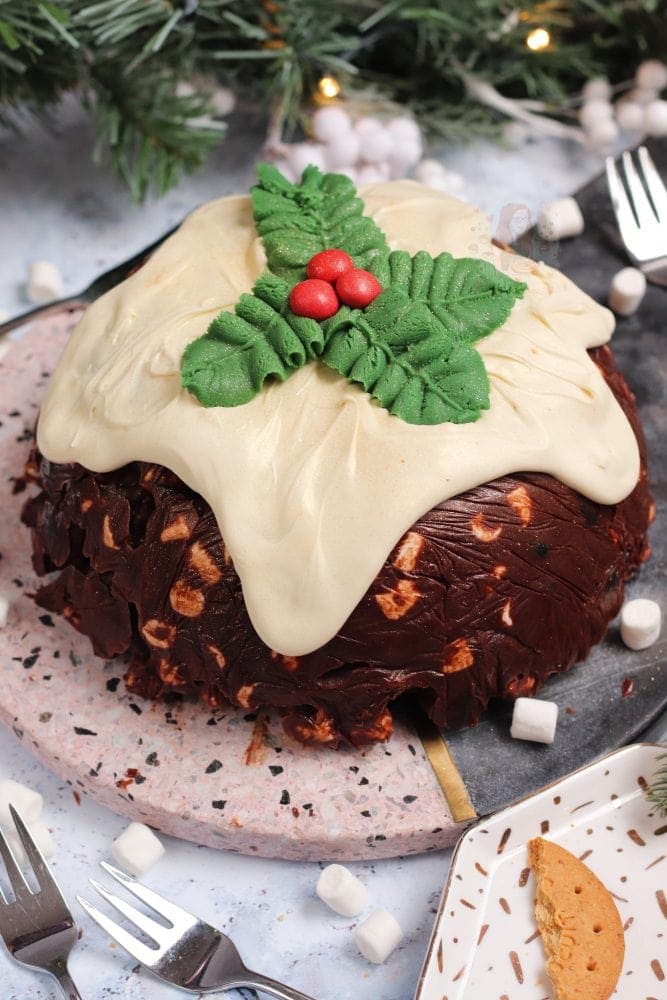
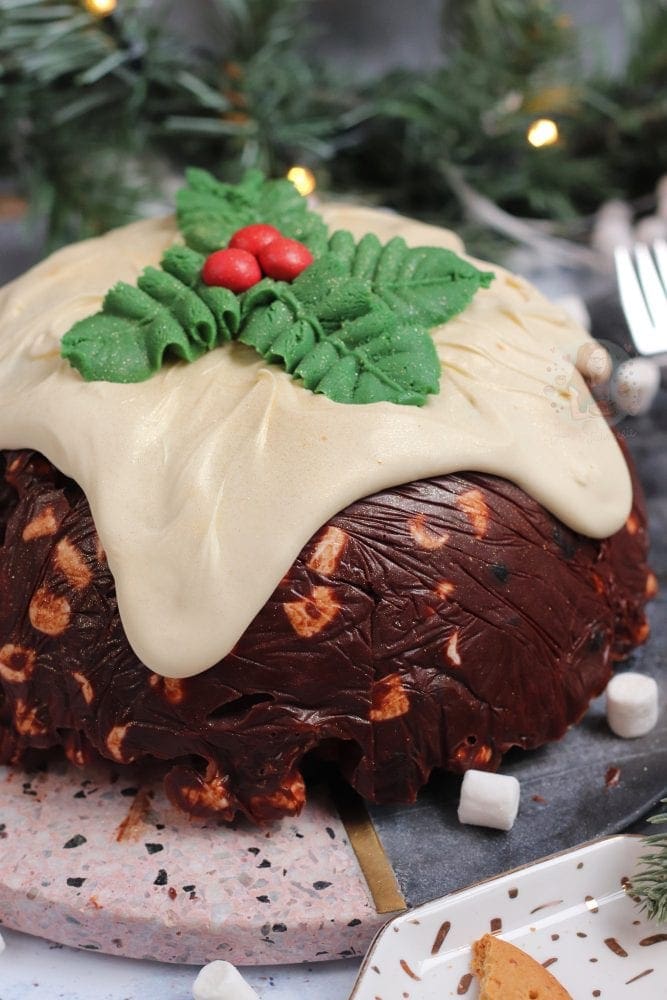
There is no reason why you can just make a batch of rocky road and set it in a bowl, splodge some white chocolate on top, and then decorate it ever so slightly! It is so easy to buy a pudding for christmas, but as I adore rocky road, and I wanted something slightly different… I thought I would make this.

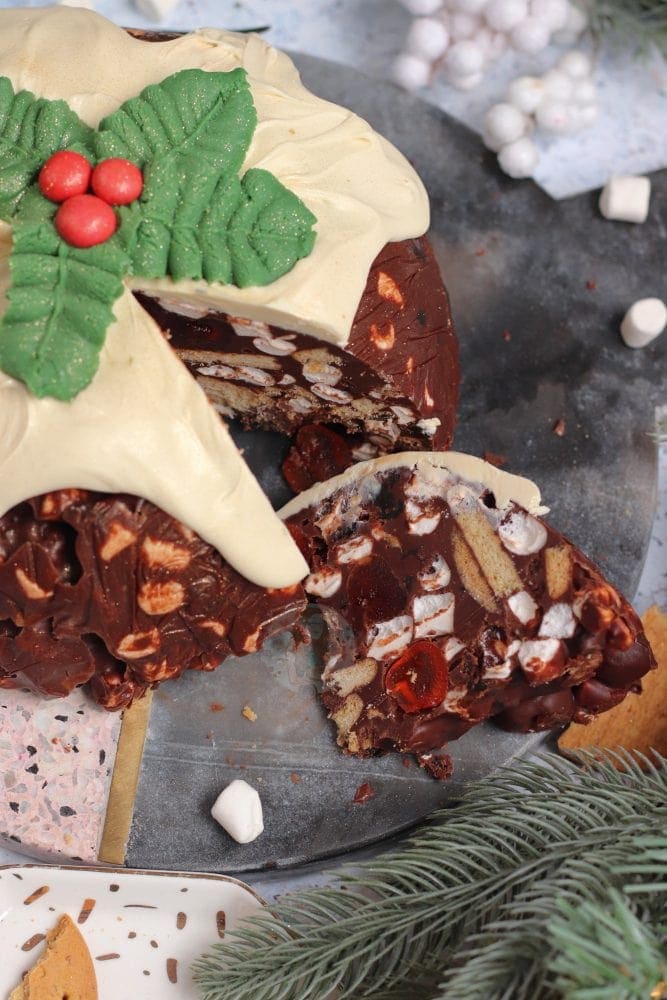
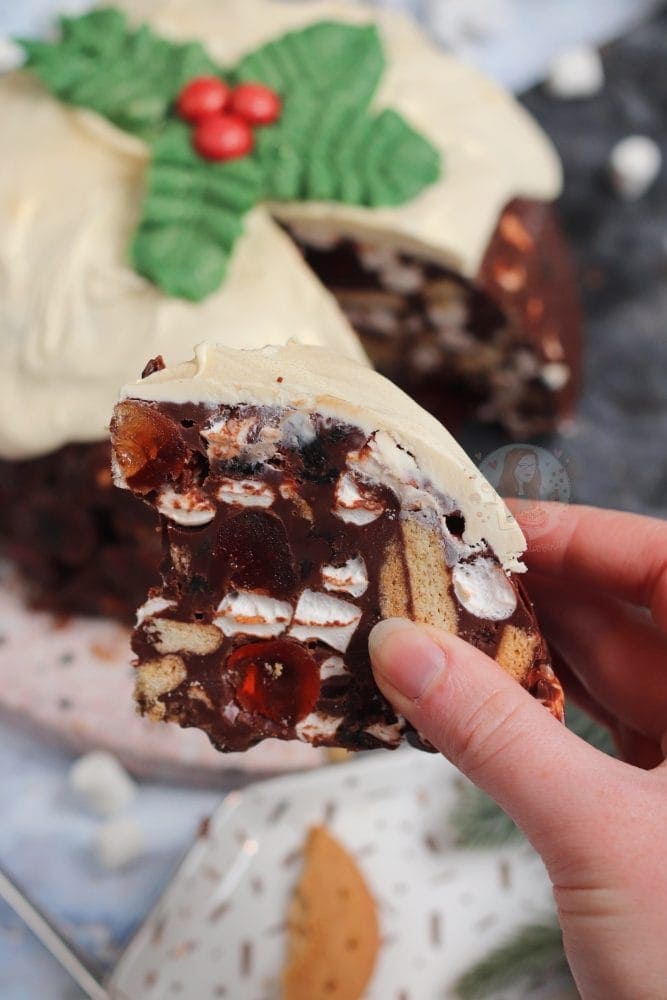
Biscuits, marshmallows, cherries, fruit and more
For the filling, it’s basically up to you. I used a mixture of digestives, amaretti biscuits, mini marshmallows, glacé cherries and some raisins. I get a lot of you don’t like raisins but you get the idea. Add in Maltesers, use just digestives, use just amaretti biscuits… so on. You can really customise this to be your ideal rocky road christmas pudding, and that’s the charm of it! It’s an easy and versatile bake.
I always prefer to prep my medium sized bowl that you will use as the mould for the pudding with a double layer of cling film, and then prep my filling in a bigger bowl before making the chocolate. I always generally find it best to prep things as much as possible because once the rocky road mix is made, you want to pour it into the bowl asap.
Chocolate mixture
For the rocky road itself, I basically followed along the lines of my other rocky roads such as my classic rocky road, and my christmas Rocky Road. The mixture of milk or dark chocolate, with golden syrup and butter, makes a smooth and delicious chocolate mix, that is much easier to cut than just chocolate on its own.
I find it best to add the butter and syrup to a pan and heat these together. You want to let the butter melt fully, and let the golden syrup start to bubble. Take the pan off the heat, and then add in the chocolates and mix until smooth,

Decoration
For the decoration, I literally just used white chocolate melted and poured on top to get a more natural effect – but that again is up to you. For the holly, I made some simple buttercream and colouring it green to mimic holly, added some red M&Ms for berries and left to set! As always, you can do this however you fancy
I used a leaf piping tip in a large piping bag for the holly – this is easier to do once the white chocolate has set slightly otherwise it might just bulge and go everywhere. I know it’s not super realistic, but you get the idea of it so that’s all that matters, right?!
Tips and tricks
As this is a bake that you would have to serve, it’s much easier to use a mix like this with the butter and golden syrup, so that you don’t have to hack at the bake with a knife. You can cut it much more easily, and it also tastes very delicious
- This recipe will last 4-5+ days in the fridge or room temp
- This can freeze for 3+ months
- I use a 2L medium sized bowl as my mould
- I used this leaf piping tip for the decoration
- I use these large piping bags for the decoration


Rocky Road Christmas Pudding!
Ingredients
For the Rocky Road
- 125 g golden syrup
- 125 g unsalted butter
- 200 g milk chocolate
- 200 g dark chocolate
- 100 g mini marshmallows
- 150 g digestives
- 150 g amaretti biscuits
- 100 g glacé cherries
- 100 g raisins
Decoration
- 100 g white chocolate
- 75 g unsalted butter
- 150 g icing sugar
- Green food colouring
- Red M&Ms
Instructions
- Line a bowl of your choice with clingfilm - you want to make sure it's all covered to it's easy to get out! I use a small/medium metal bowl as it's the perfect size/shape!
- Chop your chocolate up finely and leave to the side.
- Chop your digestives/amaretti up into a bowl, and add the marshmallows, raisins, cherries.. whatever you fancy using!
- In a pan, add your butter and syrup and melt until the butter has melted fully - take the pan off the heat and add in the chocolate.
- The heat of the butter/syrup should melt the chocolate so it should be fine as it's finely chopped - but if you find you have lumps of chocolate left then put the pan back on the heat briefly to melt the mixture fully!
- Pour the chocolate mix into the bowl of goodies and mix well.
- Pour into the lined bowl, and press down and set in the fridge until solid - I say it takes a few hours really, but check as you go! You can always leave it overnight to set!
- Once the 'pudding' has set, decorate!
- Melted the white chocolate and pour it onto the pudding for the topping, and let it do its thing.
- Cream together the unsalted butter and icing sugar until smooth - add the green food colouring to get to your desired green colour of holly!
- Pipe the buttercream onto the pudding to mimic holly.
- I added on some red M&Ms for the berries, and left it to set.
Notes
- This beauty is just a glorifed traybake in a bowl - but I love it!
- It will last for one week or so - and I kept it at room temperature!
- If you want to use all milk chocolate, I would use 500g.
- If you want to use all dark, still use 400g.
- I recommend using these products for this bake:
ENJOY!
Find my other Recipes on my Recipes Page!
You can find me on:
Instagram
Facebook
Pinterest
Twitter
Youtube
J x
© Jane’s Patisserie. All images & content are copyright protected. Do not use my images without prior permission. If you want to republish this recipe, please re-write the recipe in your own words and credit me, or link back to this post for the recipe.
Would you freeze this after the icing or before? How long to defrost? Thank you. Very excited to make this.
Is it the soft or crunchy amaretti biscuits for this recipe or doesn’t it matter?
Ideally crunchy! x
Hi Jane, just wondering whether you temper the white chocolate when melting it for the top and whether it matters? Thanks so much
Personally I don’t bother, but you can if you want! x