Jane's Patisserie » Recipes » Best Baking Recipes » Chocolate Peppermint Cake!
Chocolate Peppermint Cake!

*This post may contain affiliate links. Please see my disclosure for more details!*
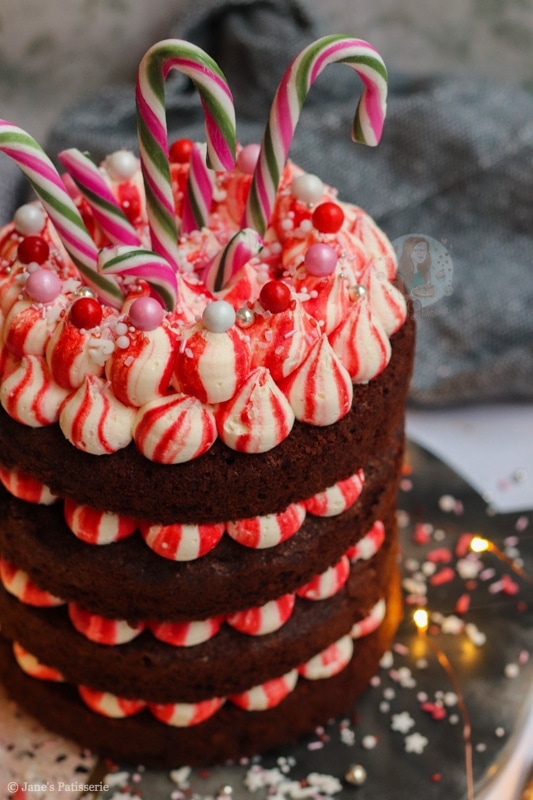
A four-layer chocolate peppermint cake with chocolate sponges, red striped peppermint buttercream frosting – and more! A delicious easy festive cake.

Chocolate + mint = my favourite!
One mint recipe to another – because just like I said on one of my latest recipe posts (my candy cane cheesecake) – I am utterly obsessed with all things mint right now. Mint chocolate being one of my favourite things in the world, here is my chocolate peppermint cake!
I decided straight from the beginning of this recipe to swap things up slightly – I am aware that this looks oh so similar to a lot of my other layer cakes as they have a similar decoration design – but this beauty is a 6” cake!

Cake
I wanted to do a smaller cake as I nearly always do 8” cakes (by far the most common cake to bake in my opinion), but I understand sometimes smaller is better. Also, I think the smaller cake looks really cute! The smaller diameter, but still four layers, naturally makes the cake look taller.
I wanted to do a basic chocolate sponge for this cake, but jazz it up slightly with peppermint flavour. You can leave the peppermint out of the sponge if you want a plain sponge, or even add a little vanilla for some flavour!

Small cake tins
I will admit (and it’s obvious when you see it) that I cut my chocolate peppermint cake sponges a bit wonky. I couldn’t find my cake leveler so I eyeballed it… and yeah, not my best work. I made two ‘deeper’ six inch cakes and then split each one into two. This made it much easier to make the four layers, as you only need two six inch tins.
Just like my 7th blog birthday cake, or the top layer of my two-tier celebration cake, I love these tins. Make sure to line the base of the tin as they are not loose bottomed – and enjoy! The cake mix is so simple to bake and it is just so delicious as well!!


Frosting buttercream
Now, for the important bit… the frosting!! I used a basic american buttercream frosting, flavoured with peppermint. I wanted to use this style buttercream because it is so easy to make – and it is sturdy. As long as you use the correct ingredients!
For buttercream like this, you MUST use block unsalted butter. Never ever use a baking spread, or a margarine when making buttercream – you want to make sure that you leave the butter to become room temperature before using, and it is worth the wait! Promise!


Frosting flavour
You want to mix the butter on its own for at least five minutes – I used my stand mixer with the paddle attachment because it’s best for this. You really want the butter to beat for so long to make it smooth, supple and make it perfect for the next stage. If your butter is too cold, you will need to beat for a lot longer to get to that smooth texture.
I then used icing sugar, and peppermint extract to create the frosting flavour for my chocolate peppermint cake. It’s at this stage, you really need to beat again for about another 5 minutes. This timing really naturally lightens the colour of the buttercream to make it whiter – but you can also add in some white food colouring if you fancy.


Colour and decoration
So once you have split the cakes into the individual layers, and your white buttercream is prepped – you can decorate! I used a large piping bag, with a jumbo round piping tip in. Before you add the frosting, you want to carefully brush some red food colouring up the sides of the inside of the piping bag.
This may sound weird to brush some unmixed food colouring up the sides of a piping bag, but you really need so little – and it may look weird inside the bag too, but at the end of the day – you just need to trust the process! Add the frosting into the bag and you are ready to decorate you chocolate peppermint cake.
Pipe little ‘poops’ of buttercream onto each layer, to create a beautiful cake like in the photos. I then put some extra buttercream on top, some cute round sprinkles, some smaller sprinkles and some candy canes as a topper! Easy, cute and utterly delicious. Enjoy! X


Chocolate Peppermint Cake!
A four-layer chocolate peppermint cake with chocolate sponges, red striped peppermint buttercream frosting - and more! A delicious easy festive cake.
Print
Pin
Rate
Servings: 12 slices
Ingredients
Cake
- 300 g unsalted butter
- 300 g light brown soft sugar
- 250 g self raising flour
- 50 g cocoa powder
- 6 medium eggs
- 1 tsp peppermint extract
Buttercream
- 200 g unsalted butter
- 400 g icing sugar
- 1 tsp peppermint extract
- 1/4 tsp red food colouring
Decoration
- Sprinkles
- Candy canes
Instructions
Cake
- Preheat your oven to 170ºC/150ºC Fan, and line two 6" deep cake tins with parchment paper.
- Add the unsalted butter and light brown soft sugar to a bowl, and beat until light and fluffy.
- Add in the self raising flour, cocoa powder, eggs and peppermint extract and beat again until a lovely smooth cake mixture is formed.
- Split evenly between the two tins and bake in the oven for 35-45 minutes (or until a skewer comes out clean!)
- Once baked, leave to cool in the tin for 10 minutes, and then leave to cool fully on a wire rack.
Buttercream
- Beat the unsalted butter on its own for a while in your mixer until its smooth and supple.
- Add in your icing sugar a little at a time and beat fully until its light and fluffy and add the peppermint extract!
- (If the mixture is really stiff, add in 1-2tbsp of boiling water and beat fully to smooth out)
- Add a jumbo round piping tip to a large piping bag, and carefully brush a small amount of buttercream up the sides of the piping bag in stripes. I use a 5mm brush, and do four stripes.
- Add the buttercream to the piping bag.
Decoration
- Level the cakes off if necessary. Split the two cakes into two so you have four layers in total
- Add your first cake to a cake board or flat serving plate and secure with a small amount of buttercream.
- Pipe round of buttercream onto the first layer, add the second layer, and repeat with the buttercream. Repeat with all layers.
- On the final layer, add some extra buttercream, and add some sprinkles and candy canes.
Notes
- This cake will last 3-4 days once made, at room temp.
- The flavouring can be swapped for any flavour you fancy, and the decoration is completely optional.
- If you want to make an 8" cake, use a 500g mix (400g flour/100g cocoa) and bake for 50-60 minutes. Use 1/3-1/2 more buttercream.
- In this recipe I used:
ENJOY!
Find my other recipes on my Recipes Page!
You can find me on:
Instagram
Facebook
Pinterest
Twitter
Youtube
J x
© Jane’s Patisserie. All images & content are copyright protected. Do not use my images without prior permission. If you want to republish this recipe, please re-write the recipe in your own words and credit me, or link back to this post for the recipe.
Do you brush the red food colouring inside the piping bag in stripes?
Yes!!
Cant wait to try this recipe!
If I use an 8inch tin but only want it to be two layers what ratios should I use please? Thank you and Merry Christmas!
Can you use a 3inch deep or does it have to be 4 inch deep. Not the best at converting. Thanks
Can’t wait to try this cake, am thrilled it’s a 6 inch as I struggle to convert recipes. Thank you so much for all these recipes. Happy Christmas xx
Yaaay, hope you love it! Enjoy! x