Jane's Patisserie » Recipes » Best Baking Recipes » Garlic Bread Rolls!
Garlic Bread Rolls!

*This post may contain affiliate links. Please see my disclosure for more details!*
Easy and delicious tear and share garlic bread rolls, with an easy homemade bread dough, stuffed with a garlic and herb butter filling.
Now, we all know how much I love baking, how much I adore all things utterly delicious… cheesecakes, cookies, desserts and more! However, one probably not-so-kept secret is that I am utterly in love with savoury food. It has my heart, and I LOVE cooking.
One happy marriage of this for my blog? Savoury baking. I have done very few savoury bakes on my blog in my over seven years of baking, and I know I need to do more. Garlic 100% seemed like the best place to start because garlic is the best thing ever – ENTER GARLIC BREAD ROLLS!
Do you ever get it when a recipe says ‘add one clove of garlic’ and you add about six? Yep, that’s me too. I think it is one of the best ingredients on the planet, and I do think a meal is missing it if you don’t use it – I get it’s maybe not as good in some peoples eyes, but I know I am not alone in adding far too much.


Garlic bread rolls
I wanted to post this garlic bread rolls recipe for a while because it is the savoury and delicious garlic version of my homemade cinnamon rolls which is by far my most popular bread bake I have ever done – and I am so happy for this one to take the number one spot. I am utterly in love – and you will all adore it too.
So for this recipe, I started with a really similar base to all my other bread roll recipes – just slightly less sweetness, and a little more salt added. I use the same base of 600g of strong white bread flour – which is the best flour to use in my opinion. You can however easily do a 50/50 strong white bread flour, and strong wholemeal flour for a little bit of difference.
I find if you are using all wholemeal flour, the bake may be slightly heavy – I love brown bread, I love wholemeal bread, but when baking it at home with no nasty additives, it can sometimes be a little heavy – but also, I think the strong white bread flour compliments the other flavours in the garlic bread rolls so well.


Yeast
I use this dried yeast because I find it behaves so well – bearing in mind I bake these all year round (I know, why have I waited to long to post these?!) but it is the dried yeast that I find will work, even in the middle of a cold winter. If you can find fresh yeast… use it! You need to use double the amount (so 28g), but some other dried yeasts don’t work quite as well, or need activating first.
Salt
I reduced the amount of sugar in the dough compared to my sweet bread roll bakes, and removed the vanilla extract, but then added a pinch of sea salt. I love to use sea salt chunks (like Cornish sea salt, or Maldon sea salt) because it has a lovely flavour. If you use a table salt, it can sometimes taste a little nasty – and we don’t want that.
Proving
When you are baking bread, it can vary in how long something needs to prove – and this is down to the weather. In peak summer, you may get each rise of the bread dough done in 20 minutes or less – whereas in the middle of winter, it could take 2+ hours… so be prepared for that.
You MUST make sure your bread dough proves properly so that you get the best bake you can get – if you don’t let your bread prove, then you may have a tight bread roll which is unpleasant to eat, and you may even struggle to get the shaping that you are after. It is not worth skipping! But at the same time, don’t let your bread over prove – you just want it to double in size at each stage.


Rolling the dough
When I am baking anything with a bread dough it is important to roll the dough if required correctly – I use a large white rolling pin that makes shaping these the absolute dream. You want to make the bread dough a large rectangle, so you can brush all the ingredients onto the middle of the bread dough.
Filling
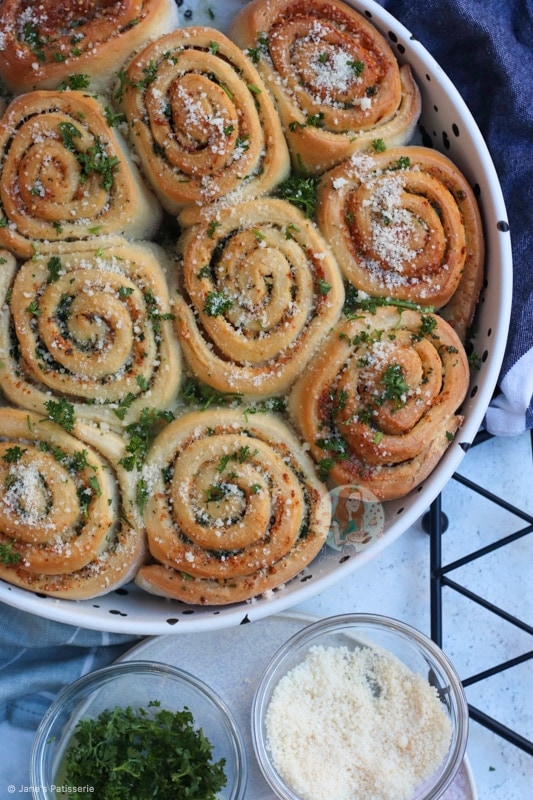
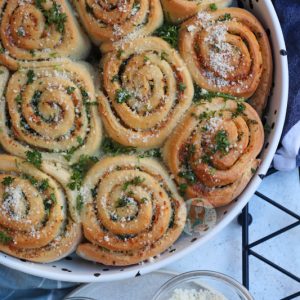
For the filling I used a garlic butter, which was really simply made up of melted butter and finely chopped and crushed garlic – and then some dried mixed herbs and some sea salt chunks. All you need to do is brush this or sprinkle it all over the rolled out dough. I then sprinkled on some freshly chopped parsley and some parmesan.

Optional topping
You can 100% add in some mozzarella here – the only reason I didn’t was because I didn’t have any this time – but either keep it as plain garlic bread rolls, or add some cheese in for cheesy garlic bread rolls! You can also switch up the herbs to use what you prefer – it is entirely up to you I promise!
Portion
I roll the bread up tightly and then cut along the shape to create 12 rolls. I find it best to cut the long sausage of bread dough into halve, and then each half into another half. Then, you can easily cut three out of each quarter. You can do whatever works for you, but you just need a sharp knife and you are set.
Second prove and bake
Let the bread dough prove again once in the dish for a little while longer until they are touching, and then bake – bake until the bread is golden, warm and absolute perfection – something I want over and over again. Imagine these garlic bread rolls dunked into a tomato pasta sauce… heaven. Enjoy! x

Garlic Bread Rolls!
Easy and delicious tear and share garlic bread rolls, with an easy homemade bread dough, stuffed with a garlic and herb butter filling.
Print
Pin
Rate
Servings: 12 Rolls
Ingredients
The Dough
- 600 g strong white bread flour (plus extra for dusting)
- 14 g dried active yeast
- 1 tbsp caster sugar
- 90 g unsalted butter (cold & cubed)
- 275 ml full fat milk
- 1 medium egg
- 1/2 tsp sea salt
The Filling
- 45 g unsalted butter (melted)
- 4+ garlic cloves (finely chopped)
- 1 tsp dried mixed herbs
- 1/2 tsp sea salt
- 15 g fresh parsley (chopped)
- 25 g parmesan (grated)
The Topping
- 25 g parmesan
- fresh parsley (chopped)
Instructions
- Sift the flour into a large bowl, and add the caster sugar, yeast and sea salt. Mix these together so its all evenly distributed.
- Rub the butter into the mixture so it resembles bread crumbs, like you would when making scones.
- Gently heat the milk until warm - but not piping hot. If heating in a pan, you want it to just about start having steam come out of the pan.
- Add the milk and egg to the dry ingredients.
- Knead the dough together for 7-10 minutes. It will be sticky at first, but it will soon come together. I use my KitchenAid with the Dough Hook to make this easier.
- Once kneaded, it will be springy to touch, and not sticky.
- Transfer into a lightly oiled bowl, and cover the top of the bowl with cling film. Let it rise for 1-2+ hours, or until doubled in size.
- Whilst the dough is proving, prep the filling by finely chopping the garlic cloves, and prepping the parsley.
- Once the dough has risen, transfer to a lightly floured work surface, and roll out to a large rectangle. Mine ends up being about 50cmx30cm.
- You want it to be as even a rectangle as possible so its easier to roll up, and the dough can be thin here.
- Mix the garlic into the melted butter, and brush over the bread dough.
- Sprinkle over the mixed herbs, sea salt, chopped parsley and parmesan.
- Roll the dough from long side to long side, so that a ~long sausage~ is formed. Cut this evenly into 12 pieces.
- I cut the middle, and then the two halves into two more, and then each into three pieces to get my 12.
- Using a large rectangular baking dish, mine was 30cmx24cm roughly, put them in. They won't touch yet, but you want four rows of three basically.
- Cover the dish with clingfilm, and let them rise for another hour or so. By the end, they should all touch.
- Towards the end of the dough rising, preheat the oven to 180C/160CFan so that when its finished rising, you can put it straight in the oven.
- Bake in the oven for 20-25 minutes, until golden brown and cooked through.
- Leave to cool, and then sprinkle over some more fresh parsley and parmesan.
Notes
- These are best on the day of eating, but will last covered for a couple of days.
- You can do the second prove in the fridge overnight, or from the morning for baking in the evening as it slows the process down.
- I use dried active yeast - but you can use quick yeast (same amount) or fresh yeast (use 28g). Some yeasts need activating before use so check package instructions!
- You can use whatever herbs you prefer to use - or even add 100-200g of grated mozzarella to the middle for cheesy garlic bread rolls!
- I use this pastry brush!
ENJOY!
Find my other recipes on my Recipes Page!
You can find me on:
Instagram
Facebook
Pinterest
Twitter
Youtube
J x
© Jane’s Patisserie. All images & content are copyright protected. Do not use my images without prior permission. If you want to republish this recipe, please re-write the recipe in your own words and credit me, or link back to this post for the recipe.
hi, can you freeze these?
just in the oven rn i added 100g of wholemeal flour and 400g of white flour will it still be ok
The recipe looks amazing! Could I let the dough prove overnight for the first prove or can it only be the second one?
These look amazing. What do you think to adding sone streaky bacon before the rolling stage? Would that be a bit too much? I guess it sounds a bit like the old fashioned bacon suet rolypoly!
Would it be too much to make these and cinnamon buns in one day? (Asking for a friend 😳).
You do you, sounds tasty! And never, it sounds delicious!!!
These look amazing and can’t wait for us to try them. 2 quick questions. 1) Would they still taste nice without the Parmesan inside? 2) Would the recipe still turn out ok if I halved all the ingredients? Thanks xx
Hiya! As long as you keep an eye on the proving and bake time, halving should be fine! And yes you can leave it out, though they will just be slightly less cheesy. Hope this helps! x
Made & baked these today to go with a salad & a pasta dish & oh wow they honestly are absolutely delicious well worth making & I will definitely be baking them again.
Mine turned out a little dry ….I want to try again. They didn’t really rise on the second proving…what did I do wrong?? I’d really like to get them right
Hiya! Due to the cold weather at the moment, it sounds like you just needed to wait a little longer! Try putting it in a warmer place to prove. Hope this helps! x
Hey, Wat houdt 1 theelepel gemengde kruiden in? Mvg
BRILLIANT recipe, turned out perfectly. Thank you!
Hiya 🙂
These are so so good! Are they freezable after cooking?
Thanks!
Yes absolutely – for up to 3 months! Enjoy! x
Can I add Mozzarella cheese on the top or inside the bread, before putting it in the over?
Hiya! Yes of course you can! Enjoy! x