Jane's Patisserie » Recipes » Best Baking Recipes » Easter Speckled Cake!
Easter Speckled Cake!

*This post may contain affiliate links. Please see my disclosure for more details!*
A fun and delicious showstopping Easter speckled cake with a four-layer chocolate sponge, and vanilla buttercream frosting!

I always love baking a showstopper of a cake, especially when it’s a celebratory time of year, such as Easter! We all know how much I love doing this… my easter chocolate cake, my Halloween bloody cake… and so on. This year, I thought I’d finally post THE Easter cake; a Speckled Cake!
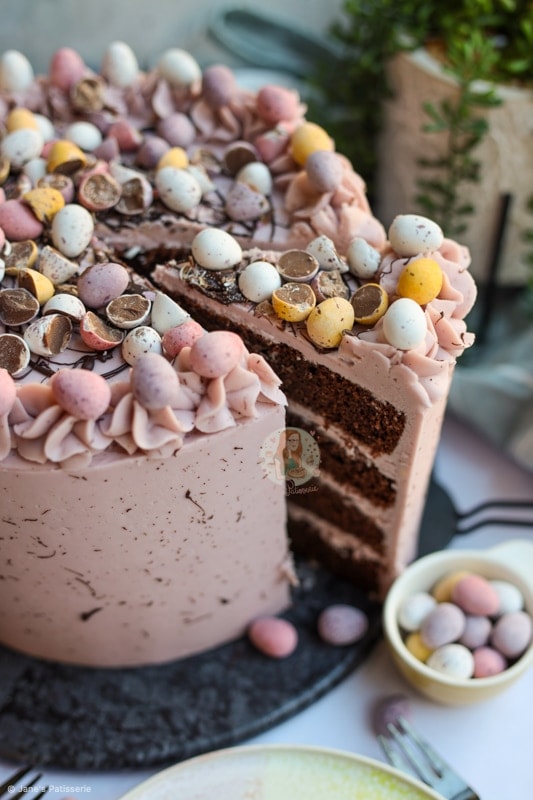
The speckled theme has always been one of my favourites as it’s just so cute. Any pastel colour and a chocolate splatter will always look cute – and I couldn’t resist doing it for you guys. Look at it! Can we appreciate it?! I am obsessed as always.


The sponge
When you look at other speckled cake recipes, they often have a vanilla sponge – and you can do this if you want! Simply remove the cocoa powder from the cake recipe, and replace it with more self-raising flour. However, I wanted chocolate.
I always love the contrast of a chocolate cake with a lightly coloured buttercream frosting. Not only does it look nicer in my opinion, but it also gets both amazing tastes of vanilla and chocolate! I did base the sponge on my back to basics chocolate drip cake (so if you have any sponge queries, head there!).
You could also try doing a half and half sponge and make two-layer vanilla, and two layers chocolate! Split a vanilla mix between two bowls, and then add 50g of cocoa powder to one! You can do whatever you fancy – it’s all about having fun with a cake like this!


Buttercream
For the buttercream, I decided to do a simple vanilla American buttercream frosting, because it is easy and because it withstands decorating a speckled cake like this so well! If you want something less sweet (or a different type of sweet in my opinion) you can try my swiss meringue buttercream frosting.
You MUST use block unsalted butter for this sort of buttercream, and any buttercream for that matter… never use a baking spread, margarine or anything. Make sure the butter is at room temperature and beat on it’s own for a while so it’s very smooth, and supple. This makes it much easier to add the icing sugar and any other ingredients.
Once I have beaten my butter on its own, it will naturally lighten in colour. I then add my icing sugar – it does seem like a lot of sugar for one cake, but it’s a four-layer cake, and the standard ratio for this type of frosting is 1:2 butter:icing sugar.

Buttercream flavouring and tips
I flavoured my buttercream with vanilla extract because it’s delicious – and coloured the frosting with a small amount of purple food colouring. In winter, such as when I am actually writing and baking this recipe, I sometimes add a little boiling water to the buttercream.
Adding the boiling water is not essential, so it’s not on the recipe list – but basically, 1-3tbsp of boiling water sometimes helps smooth buttercream to the perfect texture, especially in cold weather. During the summer, you definitely want to avoid any extra liquid.
I went for a pastel like purple/pink colour because I loved it, and I think it fits the easter theme particularly well, but you can colour it whatever colour you want! Pale green and baby blue are often used as well.


Decoration
The process of decorating this speckled cake is the same as any drip cake – you want to spread buttercream between the layers of the cake, and then create a crumb coat with a small amount of buttercream. This seals in any crumbs for when you do the final layer of buttercream on the outside. I find it best to use a small angled spatula to add all of the frosting on, and then smooth around with my large metal scraper.
When it comes to the final layer of the cake buttercream, the process is the same. My usual team of tools for this is a small angled spatula, a large metal scraper and my turntable – I wouldn’t be able to do these cakes without these.
Add on a thick layer of frosting, and smooth around. The excess you remove is what you can pipe on later for decoration. You can always watch some of my videos to see how I do this – but honestly, just trust the process, and don’t worry if they are not perfect the first time around. Top tip though, for the final smooth, heat the scraper under the hot tap as it really does create a smooth surface.


Speckled effect
For the speckled cake part of it, you can try two different methods… melted chocolate, with oil added in to make it runny, or you can use cocoa powder and water to make it. I use cocoa powder and water often, as I find it easier to ‘speckle’.
I used a pastry brush and flicked the brush ends to create a speckle, as well as flicking all of the brush for slightly bigger ‘speckle’ bits. It’s messy, but it is so much fun to do! I then used leftover buttercream around the top, and topped it with mini eggs because why not?!
I hope you love this cake as much as I did – make it any colour you fancy, flavour the cakes or buttercream how you fancy, but mainly have fun!! Enjoy! Jane x


Easter Speckled Cake!
A fun and delicious Easter showstopping Speckled Cake with a four-layer chocolate sponge, and vanilla buttercream frosting!
Print
Pin
Rate
Servings: 15 People
Ingredients
Cake
- 500 g Unsalted butter
- 500 g Light brown soft sugar
- 9-10 Medium Eggs
- 400 g Self raising flour
- 100 g Cocoa powder
- 1 tsp Vanilla Extract
Buttercream
- 500 g Unsalted butter (room temp)
- 1000 g Icing sugar
- 1 tsp Vanilla Extract
- 1/2 tsp Purple food colouring
Speckle
- 25 g Cocoa powder
- 1-2 tbsp Water
Decoration
- Mini Eggs
- Buttercream
Instructions
For the Cake
- Preheat your oven to 170ºc150ºfan, and line two 8"/20cm cake tins with baking parchment.
- In a stand mixer, or a large bowl, beat together the unsalted butter and light brown soft sugar until light and fluffy.
- Add in the eggs, self raising flour, cocoa powder and vanilla extract and beat again until combined well.
- Split the mixture between the two tins.
- Bake the cakes in the oven for 50-60 minutes, or until baked through - check with a skewer to make sure they're done!
- Leave the cakes to cool in the tins for 10 minutes, and then take out and leave to cool fully on a wire rack!
For the Buttercream
- Beat the unsalted butter on its own for minute or two, to soften it and loosen it.
- Add in the icing sugar and vanilla extract and beat well until smooth and fluffy.
- Add the purple food colouring and beat again, I went for a lilac colour.
For the Decoration
- Split the two cakes into four layers in total.
- Put the first cake onto a cake board or flat plate. Add a little buttercream and spread. Repeat with the second and third sponges. Add the final sponge on top.
- Using a small amount of buttercream, spread and smooth around the cake sides and top for a crumb coat and add to the fridge for at least 30 minutes.
- Once set, add more buttercream onto the tops and sides of the cake, and smooth around covering the cake completely in buttercream.
- I add the buttercream on using a small angled spatula, and smoothed around the edge with the large metal scraper! You need to make sure there is more buttercream on the sides of the cake than you need, as some will be removed as you smooth it over.
- Once finished, put the cake in the fridge again for at least 30 minutes.
Speckle
- In a small bowl, add the cocoa powder and gradually add the water until it is a relatively runny paste.
- Using a pastry brush, or anything else you fancy, flick and splatter the speckled decoration onto the cake. It will be quite messy!
- Decorate the top of the cake with any left over buttercream, and some mini eggs.
- Set the cake in the fridge again for 30 minutes! Enjoy!
Notes
- This cake lasts for 3-4 days at room temperature!
- For this Cake I used (affiliate links):
- I used two of these 8" Cake Tins
- These piping bags for the buttercream
- These piping bags for the drip
- This cake turntable to make decoration easier
- I used this piping tip for the buttercream!
- You can use half of the recipe to make a two-layer cake - half the sponge recipe, and half the buttercream!
ENJOY!
Find my other recipes on my Recipes Page!
You can find me on:
Instagram
Facebook
Pinterest
Twitter
Youtube
J x
© Jane’s Patisserie. All images & content are copyright protected. Do not use my images without prior permission. If you want to republish this recipe, please re-write the recipe in your own words and credit me, or link back to this post for the recipe.
Hi I’ve got 4 quite small tins 18.5cm x 2.5cm so was wondering what the baking time would be for this?
This looks so good! I wondered if it would also work in mini loaf tins, or small square baking tins/cups, and how to alter the baking time if I were to use these? Thanks!
My buttercream has gone paste like and really thick, is there any way I can save it? Thanks
Hiya! Absolutely, add 1 tsp boiling water at time until you reach your desired consistency. Hope this helps! x