Jane's Patisserie » Recipes » Best Baking Recipes » Mini Red Velvet Cakes!
Mini Red Velvet Cakes!

*This post may contain affiliate links. Please see my disclosure for more details!*
Delicious mini red velvet cakes with a scrumptious homemade cream cheese frosting – perfect mini cake for Valentines!

As it’s getting closer and closer to Valentine’s Day I figured it was time for another cute little recipe that would be perfect for the day… you can make these for your loved one, or for your friends and so on!
Red velvet cake
Red velvet cake is one of those things that is so global in popularity that there are tonnes and tonnes of recipes out there. I have my classic red velvet cake on my blog, as well as my red velvet cupcakes and I adore both recipes completely.
Red velvet cake is one of those things that every now and again people question what is actually is… and I understand why! It’s a cult bake that is everywhere, but what does it actually taste of?! It’s a mild chocolate cake sponge with a tart edge to it.
I would describe it to have a mild vanilla and chocolate flavour which has a slightly different texture and edge to it compared to a classic Victoria sponge, with the obviously red colour which these days comes from the food colouring.


Red food colouring
I will say it over and over and over on a red velvet themed bake that the food colouring you use is SO VERY IMPORTANT. I am UK based, and the struggle can be real to easily access a good quality food colouring compared to other countries in the world.
However, the colour does exist, but you definitely cannot get it from a supermarket. I use this extra strong red food colouring, and I will never use anything else. It’s called extra strong for a reason!
I know it seems a little over the top to buy a specialist colouring, but it’s really not. The amount you need from the pot is minimal, the use by date on a colour lasts for years, and you can use it for your future red velvet bakes!


Mini cakes
Because I had already done a classic round cake and cupcakes, I thought for valentines day this year I would do some mini red velvet cakes. My mini Victoria sponges and mini chocolate cakes always go down well when I post about them, so I’m sure you will all adore these as well.
Some mini cake tins can vary slightly, so here is the exact one I use just for ease of explaining. It’s a loose bottomed mini cake tin so that the cakes are easy to remove once they have been baked. You do need to line each one still just in case, so cut out 12 mini circles.


Cream cheese frosting
For the frosting, I decided to do cream cheese in the middle and on top of the mini cakes, as you have to have cream cheese frosting with your red velvet bakes. I have a post all about cream cheese frosting on my blog as it is notoriously tricky, but honestly?! Mine is pretty amazing.
- Butter – For this frosting you MUST use block butter. Margarine/spreads do not work with cream cheese frosting as they are too soft.
- Sugar – as always, icing sugar guys.
- Cream Cheese – I often use Philadelphia to make my cream cheese frosting, you just need to make sure whatever soft cheese you use is full-fat.
- Vanilla – I like to add for flavour as per usual, but this is optional.

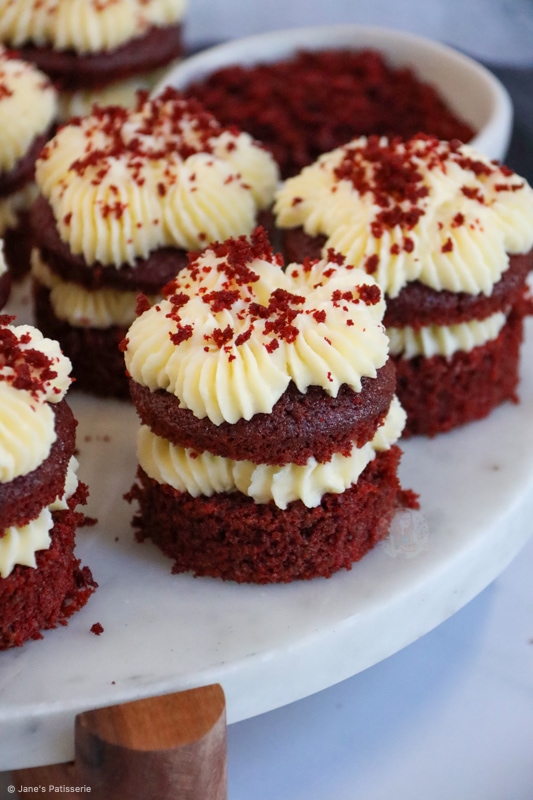
Decorations
For the decoration I kept it pretty simple… a pretty piping tip, and then some cake crumbs. This is all you ever really need for a red velvet cake, and using crumbs is classic.
I trim off a tiny amount of each mini cake to flatten them slightly, but also to get some cake for crumbs. I then either rub them into crumbs or bliltz it quickly to create the crumbs
I used this beautiful piping tip, which is different to my classic, but I adore it! I think it suited the mini red velvet cakes perfectly, and made a nice change.

Tips and tricks
- I used this piping tip
- I used this red food colouring
- I used this mini cake tin
- These will last for 3 days in the fridge, or can freeze for 3+ months
- You can make your own buttermilk by getting 175ml full fat milk and adding 1.5tsp of lemon juice to it, and letting it sit for 5 minutes before using.


Mini Red Velvet Cakes!
Delicious mini red velvet cakes with a scrumptious homemade cream cheese frosting - perfect mini cake for Valentines!
Print
Pin
Rate
Servings: 12 Cupcakes
Ingredients
Cupcakes
- 75 g unsalted butter
- 150 g caster sugar
- 2 medium eggs
- 1 tsp red food colouring (see notes)
- 1 tsp vanilla extract
- 15 g cocoa powder
- 125 ml buttermilk
- 175 g plain flour
- 1 tsp baking powder
- 1/2 tsp bicarbonate of soda
- 1 tsp white wine vinegar
Cream Cheese Frosting
- 200 g unsalted butter
- 200 g icing sugar
- 400 g full-fat cream cheese (I use Philadelphia)
- 1 tsp vanilla extract
Instructions
Cupcakes
- Preheat the oven to 180ºc/160ºfan and prep a 12 hole mini cake tin!
- Beat together the butter and sugar in a bowl until smooth and creamy
- Add in the eggs, vanilla, and red food colouring and beat again
- Mix in the cocoa powder
- Add the flour, buttermilk, baking powder, bicarbonate of soda and white wine vinegar and beat again
- Split between the 12 holes of the mini cake tin
- Bake for 20-25 minutes or until the middle of the cakes comes out clean when poked with a skewer! Once the cakes are baked, leave to cool on a wire rack.
Cream Cheese Frosting
- Make sure your butter is at room temperature, and make sure to use actual butter and not a spread.
- Beat your butter and icing sugar together until light and fluffy - like you would a normal buttercream. I beat them together for about 5 minutes.
- Add in your full-fat cream cheese (that has been drained if needed), and beat for about a minute.
- Scrape the bowl well, and add in the vanilla. Beat again for another minute.
- Scrape the bowl again finally, and beat again if needed. It should be a thick and smooth frosting once finished!
To Decorate
- If you want to use some cake crumbs to decorate, level off any peaked cakes,
- Split each mini cake in half
- Using your piping bag and piping tip, pipe your cream cheese frosting onto the bottom layer of cakes, sandwich, and pipe on the top as well.
- Once piped on, sprinkle over the cake crumbs!
- Enjoy!
Notes
- I used this piping tip
- I used this red food colouring
- I used this mini cake tin
- These will last for 3 days in the fridge, or can freeze for 3+ months
- You can make your own buttermilk by getting 175ml full fat milk and adding 1.5tsp of lemon juice to it, and letting it sit for 5 minutes before using
ENJOY!
Find my other recipes on my Recipes Page!
You can find me on:
Instagram
Facebook
Pinterest
Twitter
Youtube
J x
© Jane’s Patisserie. All images & content are copyright protected. Do not use my images without prior permission. If you want to republish this recipe, please re-write the recipe in your own words and credit me, or link back to this post for the recipe.
the cocoa completely erased the red colour? cake is brown?
What colouring did you use? It likely wasn’t the correct one (some are really weak) or you didn’t use enough!
Hey
Can i use self raising flour and omit the baking powder or will the the self raising flour affect the texture /taste
Could you use this recipe to make a small traybake instead of cupcakes
Hi! Just would like to know the nutritional value for one of these ! Making them for parents who follow a diet. Thankyou ! 🙂
Hi can I freeze these please?
Yep! Pretty much every bake can freeze for 3+ months x
Hi would I be able to bake the mixture into a bigger cake Tim and then cut the sponge smaller with cookie cutters? Would this affect the mixture and cooking time? Thank you can’t wait to try these x
Hiya! You could definitely give it a go, though if you’d like to create them this way take a look at my red velvet cake recipe! Hope this helps! x