Salted Caramel Drip Cake!

*This post may contain affiliate links. Please see my disclosure for more details!*
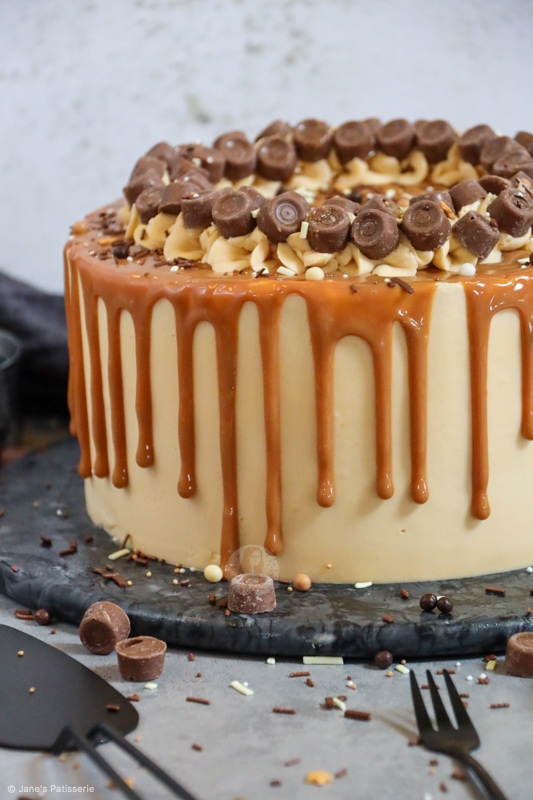
A delicious, dreamy, sweet & salty cake that everyone will enjoy. A salted caramel drip cake to beat all others, the true showstopper!

Recently I was asked to make my friends birthday cake, so I had to oblige.. I mean, it was just so difficult to bake a cake that was damn delicious and then eat a majority of it. But anyway, she let me make a recipe out of it, so we had a great deal going on!
I didn’t know what flavour to use, but then I remembered she has an obsession with all things salted caramel, so this was obviously going to be the flavour.

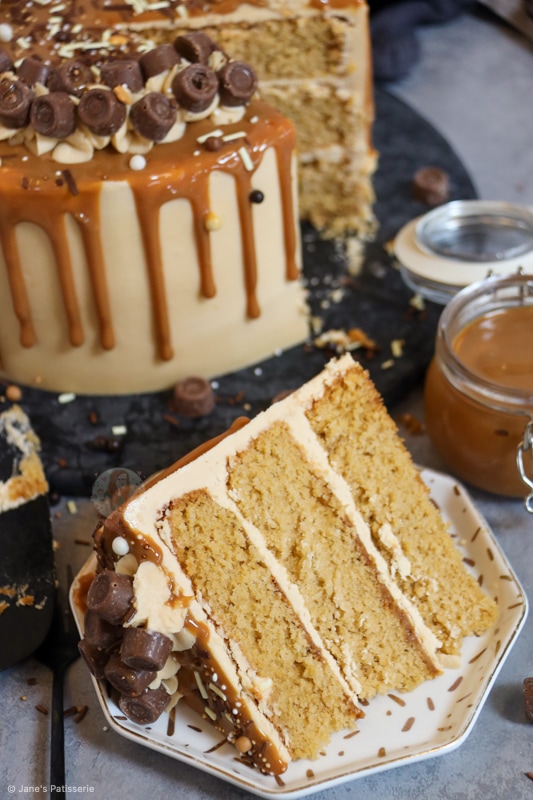
The cake
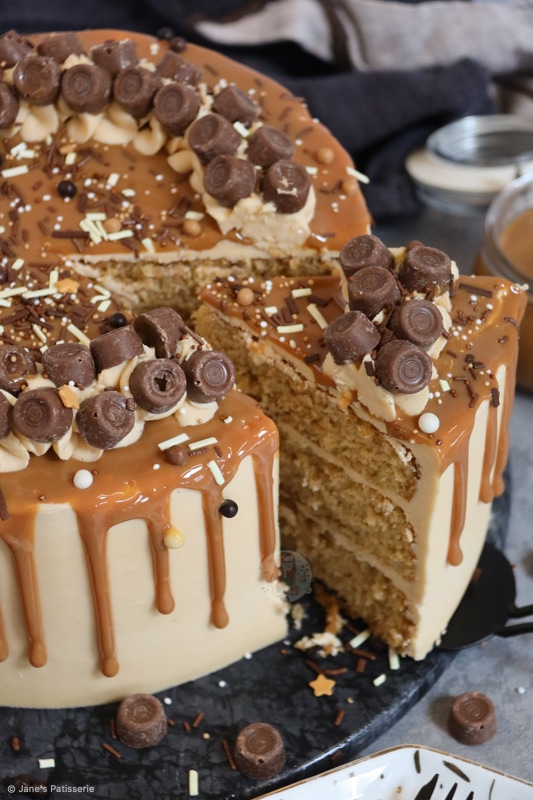
I used the same cake recipe that I have used a few times now, such as in my Caramac Cake, and my Biscoff Cake. Using the light brown sugar in the cake sponge gives it a natural caramel flavour, and also keeps the sponge so moist and delicious.
As this cake is a 400g mix, I bake mine into three layers as I find this easiest. I creates a good depth of sponge, that is perfect for a cake like this. However, you can make it a 500g mix like my other sponges (Kinder bueno drip cake) and bake into two tins to create a four layer cake!
- Butter – for the cake you can get away with using a baking spread or a room temperature block butter – both work well for sponges!
- Sugar – as mentioned above, I love using light brown sugar for a cake like this, but caster sugar, golden caster sugar or dark brown sugar works well also.
- Flour – My most used flour in my kitchen, self-raising flour, is the ideal for this cake. However, if you need to make your own you can using plain flour and baking powder. Whisk 2 level tsps of baking powder per 150g of plain flour, before using (And remove any extra raising agents in the recipe!).
- Eggs – Medium as always guys…!
- Baking Powder – This is an optional ingredient. Some people disagree with using it as self raising flour already has some help, but as long as you don’t over measure it can really lighten the texture perfectly.
The frosting
My Salted Caramel Cupcakes, and Rolo Cupcakes provided the frosting and decoration inspiration for this. Using the same frosting as the cupcakes, and oodles of Rolos we had an absolute winner here.
- Butter – the butter you use in this cake is SO IMPORTANT!!!! You MUST use a block butter, and not a margarine for this cake. If you use margarine or spread, as soon as you add the caramel which counts as a liquid, you will end up with a soup texture and nobody wants that.
- Sugar – as with any American buttercream, icing sugar! Yes it’s sweet, but that’s what the salt in the caramel is for.
- Caramel – I used a ready made caramel in a tin (carnations anyone?) – and added salt chunks. You can use a dulce de leche or another THICK caramel sauce like my homemade caramel sauce though if you wish.

The drip
As all the other drip cakes I have made so far has used chocolate, I decided to go with a salted caramel sauce. I used carnations caramel from the supermarket as its ready made, and perfect for the buttercream and drip.
I loosened my caramel as mentioned in the method by just stiring it slightly in the bowl and adding the salt. I used some Disposable Piping Bags to do the drip, like I do in all of my cakes. I use the Disposable Piping Bags for ALL of my drizzles whether its on cupcakes, cheesecakes, or drip cakes.. its so much easier to use a little disposable bag which you can just snip the end off and use.
I only cut off about 1/3cm on the end of the bag, and edge it over to create the drips. I don’t push each drip that far at all as the caramel drips further than a chocolate ganache will, and you don’t want it to puddle tooooo much at the bottom!

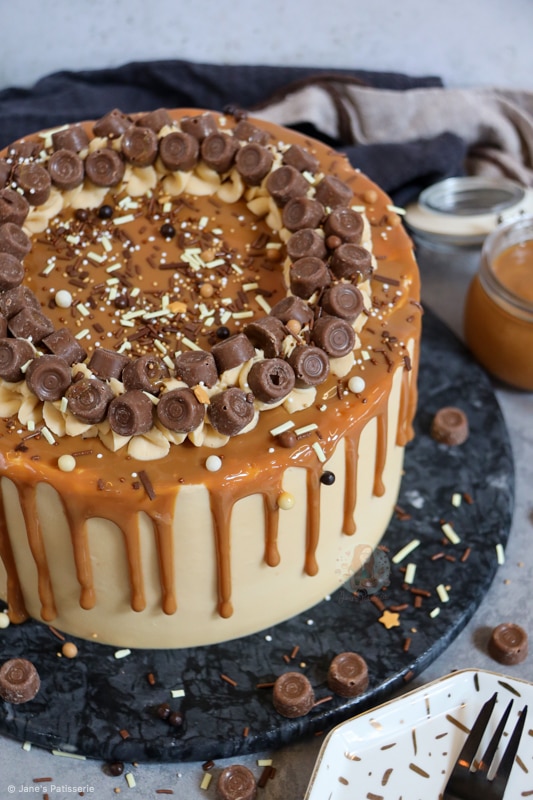
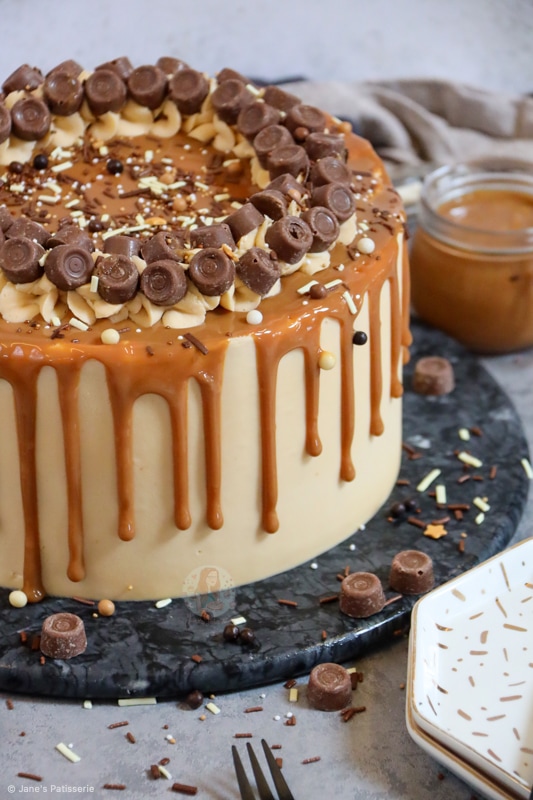
Decoration
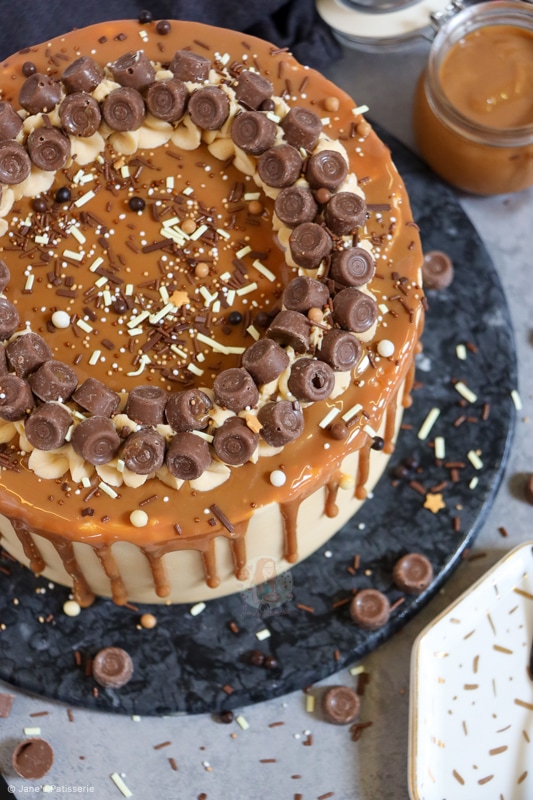
I decided to add the stereotypical ‘Jane’s Patisserie’ flair to my cake by piping round the cake with some of the leftover buttercream, adding loads of Rolos, and then some fudge and chocolate sprinkles. I just can’t resist it!
I used my favourite piping tip as always in a large piping bag, and carefully swirled the leftover buttercream about 1-2″ in from the edge. This helps as the caramel doesn’t ‘set’ perfectly so it prevents the buttercream swirls falling off the edge.
Tips & Tricks
For this cake it really is best to chill the cake at every stage. I always try and keep a drawer free in my freezer for bakes as it’s just quicker and easier, but the fridge works well, also. Chilling the cake means that it sets so when you carry on, it’s less likely to slip and slide all over the place.
I tend to fill my cake layers, make a crumb coat and chill well. Then, I add the thicker layer of buttercream, smooth over and chill. Add the caramel drip, and chill. Finally, decorate and enjoy! I know it seems faffy, but it WORTH IT.
Using a turntable makes this sort of cake much much MUCH easier to achieve, so I would recommend investing in one if you can! Enjoy!
(Photos updated June 2022)

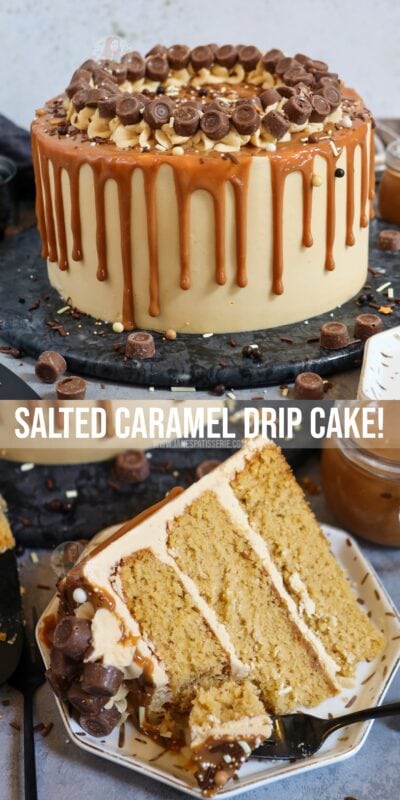

Salted Caramel Drip Cake!
Ingredients
Cake Ingredients
- 400 g unsalted butter
- 400 g light brown sugar
- 7 Large eggs (or 8 medium)
- 400 g self raising flour
- 2 tsp baking powder
- 4 tbsp whole milk (optional)
Salted Caramel Buttercream
- 250 g unsalted butter (room temp)
- 600 g icing sugar
- 175 g caramel (carnations)
- Pinch sea salt
Decoration
- 200 g caramel (carnations)
- Pinch sea salt
- rolos
- sprinkles
Instructions
For the Cake!
- Heat the oven to 180ºc/160ºfan and line three 20cm/8inch cake tins with baking parchment – leave to the side.
- In a stand mixer, beat together the butter and light brown sugar until light and fluffy.
- Add in the flour, eggs, baking powder (if using) and beat again briefly until combined – try not to overbeat!
- Divide the mixture between the three tins and smooth it over – bake for 25-30minutes until the cakes are golden and when the cake springs back (skewer should also come out clean)
- Once baked, leave the cake to cool in the tin for 10 minutes, and then remove and leave to cool fully on a wire rack. If the cake has domed slightly, leave the cake to cool upside down to flatten it slightly.
For the Decoration!
- In a stand mixer, beat the butter with an electric mixer until it is smooth
- Beat in the icing sugar 1/3 at a time until its fully combined. Keep beating the buttercream for 5-6 minutes on a medium speed so it starts to get fluffier and lighter.
- Add in the carnations caramel and beat again with a pinch of sea salt and beat again for 3-4 minutes. Taste it, and if its salty enough then leave it, if not, add a little more and beat again.
Decoration
- Once the cakes are cooled, put the first layer on the serving plate spread some of the buttercream onto the top of the first layer, add the second cake on top, and then top again with some of buttercream and then add the final sponge layer.
- Only use about 2 tbsp of buttercream per layer so that you have enough to decorate with!
- With the leftover buttercream, as you can see, I covered the sides (and top) too! Do a first layer of around the edge and top using a large metal scraper and refriergate for 30 minutes. Repeat again with a slightly thicker layer of buttercream.
- I slather it on all over using an off-set spatula, and then run the metal scraper round till its smooth. The more you put on, the thicker it’ll be as because you are making it smooth, more comes off than you realise with smoothing it over.
- Set the cake in the fridge for another 30 minutes.
- Loosen the caramel you are using by briefly mixing in a bowl. Add to a piping bag.
- Pipe it round the edge of the cake, edging over slight bits to create the drip. You don’t need to use too much per drip as it’ll drop quite far down by itself! Fill in the top with more caramel so the top is also covered. Refrigerate the cake for about 30 minutes.
- Pipe on the rest of your buttercream, and put on some Rolos, and sprinkles! Don’t pipe the buttercream too close to the edge of the cake as the weight might make it fall down (because of being on the caramel) so move it in slightly like I have! Enjoy!
Notes
- I seriously recommend using a Metal Scraper for the decoration of the buttercream, and the Disposable Piping Bags.. I wouldn't be anywhere without them!
- All of the decorations are completely optional – but I love this style of cake!
- To make a smaller 2 layer version of the cake:
- 250g Sugar, Butter Flour and 5 eggs!
- Split between two 8" tins!
- Use 2/3 of the decoration recipes!
- This cake will last in an airtight container for 3 days!
- I used the Carnations Caramel - not condensed milk, but the caramel by the same brand. You can also use Dr Oetker Salted Caramel fillings, just don't add more salt to it. You want a thick caramel to use, not a thin sauce.
ENJOY!
Find my other recipes on my Recipes Page!
You can find me on:
Instagram
Facebook
Pinterest
Twitter
J x
© Jane’s Patisserie. All images & content are copyright protected. Do not use my images without prior permission. If you want to republish this recipe, please re-write the recipe in your own words and credit me, or link back to this post for the recipe.
I just made this cake and had to leave a comment because it looks so impressive! I used Tesco’s Finest Salted Caramel Sauce and it’s worked a treat. From the spoons I’ve licked this is going to taste like a winner too!
Awh yay I am so so glad! ❤️
Hello, this sounds delicious, and I really want to try it, but I don’t know that they sell carnation caramel where I live. Is there an alternative to this type you have tried?
Thanks!
Have you got Dulce de Leche? That’s the best alternative!
Thank you, I had this same question!
Want to make this now but don’t have unsalted butter to hand!! Would it make a huge difference using stork butter??
You can use stork in the sponge but I wouldn’t recommend it for the frosting.
Thank you! x
I have just finished making this wonderful cake. Thank you so much for the recipie and an even bigger thank you from my taste testers (my three wonderful children and my dad) I made this over two days and it has kept beautifully. I look forward to trying some of your othe recipie xxxx
Awh thats amazing! I am so glad!! xx
I have to travel 2 hours. Do you think the caramel drip and buttercream piping will hold up okay or should I wait to put the drip and decorations on when I get there?
Certain types of sugar can produce more moisture, such as dark brown sugar. The light brown sugar doesn’t, but as the dark brown sugar is more caramelly it is possible. Also, it might be that the mixture was overmixed to have caused this.
Hi there,
what sort of nozzle did you use for the ruffle please?
Closed Tip 2D Star
Hey,
Would it be possible to make the cakes and then freeze them to decorate at a later date?
Thanks!
Yes it is! ?
Hi Jane,
Love the look of this recipe! I’m just in need of some advice, if I need it for a birthday on Sunday, would you bake the sponge Friday and decorate Saturday or bake sponge on Saturday and decorate Sunday?
It’s up to you really, the cake would last till Sunday if you made it on the Friday definitely, but you could do it all on the Saturday if you had the time. Make sure you leave the caramel on the drizzle to settle before piping any decoration on top, and pipe it far enough into the middle that it wont slip off the sides if you know what I mean! 🙂
I am so excited to try this recipe for a birthday next week however I was wondering approximately how tall a three layer cake like this will be so I can order a cake box, thankyou.
Ummm it should fit in a 10x10x6 cake box? so a 10″ cake box, at least 6″ high. x
thank you very much!
I’m making this tonight – fingers crossed! I am going to try the smaller cake what tins would I use for the 300g cake?
Thanks! I love all your recipes and Instagram page!
Two 8″ tins for the smaller one xx
Thank you!
Fen
Just used this to make a cake for tomorrow- It was awesome! And delicious!
Ahh amazing!!! ?
Love this recipe and your youtube channel! Could you post a video of this being created please as I’d love to follow it x
Aah thank you Candice! ❤️ I’ll add it to my list of things to film! x
Hi, am making a caramel and chocolate ganache drip cake for my brothers birthday today, am just wondering if the caramel will set for me to pour the ganache over the top? So basically when you made your cake did the caramel set or was it still runny?
I would personally do the ganache first and let that set, and then the caramel as the caramel doesn’t set fully 🙂 x
Wow, wow, WOW! What an absolute stunner of the cake. I love the frilly buttercream edge around the top. That’s a great way to use up left over icing. I should probably do that rather than piping it into my mouth(!)
I’ve just been introduced to your blog through Sammie at “Feasting is Fun” and think all your bakes/photographs are beautiful.
Hahaha thank you! And maybe half on the cake, half into the mouth?! And ohh thank you! I love Sammie’s work!
Hi Jane, this recipe sounds beautiful. How tall would you say the cake is ??
Hiya! Thank you! I would say about 6 inches!